The Quiz tool
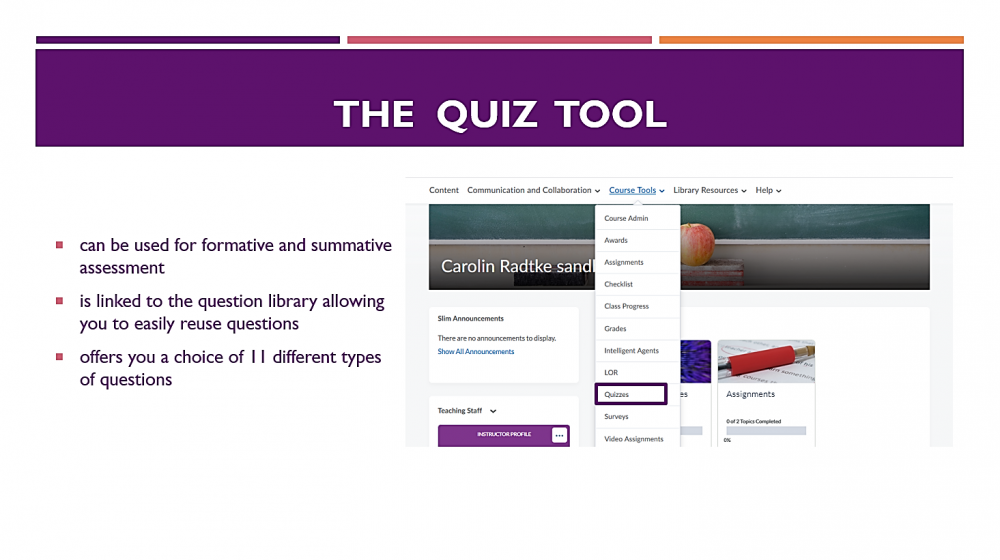
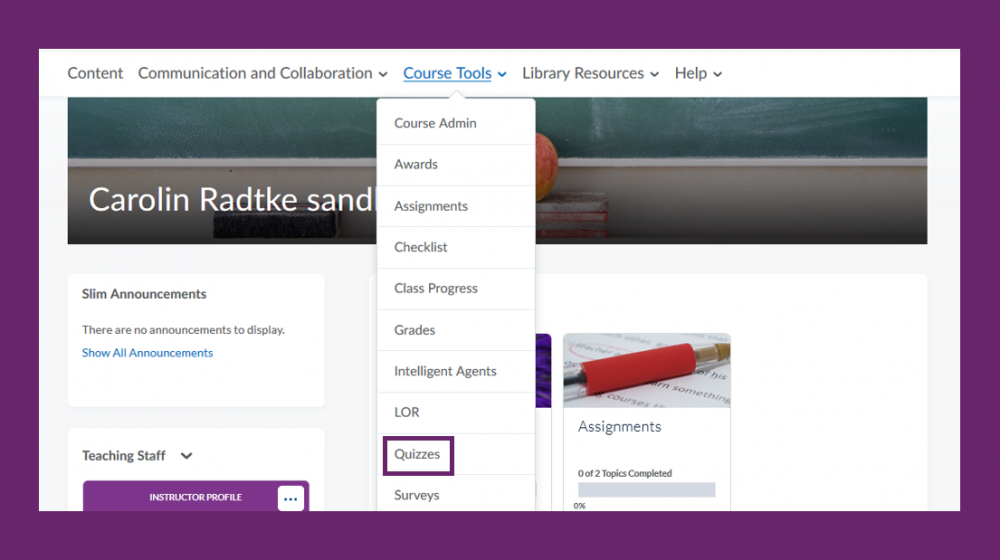
From your homepage, navigate to Course Tools and then Quizzes.
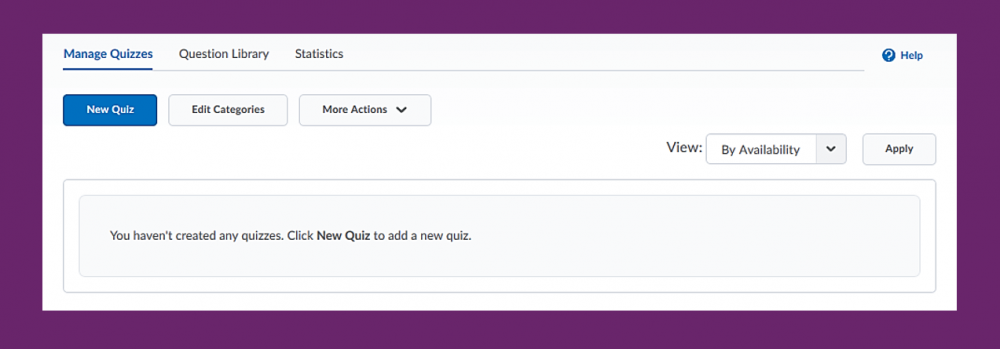
Once you have entered the Quiz tool, you will see the following options. The tab labeled 'Manage Quizzes' allows you to create new quizzes or work with the quizzes you might alreadty have there. The tab labeled 'Question Library' allows you easy access to your question library where you can edit exsiting questions or create questions that you can import into quizzes later on. The 'Statistics' tab gives you access to statistics you might have set up for your quizzes. In order to start a new quiz, click on the blue 'New Quiz' button.
Setting up a new quiz
Once you have clicked on the blue 'New Quiz' button, you will be taken into the quiz editor. In there, you can see 6 tabs labeled 'Properties', 'Restrictions', 'Assessment', 'Objectives', 'Submission Views', and 'Reports Setup'. Today, we will go over the first five tabs. Start in the 'Properties' tab by giving your quiz a name.
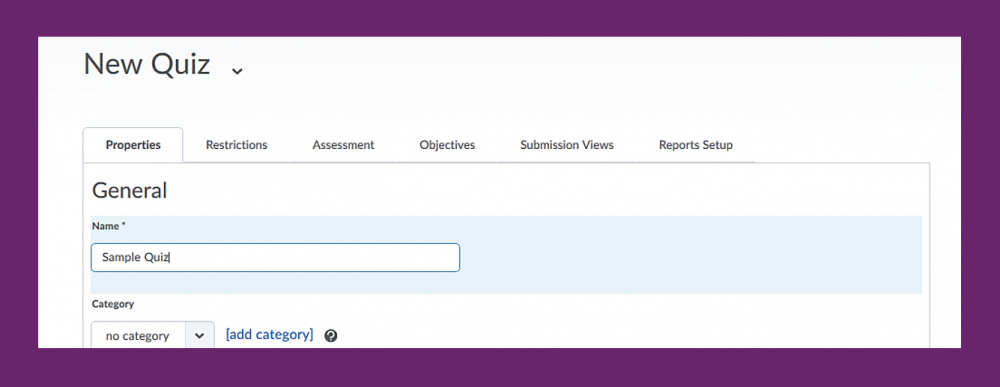
Image 1
General
| Name | You have to give your quiz a name to be able to edit anything else. |
| Category | If you have a lot of quizzes, you can group them into categories, i.e., formative assessments, summative assessments, etc. |
Quiz Questions
| Add/Edit Questions | When you click on this button, you will be able to add questions to your quiz or edit them. Once you have added questions to your quiz, you will be able to see them below this button. |
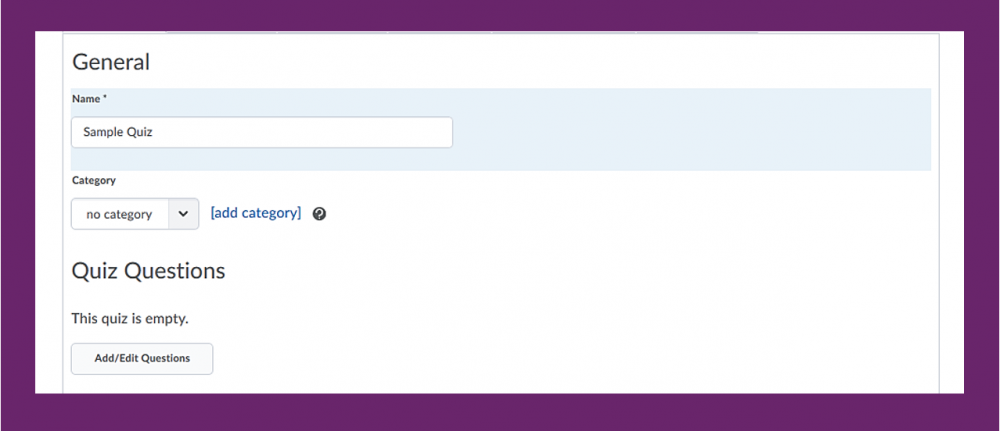 Image 2
Description/Introduction
| Description | This is an area where you can add a description to your quiz. The description will display before students start taking the quiz. Have a look at Image 4 to see how the description will display. Remember to make sure that you 'switch on' your description above the text box. |
| Introduction | This is an area where you can add an introduction to your quiz. The introduction will display before students start taking the quiz. Have a look at Image 4 to see how the introduction will display. Remember to make sure that you 'switch on' your introduction above the text box. |
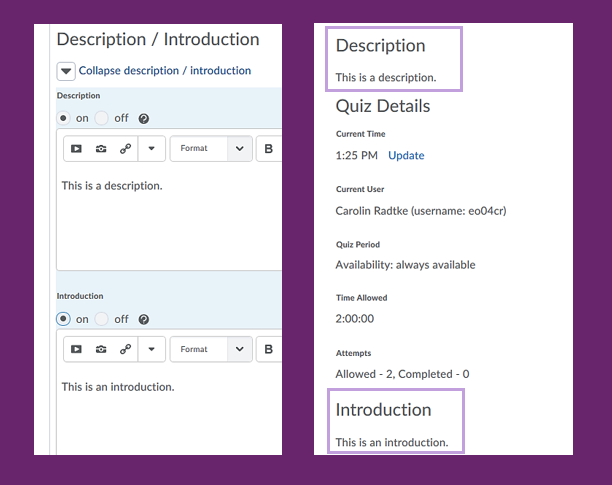 Images 3 and 4
Page Header/Footer
| Page Header | This is an area where you can add an page header to your quiz. The page header on the top of the page when the students are taking the quiz. Have a look at Image 6 to see how the page header will display. Remember to make sure that you 'switch on' your page header above the text box. |
| Page Footer | This is an area where you can add an page footer to your quiz. The page footer on the top of the page when the students are taking the quiz. Have a look at Image 6 to see how the page footer will display. Remember to make sure that you 'switch on' your page footer above the text box. |
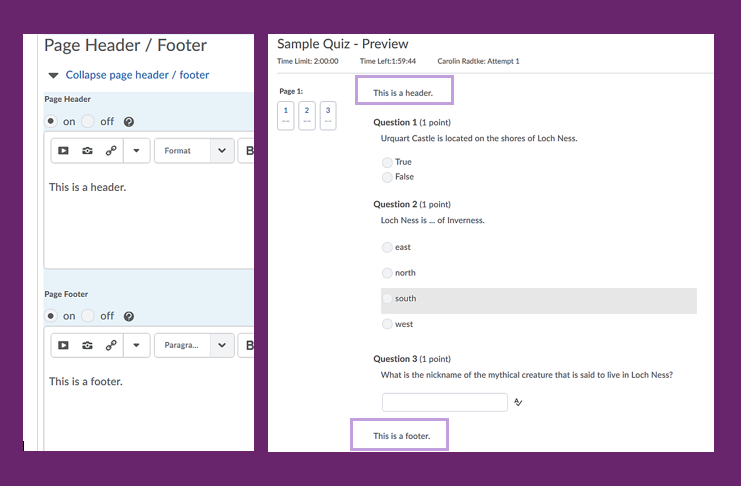 Images 5 and 6
Optional Advanced Properties
| Allow hints | This means that if you have entered hints when creating your questions, students will be able to see them. |
| Disable right click | This option will keep users from being able to print questions (and possibly distribute them to other students). |
| If you turn on this option, users cannot access the Email tool, Instant Messages tool, or their alerts if they have a quiz attempt in progress. | If you turn on this option, users cannot access the Email tool, Instant Messages tool, or their alerts if they have a quiz attempt in progress. This is useful when you are worried that there might be information in emails, the messages tool or the lerts that might help students complete the quiz. |
| Notification Email | If you enter an email address here, you will receive a notification each time a student submits the quiz. |
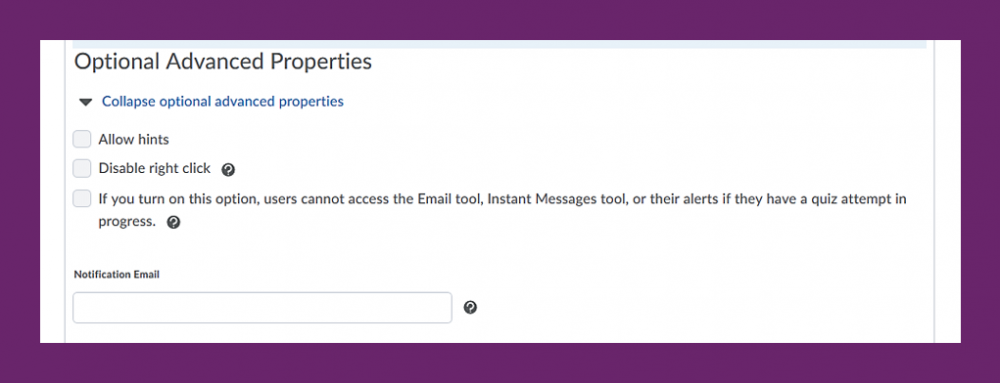 Image 7
Dates and Restrictions
| Status | This shows you whether the quiz is Inactive (invisible to students) or Active (visible to students). All quizzes are automatically set to Inactive when you first create them, but you can easily change that using the Status Drop-down menu. |
| Due Date | By setting a due date and time, students will only be able to access the quiz up until that due date. After the due date, they will still be able to see the quiz, but will not be able to complete any attempts. Note: Due dates will always be displayed in the Calendar tool. |
| Availability |
Set a Start Date if you don't want students to see or access a quiz until a certain date and time. Set an End Date if you don't want students to see or access a quiz after a certain date and time. Click on 'Display in Calendar' if you want the start and end dates to be displayed in the calendar. |
| Additional Release Conditions | Here is where you can attach, or create and attach release conditions. This means that you can require students to complete something else before they are able to see and access the quiz. |
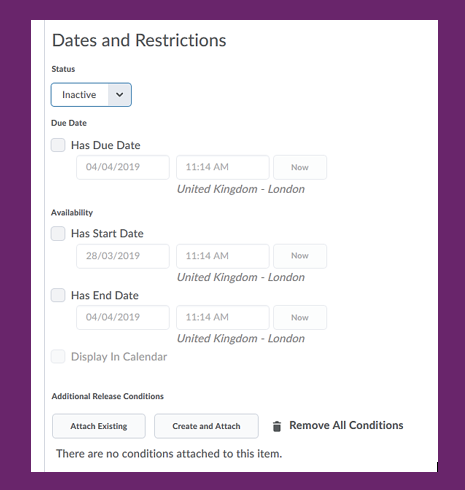 Image 8
Optional Advanced Restrictions
| Password | Here, you can set a password that students will need to enter in order to access and complete the quiz. |
| IP Restriction (IPv4) | This means that when clicking on 'Add new IP Range', you can add an IP range/IP addresses from which students will be able to access the quiz. If they are outside of the established IP range, they will not be able to access or complete the quiz. |
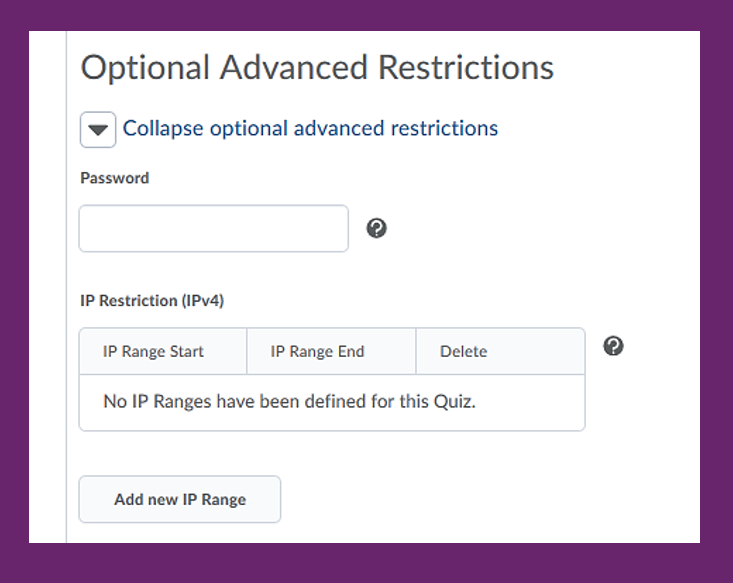 Image 9
Timing
| Recommended Time Limit vs. Enforced Time Limit | A recommended time limit will allow students to spend more time on the quiz if necessary. An enforced time limit will only allow students the specified time to complete their attempt. |
| Text box for time | Here, you can enter either your recommended time or enforced time. The time is always preset to 120 minutes when you create a quiz but can be easily changed and can be as much or as little as you want it to be. The recommended or enforced time will display to students before they start the quiz. (see Image ) |
| Show clock | If you check this box, students will see a clock when they are working on an attempt. This might be especially useful when you have set an enforced time limit so students know how much time they have left. |
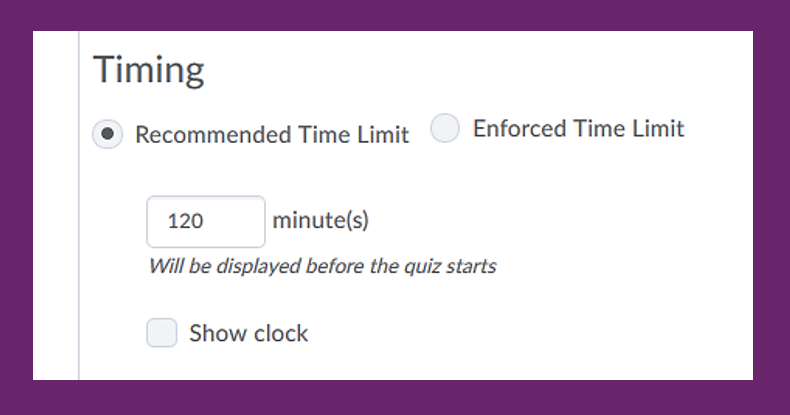 Image 10
Special Access
|
Allow selected users special access to the quiz
|
If you check this, any user you grant special access to this quiz will be able to complete attempts, even after the due date. |
| Allow only users with special access to see this quiz | If the quiz is no longer visible to users without special access, you should check this box to make it visible to users with special access. |
| Add Users to Special Access | Click this button to select users from your classlist who need special access to the quiz. You can also use this feature to grant a user extended time to complete a quiz by changing the recommended or enforced time limited. In addtion, you can edit the number of attempts this user will get and can set new due dates, start and end dates for the user. |
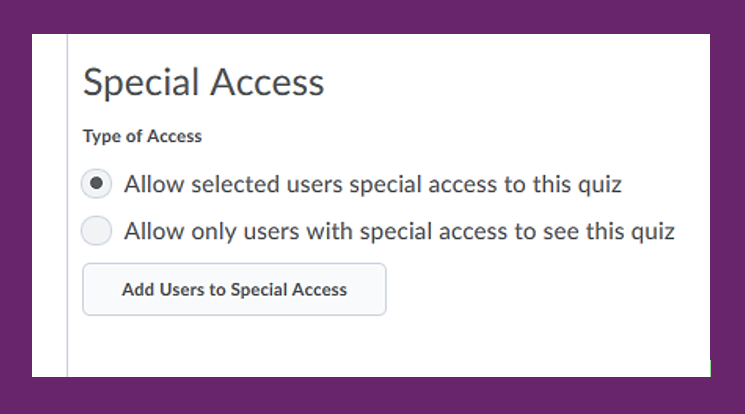 Image 11
Assessment
| Automatic Grade | If you check this box, any attempt completed by a student will be marked automatically. This is only possible for certain types of questions. |
| Grade Item | Here, you can attach a grade item to the quiz. You can either select a grade item you created beforehand, or create one right there by selecting 'add grade item'. |
| Auto Export to Grades | Select this option if you would like to automatically export the mark to the grade book. This only works for autograded quizzes associated with a grade item. |
| Student View Preview | Once you have created questions, you will see a preview of what students will see as the maximum points when completing the quiz. |
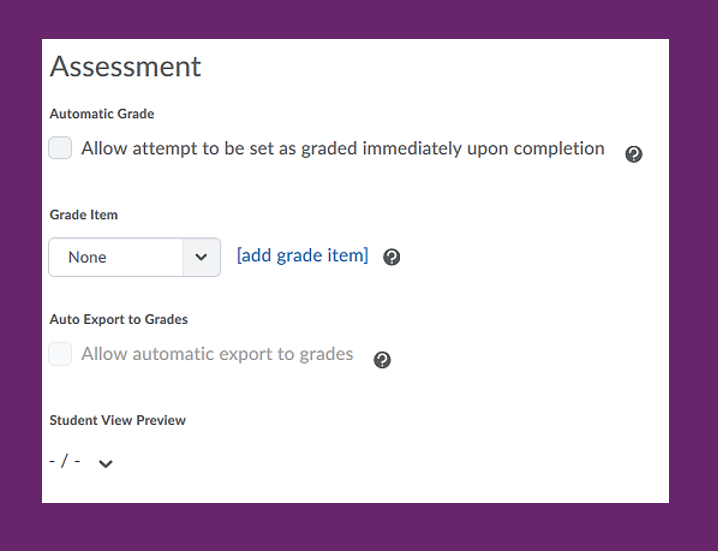 Image 12
Attempts
| Attempts Allowed | Choose from the drop-down menu how many attempts students will have. You have the choice between 1 - 10 and unlimited. |
| Overall Grade Calculation | If you have selected multiple attempts, this setting will determine which attempt will be graded. You can chose to have the highest, lowest, first or last attempt graded, and can also choose to grade based on the average of all attempts. |
| Avanced Attempt Conditions | If you have selected a minimum of 2 attempts, you can determine advanced conditions. You could for instance determine a minimum or maximum percentage students must have achieved on attempt 1 before they can move on to attempt 2. |
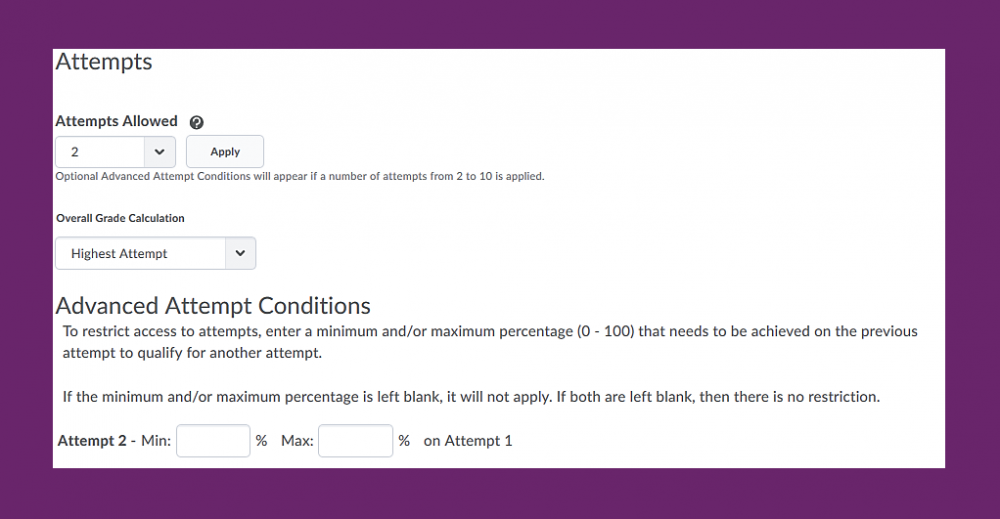 Image 13
Here, you could attach any learning objectives you might have created previously in the Brightspace Competency tool.
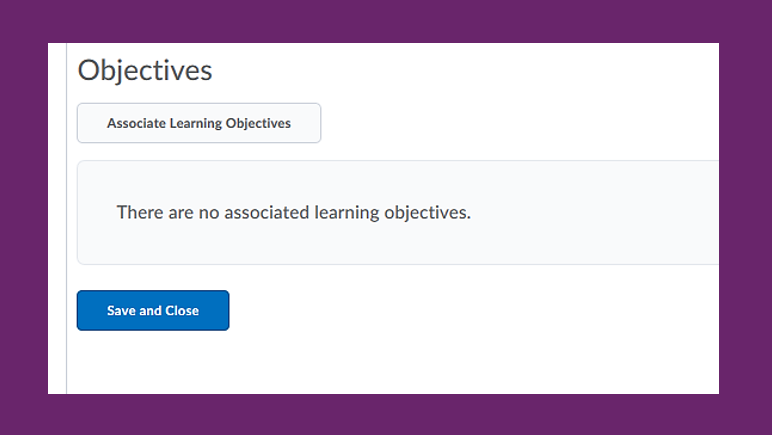 Image 14
Default View
This is the submission view that is preset for any quiz you create. Submission view means that this is what students will see when they submit their quiz. The default view will be released to students right after they submit the quiz, will not show any questions from the quiz and will not provide any statistics.
Click on the blue words 'Default View' to see the detailed settings of this submission view.
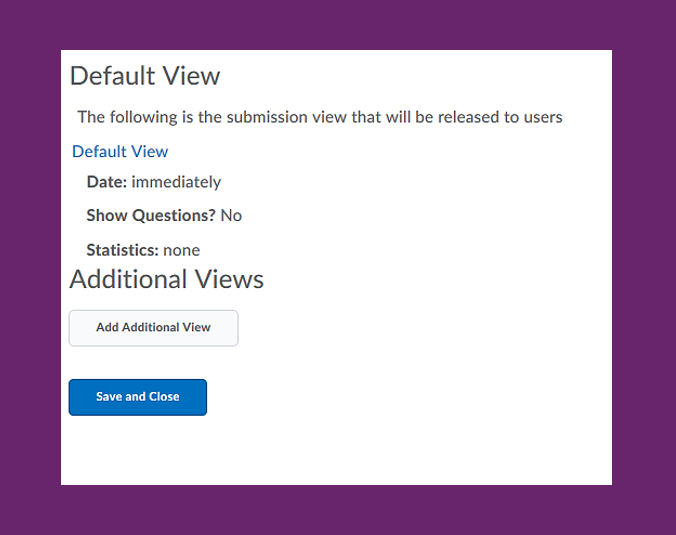 Image 15
Elements of the Default View
Once you have clicked on the blue words 'Default View', you will see the detailed settings of this view.
View properties
Here, you are able to see which message students will see when the 'Default View' is displayed to them. You can either leave the message as is, or you can edit it and save it later on.
View Details
Here you can see the details of the 'Default View', i.e. what information is provided to learners.
Show Questions?
If you check 'Yes', you will be able to choose what you want sudents to see. If you check 'No', students will not see any questions or related information.
| Show questions answered incorrectly | If you check this, students will see any incorrectly answered questions that can be autograded. |
| Show questions answered correctly | If you check this, students will see all correctly answered questions that can be autograded. |
| Show all questions without user responses | If you check this, students will see any questions they did not answer in their attempt. |
| Show all questions with user responses | If you check this, students will see any questions they did answer in their attempt. |
| Show question answers | If you check this, students will be able to see question answers as well as any feedback you might have provided. |
| Show question score and out of score | I you check this, students will see the score for the individual questions as well as their overall score. |
If you check the box next to 'Show attempt score and overall attempt score', students will be able to see their score as soon as they have submitted their attempt. Once again, this option can only be checked if the questions of your quiz can be autograded.
Under statistics you can opt to show students the class average as well as the score distribution.
Once you have made any changes you would like to make, you click 'Save'.
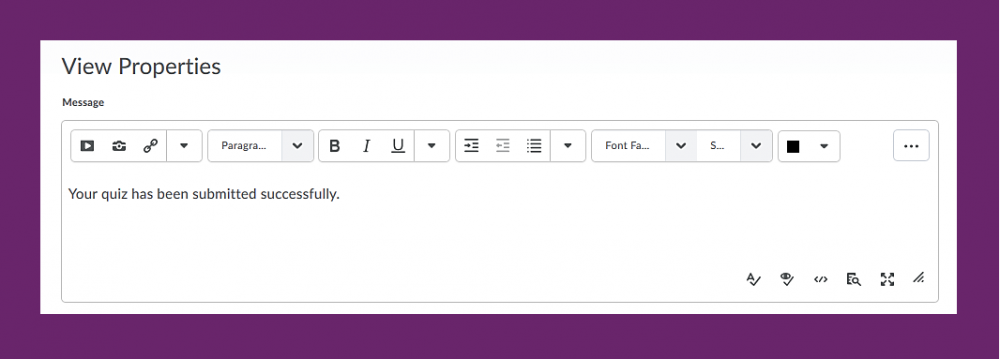 Image 16
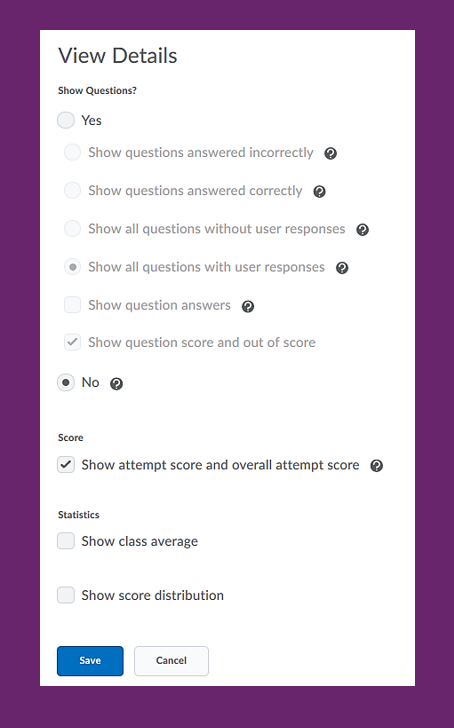 Image 17
Add Addtional View
To add an additional view, click on the 'Add Addtional View' button.
Setting up additional views is especially helpful if you want students to see a different set of information after attempts, for instance, or when you have a quiz that runs over a longer period of time. In that case, you might want students to see very little information initially so they cannot give answers away to fellow students who might not have taken the quiz, but you might want to release answers and feedback later on when all students have taken the quiz. This is where additional views come in handy.
Ultimately, you can have as many submission views as you want which allows you to customise the quiz for all students.
Once you have clicked on 'Add Additional View', you will be able to specify what you want to be dispplayed in this view.
First of all, give your submission view a name and enter a message you want students to see when they get this view.
Next, edit your View Restrictions. Set a date and time for when you would like the view to be released. You can also specify an IP address which will restrict student access to the submission view. Students will now only be able to see the submission view and the information contained within from a specific IP range or address. If students have multiple attempts, you can also set the view to be released upon students completing a specific attempt. Similarly, you can set a minimum or maximum score that students will need to achieve in order to see the submission view and any information attached to it. Last but not least, you can also limit the time students will have to look at the submission view.
In addition to that, you will have the same choice of View Details that were already available in the Default View.
When you are done editing your view, click on 'Save' and you will see that your new submission view was added to the quiz.
 Image 18
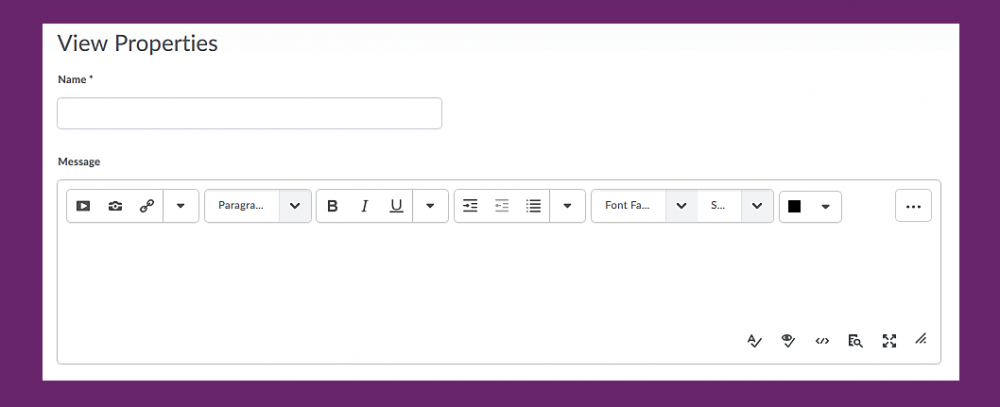 Image 19
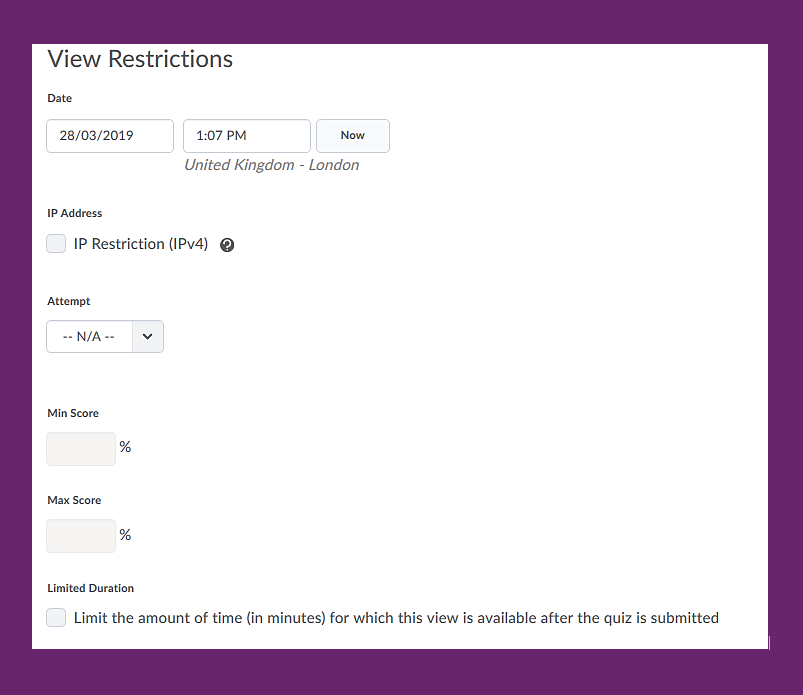 Image 20
 Image 21
Creating, adding and editing questions
To start creating and adding questions, click on the 'Add/Edit Questions' button. Also click on this button if you would like to edit your questions.
Image 1
You have the choice between 12 different types of questions.
You can create the following question types in the Quiz tool and the Question Library:
- True or False (T/F)
- Multiple Choice (M/C)
- Multi-Select (M-S)
- Written Response (WR)
- Short Answer (SA)
- Multi-Short Answer (MSA)
- Fill in the Blanks (FIB)
- Matching (MAT)
- Ordering (ORD)
- Arithmetic (2+2)
- Significant Figures (x10)
You can create the following information items in Question Library:
- Likert (LIK)
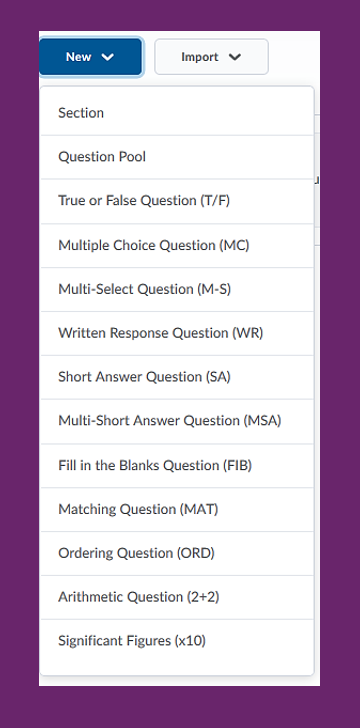 Image 2
Once you have added your questions to the quiz, you can either keep editing them in the questions area (Image 3), or you can edit them in the Properties area of your quiz (Image 4).
If you edit the questions in the content area you can make the following selections and customisations:
| Questions per page | This allows you to determine how many questions you want to display per page. This is especially useful if you have a really lonkg quiz since it will help break your quiz into chunks. |
| Prevent moving backwards through pages | This will prevent students from going back to previous questions. This way, they can only move forward once they have answered a question. |
| Shuffle questions | This means that questions will be shuffled when students are taking the quiz. |
You can also break your quiz into smaller sections or pages by doing the following.
Between questions, you will see a thing grey line. Locate the line and click on the small triangle in front of the line. This will insert a page break. The line will turn blue and you will see that in Image 5, question 1 will now be on page 1 while questions 2 and 3 will be on page 2.
 Image 3
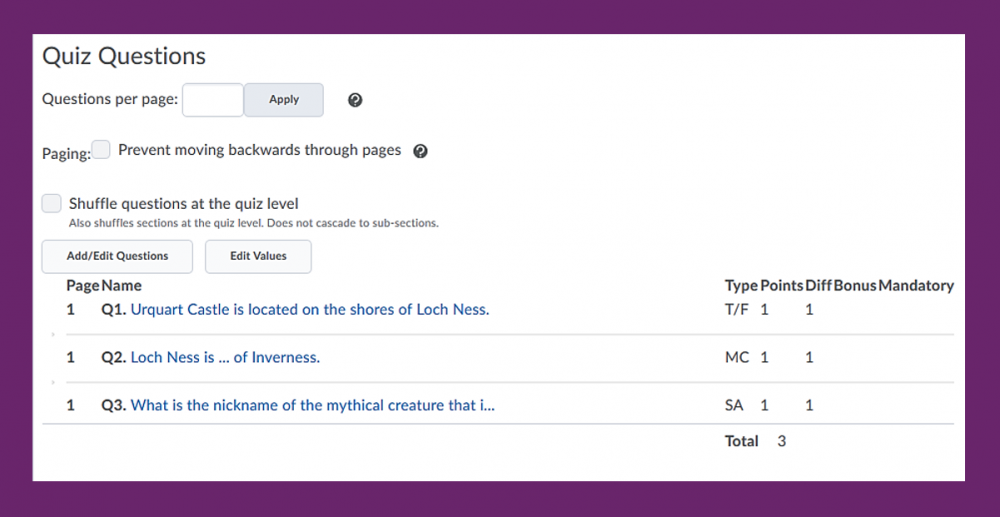
Image 4

Image 5
Previewing a quiz
While most things in Brightspace can be previewed via the student view function, quizzes have a separate preview function. This quiz preview will allow you to see what students will see. You will see the starting screen with all the information that students will see before the start the quiz, you will be able to take the quiz as though you were a student, and you will see any feedback as students will see it.
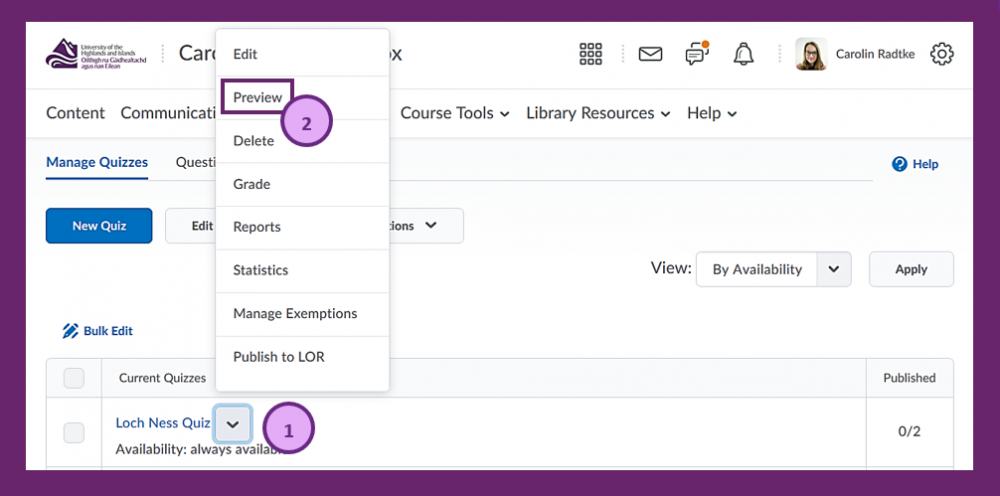
To start this preview, navigate to the drop-down menu next to the quiz you would like to preview (1), and select 'Preview' (2).
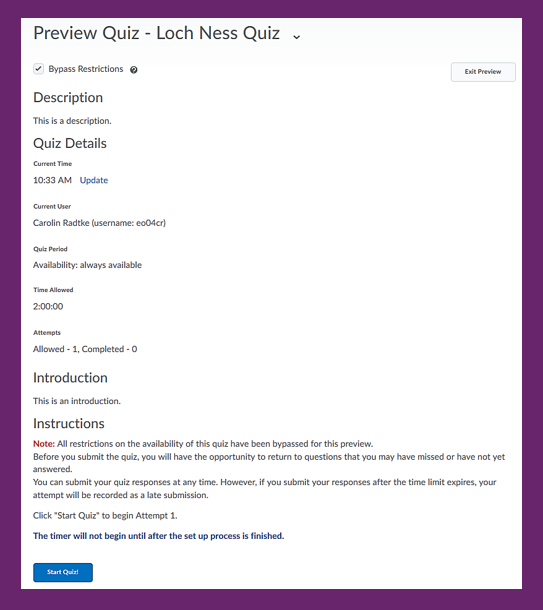
Next, you will see the overview page for your quiz. You will see any description or instructions you put in as well as the number of attempts and time allowed.
When you are ready to try out the quiz and take it just as a student would, click on the blue 'Start Quiz' button on the bottow of your screen.
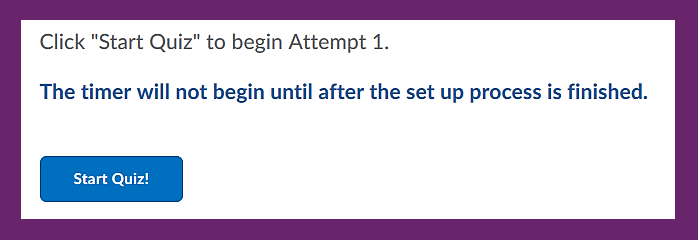
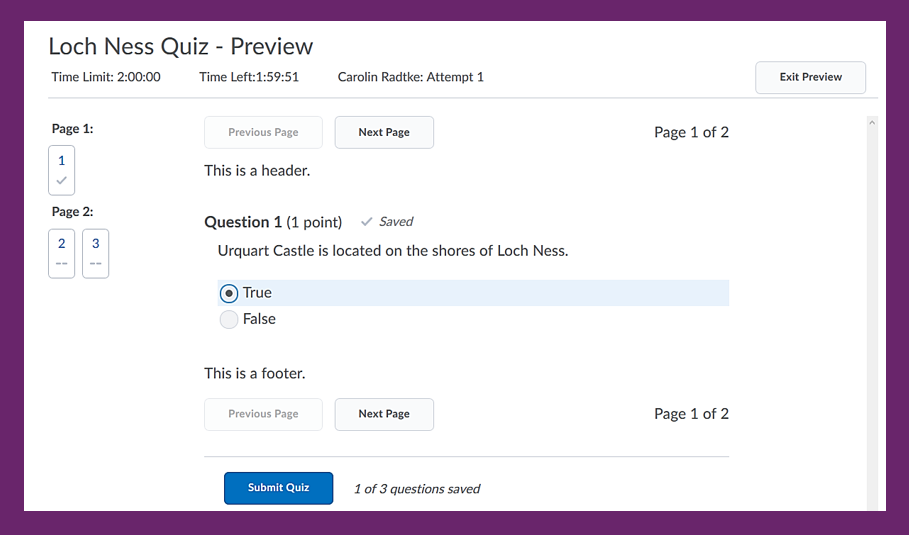
You will now be able to see and complete the quiz questions just as a student would. If you put in any headers and footers, you will be able to see them. You will also be able to try out how your distribution of questions across different pages works.
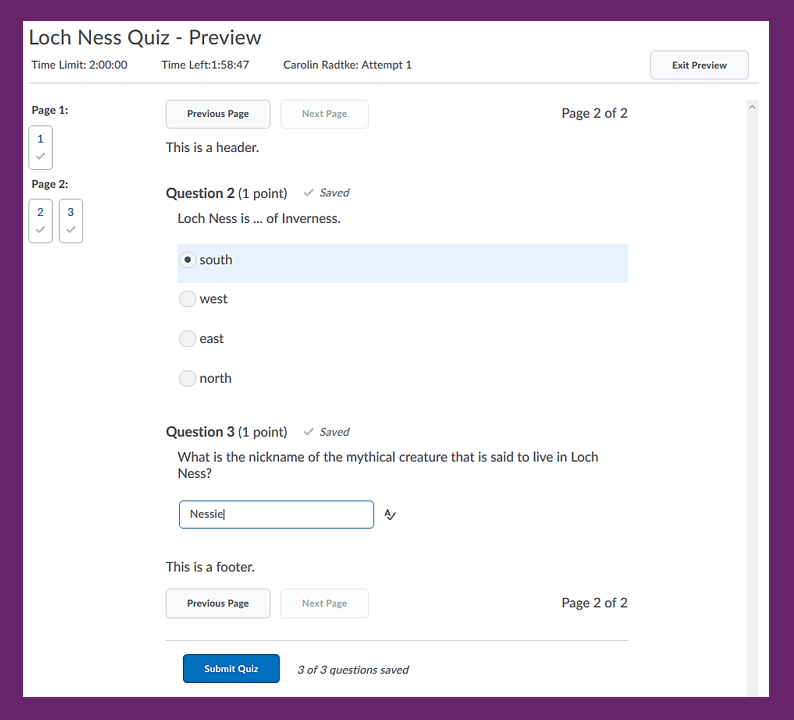
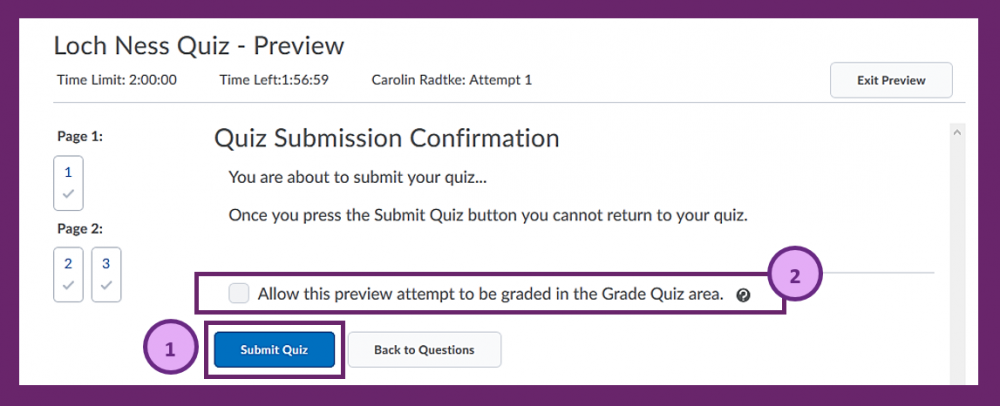
Once you are done, you will be able to submit your quiz by clicking on the blue 'Submit Quiz' button on the bottom of the page.
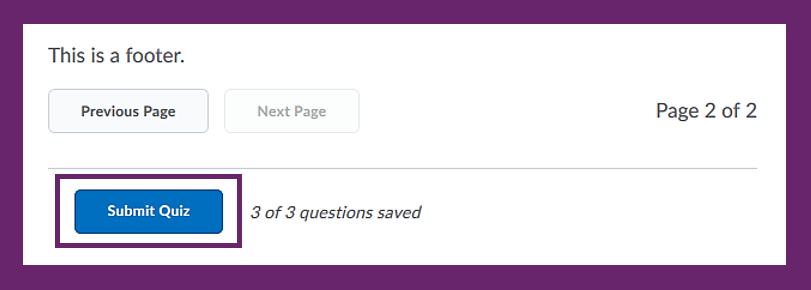
Before submitting your quiz, you will be asked whether you want the preview attempt to be graded in the Grade Quiz area (2). Any grade given for this quiz will, however not count towards the class statistics for the quiz.
When you are done, click on the blue 'Submit Quiz' button (1).
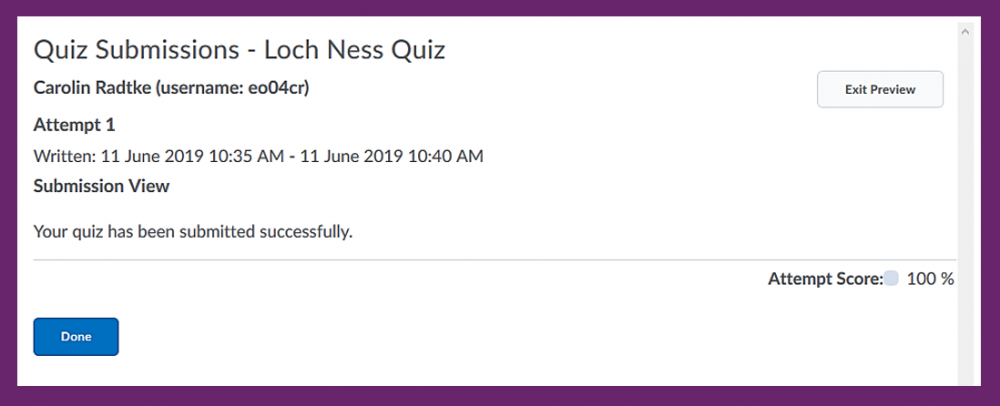
Once you have submitted the quiz, you will see what students will see in the submission view you have set up. This is just the basic submission view, but if you have changed any of the settings or created a new one, you will be able to test here what this looks like for students. This could include any feedback, questions answered right or wrong, etc.
When you are done click on the grey 'Exit Preview' or the blue 'Done' button.
And now it's your turn!
Now you can go ahead and experiment with the quiz tool yourself.
You can either build a quiz that you would like to use in your module anyways, or you can try your hand with the following instructions for a wee mock quiz which still gives you room to experiment with any question types you might want to try out.
Mock Quiz Instructions:
- Start by creating a new quiz.
- Add at least 5 questions to your quiz. Feel free to experiment with different types of questions.
- Add an introduction to your quiz.
- Enter a due date and a start date for your quiz.
- Set a recommended time limit of 30 minutes for your quiz.
- Select your quiz to be graded automatically upon completion.
- Set your quiz to 2 attempts for students. Change the settings so students can only complete their second attempt if they have achieved at least 50% on attempt 1.
- Set up an additional submission view that students will receive after attempt 1. Set the view so students only see the answers they answered incorrectly in attempt 1 as well as the attempted score and overall score of attempt 1.


