
Introduction
The Discussions tool in Brightspace provides staff and students with an area to communicate and collaborate, to pose questions, and to share information and opinions. One of the key benefits of the discussion tool is that it allows time for reflection - it is an asynchronous tool. Staff and students can participate in a discussion on their own time, and can consider what they want to write, based on their own thoughts and those of others, before clicking 'Post'.
This guide will give an overview of the Discussions tool before going into some detail about the various ways discussions can be created and managed.

Overview
Accessing the Discussions tool
The Discussions tool can be found in the Communication and Collaboration drop-down menu of the Brightspace navbar.
Illustrated guidance on how to do this can be found in the Managing discussions section of this resource.

Accessing the Discussions tool in Brightspace
A hierarchy
The Discussions tool has four main levels in its hierarchy: Forums, Topics, Threads and Posts.
Forums are the top level of discussions - they are best thought of as an administrative way of grouping various discussions together (you could for example have a forum called 'Weekly discussions' or 'Lectures'). You will be able to create individual discussions within these groupings for specific weeks or lectures. *Note: Only lecturers can create forums.
When creating a forum, devise a meaningful title and write a short informative description to go with it. Availability options for the forum can be set up at this point.
Tips and tricks: Forums can be created and set to become available at different times across the duration of your module or be available to students all the time. This is done using the Restrictions tab when setting the forum up (shown opposite).
Forums can also be restricted by many other Release conditions: access to particular groups only, completion of an activity required, a score in a quiz etc. For more information on Release conditions, check out our Release conditions guidance.

The Restrictions tab
Forums are made up of topics - in fact, students can only participate in a discussion when one or more topics are added to a forum. A topic is often the description of what is going to be discussed, or can be a specific task.
*Note: Like forums, topics can only be created by staff.

Sample topic overview showing threads and posts (including unread posts shown in brackets)
Over the next few pages we'll cover how to set up content in each level of this hierarchy.
Creating a forum
Go to: Communication and Collaboration > Discussions

Accessing the Discussions tool in Brightspace
From the drop-down list select New > New Forum

Creating a new forum
In the Properties tab give the forum a title and a description.

Forum properties
As you scroll down you will see various options that may be applied to a how instructors and learners interact with the forum (you can allow anonymous posts, request that a moderator must approve posts before they can be displayed, you can require students to start at least one thread before they can read or reply to any other threads, and you can set the forum description to be visible). Select as appropriate.
You can also adjust availability (which can include date restrictions) and locking options (a way to stop ongoing discussions). If you do include date restrictions you can choose to add this information to the module calendar.

Forum properties continued
Restrictions via Release conditions: At this point, if you have any other restrictions that wish to put on your forum, scroll back up and click on the Restrictions tab. Within the Restrictions tab there are a great many options for controlling access. Using Release conditions, for example, you can give access to particular groups only, you can tie access to the completion of an activity, or to a score in a quiz, etc. To attach restrictions via Release conditions, click on either Attach Existing (if you have any pre-existing release conditions) or Create and Attach. Clicking on Create and Attach will show you the wide array of possible release conditions. Select as appropriate and click Create.
For more information on Release conditions, check out our Release conditions guidance.
When complete, click Save and Close (*alternatively, if you are ready to add topics to your forum, you can click Save and Add Topic).
Creating a topic
Go to: Communication and Collaboration > Discussions

Accessing the Discussions tool in Brightspace
From the Discussions drop-down menu select New > New Topic

Adding a new topic to a forum
There are 4 tabs on the New Topic screen: Properties, Restrictions, Assessment and Objectives. See below for details of each.
Properties:
In the Properties tab, select the parent forum that you wish the topic to fall under (Note: you can also create a new forum from this screen, which saves you going backwards).
Select if you wish the topic to be open to all or restrict access by group.
Give the topic a title and description (Note: the Description area is a good place to lay out any particular instructions you wish the students to follow).

Discussion topic properties
Motivation: One way to encourage participation is to check 'Users must start a thread before they can read and reply to other threads' (this option is found at the bottom of the Properties area (shown opposite). This might be particularly useful when you set up a discussion forum and topics for reflections on and question from weekly lectures. This way all students must first post their own original thoughts before being able to read and interact with other students' thoughts.

Option to force users to start thread before they can see other threads
Restrictions via Release conditions:
Using Release conditions, you have exactly the same options as were available at the forum level: access for particular groups only, access tied to the completion of an activity, or to a score in a quiz, etc.
For more information on Release conditions, check out our Release conditions guidance.

Discussion topic restrictions
Assessment:
If you intend to grade participation in the thread do so here. If you do intend to grade participation, it is strongly recommended that you select the option to associate the thread with a grade item so the final mark can be automatically linked to the Grades tool. If you do not have one already set up for this purpose, simply click on New Grade Item to do so. You must have a score Out Of if you are grading. You can also add a rubric and allow assessment of individual posts.

Discussion topic assessment options
Objectives:
The Objectives tab allows you to associate pre-existing learning objectives with participation in the discussion. Brightspace defines Learning objectives as 'the things that a person needs to learn in order to acquire a competency/become competent in a given domain. They are comprised of associated activities which, when completed, complete the learning objective.'

Discussion topic objectives
Creating and replying to threads
to create a thread - go to: Communication and Collaboration > Discussions

Accessing Discussions tool in Brightspace
From the Discussions list, scroll to the topic you wish to add a thread/s to.
In our example opposite there are currently no threads. The question posed in the topic is clear, as is the instruction that all students should start a thread (to share their definition) and reply to at least one other person. At the beginning of a semester, this is a sensible way to get everyone used to the Discussions interface.
To post a thread in response to the question posed in the topic, click on Start a New Thread.

Customising notification options

Starting a new thread
Students must give their thread a title; a full html editor allows for the thread itself to be composed of text, images, links, even multi-media. They can also add attachments.
When a student starts a thread, the default is for them to be automatically subscribed to the thread (meaning they will receive notifications when others reply). If the student does not want to be notified, they should remove the check mark.
Once they are ready, the student clicks Post. At this point, unless moderation is in effect, the thread is visible to all others who have access to the topic, and can accept replies.

Posting a thread
To reply to a thread, from the Discussions list, click on the title of the thread. You will then see a button: Reply to Thread.

Replying to a thread
Clicking on this takes you to a page very much like the Start a New Thread screen, where you title your reply, add text, imagery etc.
When ready, click Post.

Html editor showing some text from a thread
Once there are replies to threads, the option to reply to the reply will be available in addition to reply to thread.
It's perfectly possible that this process could go several layers deep, especially if there are multiple opinions involved .

Selecting Threaded from the Show dropdown menu

Replying to a thread overview
Allowing participants to post anonymously in discussions
As you might have noticed on the previous page, there is a check-box when setting up forums (and topics) for Allowing anonymous posts.
Discussion tools are a staple of online education, offering valuable opportunities for well thought-out interactivity – but, especially at the start of a module, or if a controversial topic is being discussed, some students may feel reticent to get involved or add their name to a post. By allowing for anonymous posting, Brightspace offers a way to make this easier on such students.
Follow the steps below to set up discussions which allow anonymous posts:
On the navbar, click Communication and Collaboration, then from the dropdown list Discussions.

Accessing the Discussions Tool in Brightspace
On the Discussions List page, from the New button drop-down menu, click New Forum.
Enter a title for your new forum, e.g. ‘Weekly discussions’ (shown opposite).
Enter a description for your new forum.

Creating a new discussion forum
Important: There is a check-box beneath the Description area ‘Allow anonymous posts’ – you can check this box (opposite) but technically, until you create a topic within a forum, students will not be able to see that forum (also each topic also features this same check-box. Therefore, our advice would be to use the Allow anonymous posts check-box at the topic level).

Option to allow anonymous posts
Use the menu to the right of the forum name to select Add Topic

Adding a new topic
In the New Topic Details Options section give your topic a name, e.g. Week 1: Welcome to the module.

New topic details options
Below Title and Description you will see various other check-box options, one of which is Allow anonymous posts. If you put a check in this box, students will have the opportunity to post without their name showing.
Click Save and Close.

Allow anonymous posts
When students (and staff) come to take part in such topics, they will be asked to either start a thread or reply to an existing thread.
Before they click Post to upload their comments, they will be asked if they want to Post as Anonymous.
If a student chooses to Post as Anonymous, the author displays as ‘Anonymous’

A user selecting 'post as anonymous'
Managing discussions
1. Navbar
You can simply tell your students to go straight to the Discussions area via the navbar (picture opposite) and to look for a particular Topic in the discussions list.

Accessing Discussions tool in Brightspace
2. Table of Contents
You can create an area (either a module or sub-module) in your Table of Contents for discussions.

Creating an area in the Table of Contents for Discussions
After creating a module or sub-module, use the Upload/Create menu (if you haven't yet written your topics) or the Existing activities menu (if you have pre-existing topics) to populate the space.

Adding a discussion to the table of contents
When added in this way, student who navigate to the Discussions module will see links to specific discussions.

Links to discussions in Brightspace
3. Course items (using quicklinks)
As shown in 2. above, using the New/Create and Existing Activities menus, links to discussions can be added to areas within the Table of Contents. In this case the link essentially is the item; however, using the Quicklink function you can link to a discussion within an item of content that might cover far more than this activity.
To do this, navigate to the particular area of your module that you wish to create an item: for example, Learning resources > Week 1. Then, select Upload/Create > Create a File

Creating a file
At this point, create your item (it could be a formatted item that contains text, imagery, multi-media etc.) - and when you come to the point where you want to embed a link to a discussion, click on the Insert Quicklink icon in the html editor and select Discussions.
In the Dicussion popup that appears, navigate to an existing discussion or create a new one.

Adding a discussion via a quicklink
You will now see a link (which students can click on) in your item.
Click Publish to complete the process.

4. Announcements
Finally, we have announcements. Navigate to announcements (Communication and Collaboration > Announcements), then select New Announcement.

Creating a new announcement in Brightspace
Give the announcement an appropriate title ('headline') and in the body, as you saw above, use the Insert Quicklink function to link to a new or existing discussion.

Inserting a quicklink in an announcement
You will see a link has been added to your announcement. Click on Publish to complete the process.

Announcement showing a link to a discussion topic
When they next login, students will see the announcement at the top of their announcement list.
Note: The Slim Announcements tool does not show the link to the discussion on the home page - to see the link a student should click on the title of the announcement.

Slim announcement showing a link to a discussion topic
Brightspace offers various alternatives when it comes to visualising a discussion. There are two different views available to staff and students: Grid and *Reading (*Reading view is the default). These views do not alter the look of the initial Discussions List screen but they do make a noticeable difference when it comes to viewing topics and threads. Note: There are further viewing options within each of the main views.
Navigate to the Discussions List (Communication and Collaboration > Discussions)
At the right of the screen, click on *Settings (*Settings is available at all levels throughout the Discussions tool, whether you are viewing the Discussions list, creating a forum, topic, thread, or reply).

Settings button within Discussions
In Settings you can change a variety of things that will affect the look and feel of the Discussions tool. First of all, under Default View, make sure that Reading View is checked.

Reading view
In Reading view one of the most notable options is whether or not to display the Discussions List pane:

Discussions list pane check box
Reading view with Discussions List pane showing:

Reading view with Discussions List pane showing
Reading view with Discussions List pane hidden:

Reading view with Discussions List pane showing
In addition, within Reading view within a topic you can filter threads (show all; unread only or flagged only):

Filtering options
You can also adjust the order in which threads are shown in a variety of ways (including most recent activity, least recent activity and author first name):

Ordering threads
Navigate to the Discussions List (Communication and Collaboration > Discussions)
At the right of the screen, click on *Settings (*Settings is available at all levels throughout the Discussions tool, whether you are viewing the Discussions list, creating a forum, topic, thread, or reply).
Settings button within Discussions
Under Default View, check the Grid View box.

Selecting grid view
In Settings you can change a variety of things that will affect the look and feel of the Discussions tool. As is the case in Reading View, showing or hiding the Discussions List pane has an effect on the layout:
Discussions List pane visible:

Discussions list pane visible
Discussions List pane hidden:

Discussions list pane hidden
However, when in Grid view, the display option that has a great impact is Show the preview pane.
Preview pane showing:

Grid view with preview pane showing
Preview pane hidden:

Grid view with preview pane hidden
When Preview pane is unchecked, any time you click to start a thread or reply to a thread a popup box appears for you to type in. This popup can be moved around the screen and changed in size. This is our preferred display option.
As is the case in Reading View, in Grid View, you can further alter the display by showing posts as threaded or unthreaded.

View menu for discussions in grid view
We feel that makes specific activities easier to see in the tool - but as always, it is up to you and your students to decide which layout you prefer.

Threaded view showing how indentation is used to identify different types of message
Opposite each topic you can see how many threads there are, how many posts (including how many you haven't read) and the author, date and time of the last post (below).

Discussion list overview
This is helpful but if you want to be even more aware, there are three functions in particular that we want to draw your attention to: Subscriptions, Notifications and Statistics.
Subscribing to a forum or topic means that you are signing up to be notified of any changes made in those forums or topics. To subscribe to a forum, navigate to the Discussion list (Communication and Collaboration > Discussions). From there you have access to all the forums and topics you have created. To the right of each forum there is a drop-down menu. From the menu select Subscribe.

Accessing the Subscribe option in a discussion forum
When you click Subscribe you will be asked how (and how often) you would like to be notified of changes. Select as appropriate.
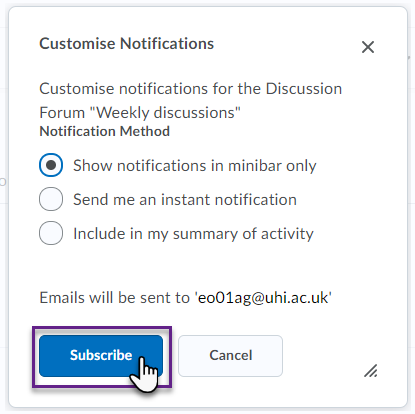
To subscribe to a topic, the process is the same (opposite).

Accessing the Subscribe option in a discussion thread

Accessing the Subscribe option in a discussion topic
To view all of your subscriptions in one place, click on the Subscriptions tab.
You are able to control which subscriptions are displayed: All, Forum only, Topic only or Thread only.

Viewing all subscriptions
Lower down the Subscriptions tab you are shown your default notification method, then if you scroll down you will see a summary of the activity in the forums/topics you have subscribed to (opposite). To go one layer deeper, click on the topic title.

Subscription notification options
Finally, there's the Statistics tab. This feature offers you a valuable snapshot of activity. There are two view: Users/ Forums and Topics.
In Users view (opposite), information includes total numbers of threads, replies and any unapproved (if applicable) posts. Also, if you scroll down you will see your classlist and threads/replies per person. Clicking on a user's name will bring up a detailed, personalised, account of Discussion tool use.

Statistics by user
Alternatively, if you view by Forums and Topics you will see a layout that looks similar to the initial Discussions List screen.
Clicking on any topic or thread in this view will bring up a popup detailing the interaction that those in your classlist have had with the topic or thread.

Statistics by forum and topic
To get round this you might consider posing your question in a thread instead of a topic.
In this scenario your forum could be Weekly discussion, your topic Week 1 and your thread the question. This is just one possibility when it comes to managing a discussion.
In our opinion, regardless of the structure you choose there are two things that will stand you in good stead: Including clear instructions and, especially at the beginning, leading by example.
Using Discussions as a supplement for online lectures
As mentioned in the section Discussion overview, you might want to consider to set up discussion topics as a supplement for online lectures. This is a great way of giving students a chance to reflect on the lecture as a whole and/or on particular questions. If you are using a recorded online lecture in combination with synchronous virtual classroom meetings in tutorial groups, you could ask students to post in a discussion forum prior to the synchronous tutorial meeting.
If you would like to set up discussions for your lectures, we would recommend the following approach:
- Set up a discussion forum called Lectures (for more information on how to do this, check out the section on Creating a forum);
- Set up discussion topics for each lecture within this forum; make sure to give these topics a meaningful name (for more information on how to do this, check out the section on Creating a topic);
- Provide students with a link to the discussion topic within the content area (for more information on how to do this, check out the section on Managing discussion); alternatively, you could also ask students to access their discussions via the Discussion tool link in the Communication and Collaboration drop-down menu;
- Use students' discussion posts for a synchronous follow-up meeting in tutorial groups; alternatively, you can also engage with students within the discussion topic by relying to their threads or posts.
When you set up the discussion forum, we would recommend thinking carefully about the settings:
- Is the topic of the lecture or follow-up discussion sensitive, in other words might it be easier for students to express their opinion anonymously? If the answer is yes, consider allowing anonymous posts. For more information on how to set up anonymous posting, refer to the section on Anonymous posts;
- Do you want to make sure students contribute their own reflection or thoughts without being influenced by what their fellow students have posted? If the answer is yes, consider setting up your discussion topic to allow students to see their fellow students' threads only once they have created their own thread. For more information on how to set this up, refer to the section on Creating a topic. You will find the information in the blue box about Motivation about half way down the page.
In addition to specific discussion topics for each lecture, you can also add either another topic or a separate forum + topic to allow students to ask general questions about the lectures or anything else about your module / unit / course.