Turnitin®
The university recommends that Turnitin should be used as an educational tool, allowing students to view their originality report prior to making their final submission. Turnitin can be
-
used to perform originality checks on students' assignments
-
used to evaluate students' submissions using QuickMarks® and rubrics/grading forms
-
set up so marks generated in Turnitin® automatically sync as draft into the assignments tool and gradebook in Brightspace
Before you start using Turnitin®
Our Turnitin licence allocates seats to active students, once we go over our allocation, Turnitin will not accept any new students. This means that every assignment that doesn’t have the correct end date is using seats for students who may have already left the university.
What do I need to do?
- Always follow these instructions when creating assignments.
- Check that all your old Turnitin assignments are closed.
- Delete any Turnitin assignments in your Brightspace sand box.
For more information on Ouriginal (formerly Urkund), the FE and HN originality checker, have a look at our staff guidance on Ouriginal, as well as our Ouriginal Student Guide.
Setting up a Turnitin assignment in Brightspace
To create a Turnitin assignment, navigate to your course and select Assignments from the Course Tools menu. You will see any existing assignments and if they are hidden from students. To make assignments visible, select the assignment, click More Actions, in the drop-down list click Make visible to students.
To create a new assignment, click the New Assignment button. The New Assignment window opens (Figure 1).
Add the assignment name.
If you enter a “Grade Out Of” score, e.g., “100” a column for this assignment will be created in the Gradebook.
Enter the Due Date.
Add instructions as appropriate.
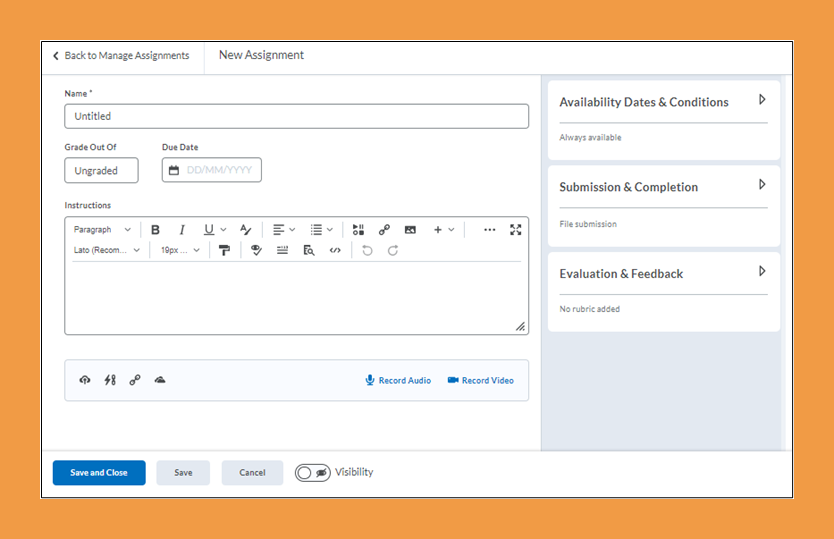
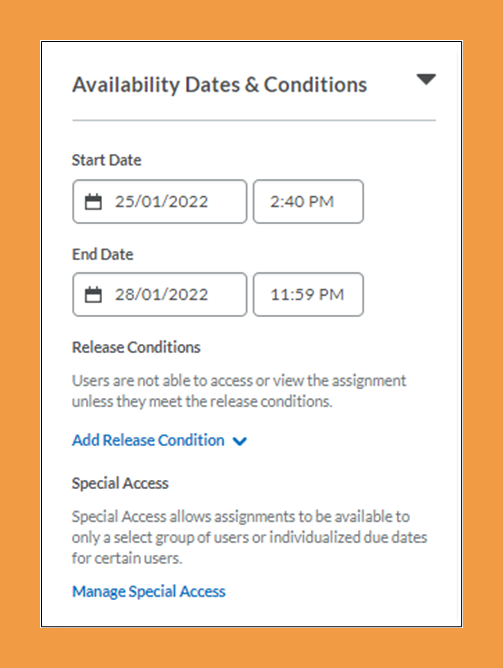
On the left-hand side, click the Availability Dates & Conditions (Figure 2) to expand that section. Enter the date the assignment is to become available to students as the Start Date. If you set a future Start Date and the Visibility button is off, the assignment will remain invisible to students. If the Visibility button is on, the assignment will be visible to students but there will be no active link to enable them to submit until the Start Date.
The End Date is the very last day students may submit if you have allowed late submissions. Regardless of whether an End Date is entered or not, Turnitin will take a date six months in the future from the date of assignment creation and use this as the Post Date. Post Date is when Turnitin releases grades and feedback to students but, in Brightspace, this feature is not really used. *Nevertheless, it is important to add an End Date so that Turnitin assignments do not remain ‘live’ from year to year indefinitely.
The Availability Dates and Conditions box is also where you can:
- Create new or use existing Release Conditions and
- Manage Special Access to allow specific certain people to see the assignment or to set a longer due date for specific people.
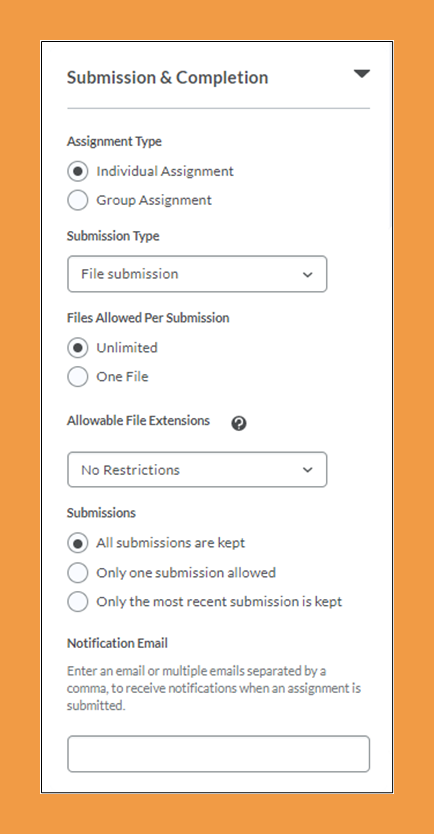
To set other assignment options expand the Submission & Completion section (Figure 3). Choose whether student can upload one file at a time or many. It is best to leave Allowable File Restrictions at No Restrictions but please remember Turnitin is a text originality checker, it cannot handle (at this stage) audio or video.
You can choose whether to keep all a student's submissions to the assignment or just the latest. You can also specify whether only one submission is allowed – the university's recommendation is to use Turnitin as an Educational tool and allow students to submit, view their originality report and then resubmit.
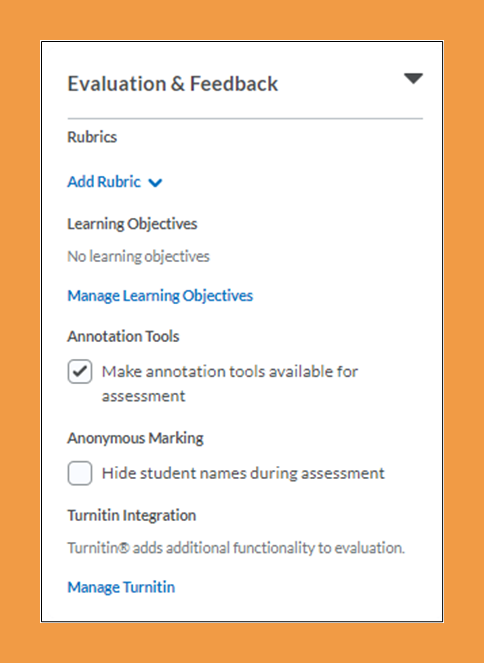
Expand the Evaluation & Feedback section to add a rubric to the assignment (Figure 4). This will be a Brightspace rubric and will not be available to you if you use Turnitin’s Feedback Studio to grade. You may also specify whether the submissions are to be anonymous. This setting cannot be changed once a student has submitted.
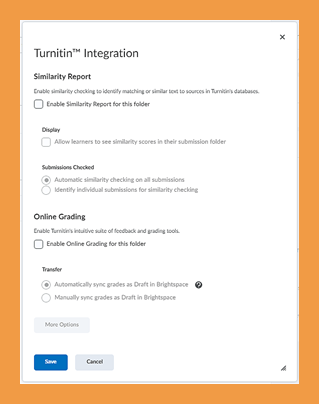
The Manage Turnitin link at the bottom of the Evaluation and Feedback section will bring up the Turnitin Integration screen (Figure 5), where you can activate Online Grading, etc. Click on the Manage Turnitin link.
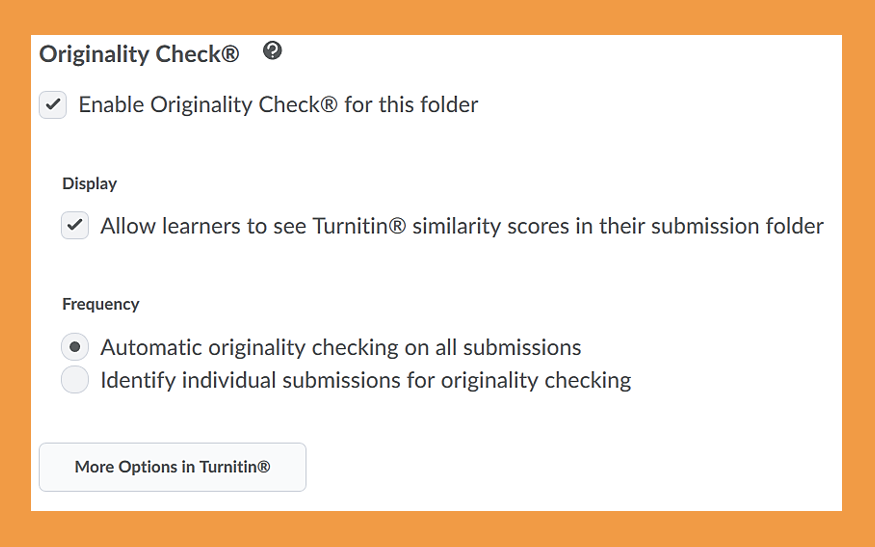
On the Turnitin Integration screen, select Enable Similarity Report for this folder if you wish to check matching sources. You my also select Enable OnlineGrading for this folder if you wish to use Turnitin’s Feedback Studio to grade and provide feedback.
Select "Allow learners to see Turnitin Similarity scores in their submission folder" – the university's recommendation is to allow students to see their Similarity reports. Automatic originality checking on all submissions must be selected to ensure that students are not disadvantaged.
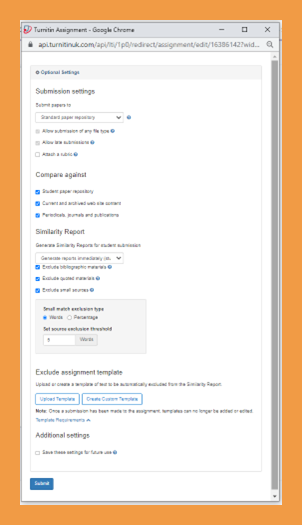
The More Options in Turnitin button at the bottom of the Turnitin Integration section will open a popup window (Figure 6). Click on this button.
The first setting is the default Submit papers to Standard paper repository. Only change this to “Do not store the submitted papers” if you are submitting a dummy assignment to familiarise yourself with Turnitin's functionality. Student papers must always be submitted to the repository.
You also have the option here to attach a rubric which you will be able to access in Feedback Studio. Turnitin and Brightspace rubrics are in specific formats which are not interchangeable.
The university recommends that similarity reports should be set to Generate immediately (students can resubmit).
The Upload Template option at the foot of the Optional settings popup window is for the use of templates which is a new feature introduced by Turnitin which enables tutors to upload a blank header sheet to the assignment. This part of the students’ submissions will not be included in the originality matching.
If you make any changes to this window, there is a Submit button at the bottom. Having submitted the More Options, you need to save in the window titled Turnitin Integration. This takes you back to Brightspace, where you need to Save and Close.
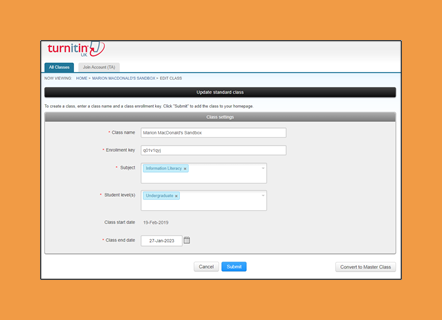
To check, log into Turnitin. Having logged in, you will see a list of your classes, with active classes being at the top of the list (Figure 7).

If you are inserting an end date at part of end-of-year housekeeping, use tomorrow’s date (whatever that is) and save the assignment.
Turnitin® Online Grading and Similarity Check
Please note as well that you should only use Turnitin® in teaching spaces and not in Sandboxes.
Once you have enabled Turnitin® Online Grading®, you will be able to determine whether you would like grades in Turnitin® to sync automatically as a draft to Brightspace or whether you would like to sync Turnitin® grades manually as draft in Brightspace. If you have linked the assignment to a grade item and choose the first option, a grade from Turnitin® will automatically saved as draft in Brightspace. This means that once you are done marking all assignments in Turnitin®, you will only need to release the grades to students afterwards. If you decide for option number two, you would have the added step of having to first sync all grades from Turnitin® into Brightspace and then releasing them to students. (Figure 9)
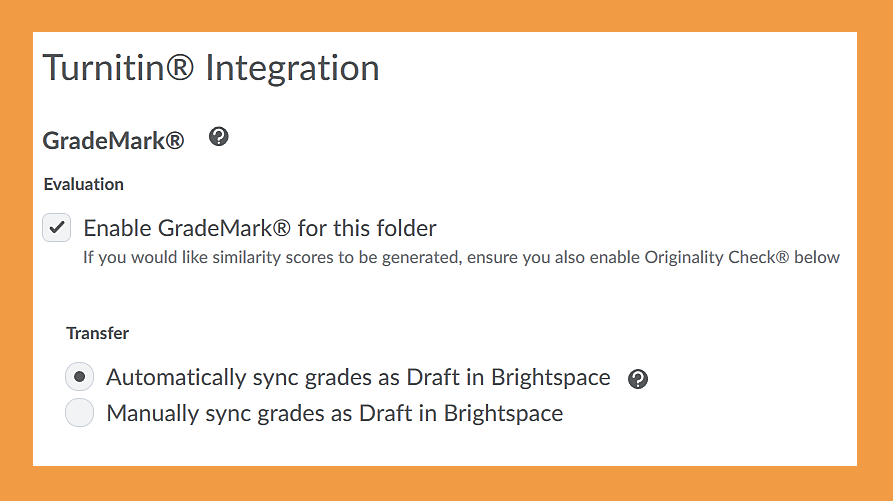 Figure 9
Once you have enabled the Turnitin® Similarity Check®, you will be able to determine what will be displayed to students as well as whether or not you would like an originality check to be performed on all submissions or just individual submissions. (Figure 10) If you choose for students to be able to see their Turnitin® similarity scores, students will see the following once they have submitted their assignment and have clicked on 'Submitted' in their assignment view (Figure 11):
 Figure 11
You as the instructor will see the following:
 Figure 12
Once you have graded the assignment, you will also be able to see the score where at the moment it says 'No Score'.
For more information on how your students will use Turnitin®, have a look at our Turintin® Student Guide.
Optional settings for Turnitin®
Once you have enabled the Turnitin® Online Grading® and Similarity Check®, click on the 'More Options in Turnitin®' button to customise your settings further. In this step, you will also be able to create and/or attach a rubric. (Figure 13)
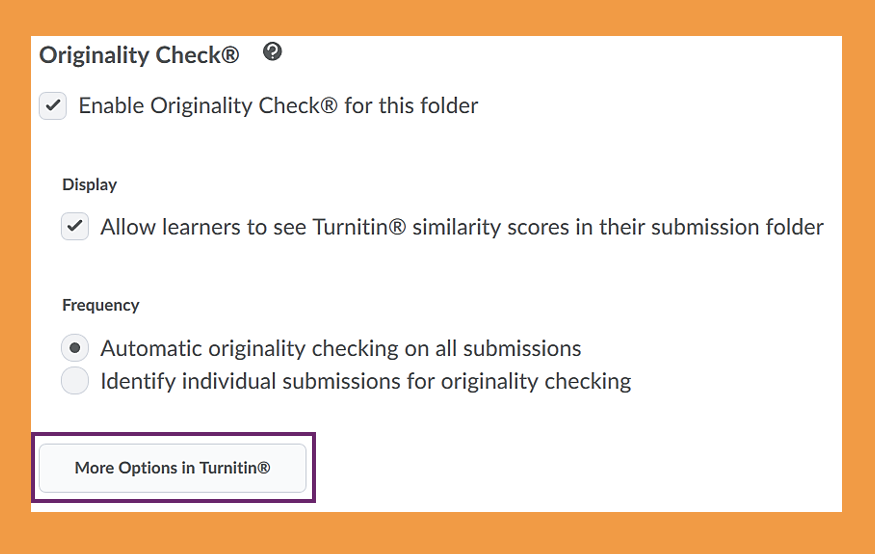 Figure 13
Once you have clicked on the 'More Options in Turnitin®' button, a new window will open for you. Initially, you will be able to see the title of your assignments and the max grade which are both taken from the assignments tool. You will also see a button that says 'Optional settings'. Click on the button to customise your assignment further. (Figure 14)
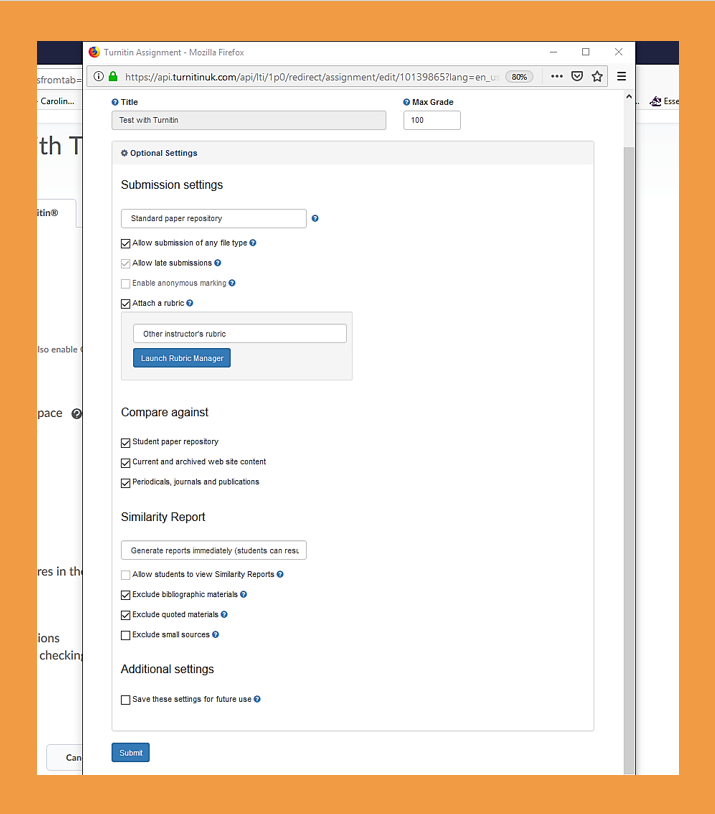 Figure 14
Submission settings (Figure 8)
| Repository | Here, you can choose which repository you would like submissions to be stored in. If you select 'Standard paper repository', papers will be stored and can be used for similarlity checks in the future. If you select for your paper not to be stored, an initial similarity report wil be generated but the paper will not be stored and available for any future similarity comparisons. |
| File type | Although the setting suggests 'any' file type, we would strongly suggest relaying to students the message that files should be documents only. |
| Late submissions | This option cannot be customised in Turnitin® as it is one that can be customised in the Brightspace assignment set-up wizard. If you have selected this option there, it will be automatically checked here and vice versa. |
| Anonymous marking | This option cannot be customised in Turnitin® as it is one that can be customised in the Brightspace assignment set-up wizard. If you have selected this option there, it will be automatically checked here and vice versa. |
| Rubrics | Here, you can choose to attach a rubric to your assignment. You can either choose from your existing rubrics or can launch the rubric manager to create a new rubric. |
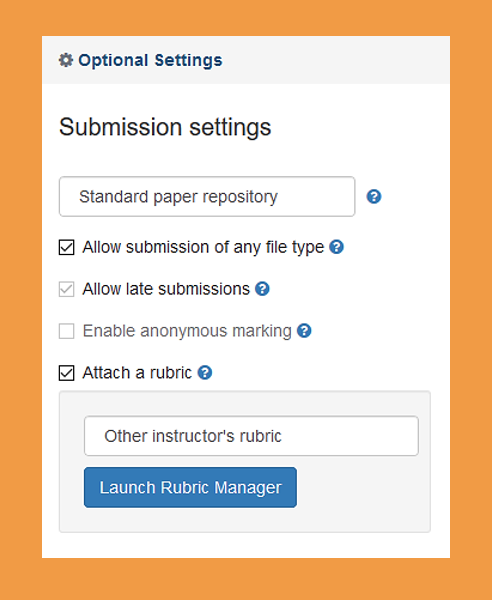 Figure 15
Compare against (Figure 16)
This area allows you to customise what you would like to compare student submissions against.
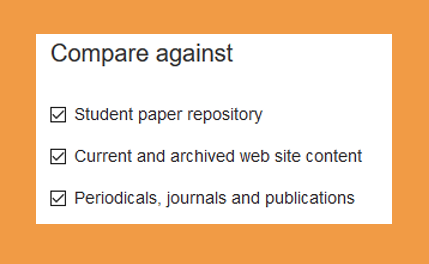 Figure 16
Similarity Report (Figure 17)
| When will reports be generated? |
There are three options when reports will be generated.
|
| Visibility of Similarty Report to students | This option cannot be customised here as it is one that can be customised in the Brightspace assignment set-up wizard in the Turnitin® tab. If you have selected this option there, it will be automatically checked here and vice versa. |
| Exclude bibliographic materials | This means that bibliographies are excluded from the similarity check. |
| Exclude quoted materials | This means that quotes won't factor into the similarity report. (This can be overridden for individual submissions.) |
| Exclude small sources | If you check this box, you can determine the number of words or percentage that will be automatically excluded from the similarity reports. |
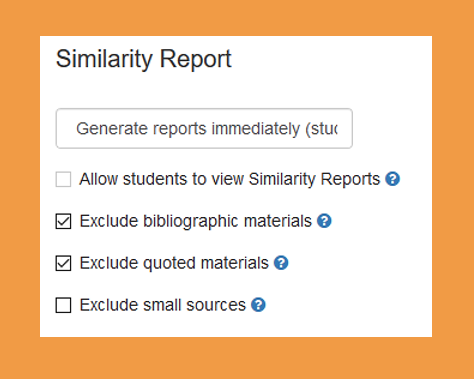 Figure 17
If you check this box, your settings will be saved for the future. (Figure 18)
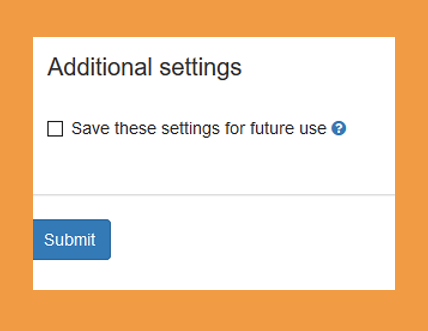 Figure 18
Setting up a rubric or grading form in Turnitin®
If you would like to create and/or attach a rubric or grading form to your assignment, check the box next to 'Attach a rubric' under 'Submission settings' and click on the blue 'Launch Rubric Manager' button. (Figure 19)
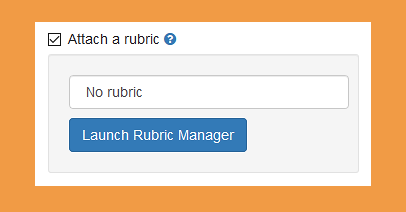 Figure 19
This will take you to the Turnitin® rubric manager (opens in a new window). If you already have rubrics and grading forms in the manager, you will be taken to the first on your list. If not, you will be able to create a new rubric or grading form.
If you are taken to a previous rubric or grading form, or to see the rubric manager options, click on the list button on the top left-hand side.
From there, you will be able to create a new rubric (analytic rubric) or grading form (holistic rubric). You can also duplicate previously created rubrics or grading form, rename them or delete them.
(Figure 20)
Note: You can only delete rubrics or grading form that have not yet been used for marking an assignment.
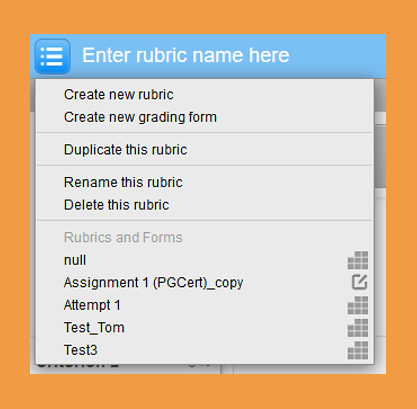 Figure 20
Rubrics in Turnitin®
Within Turnitin®, there are different types of analytic rubrics that you can create.
- Weighted rubrics (weight each criterion)
- Custom points rubrics (enter custom points for each scale)
- Qualitative rubrics (no grade is assigned, there is only text based feedback)
To start, launch the rubric manager menu and select 'Create new rubric' from the menu. (Figure 21)
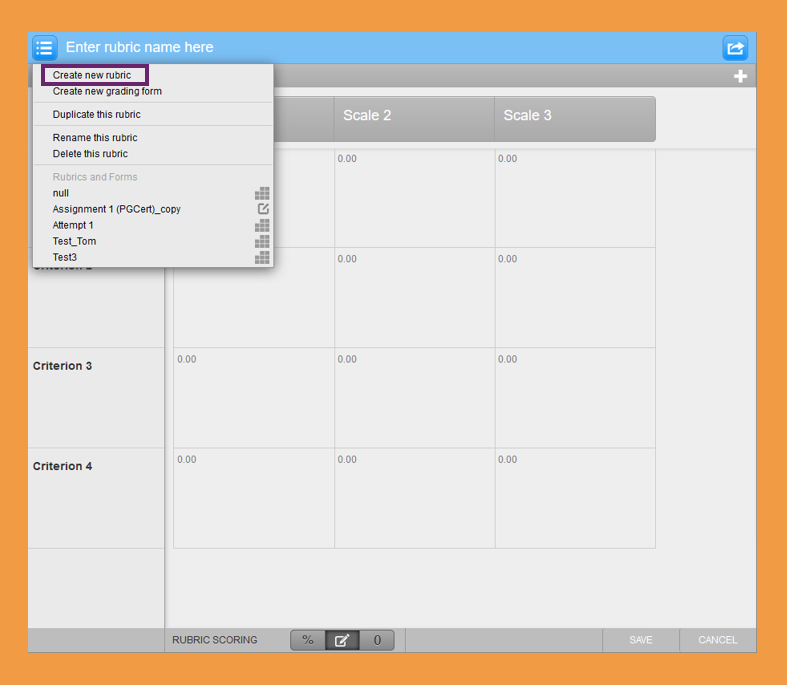 Figure 21
Here, you will find a brief explanation of what you will see when you start creating a rubric. (Figure 22)
- Start by giving your rubric a name.
- The + sign next to criteria and scales will allow you to add additional criteria and scales.
- This is where you can change the weight of each criterion in weighted rubrics. By clicking on the individual criteria, i.e., 'Criterion 1', you will also be able to rename them.
- This is where you can edit the scales. Click on the individual scales, i.e., 'Scale 1', to edit the scale name. Click on the point value in the top right-hand corner to edit the value of each scale. Click on the boxes below the scales to edit the description/feedback.
- Here, you can choose the type of rubric you would like to create - weighted rubric (%), custom points rubric or qualitative/text only rubric (0).
- When you are done, click Save.
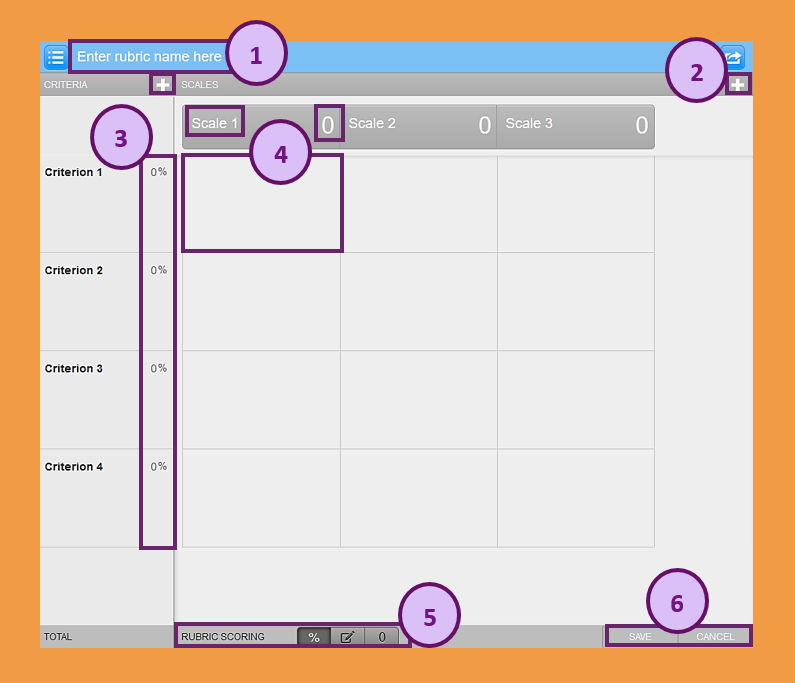 Figure 22
Here, you will find a brief explanation of the components of a weighted rubric. This is usually the default that comes up when you create a new rubric.
If not, click on the percentage symbol on the bottom of the screen next to Rubric Scoring. (Figure 23)
 Figure 23
- Start by giving your rubric a name.
- Next, determine the criteria you would like to evaluate and how much each will be worth.
Note: Once you have entered the criterion names, you can also provide short explanations for each criterion by clicking on the field below the criterion name. This comes in especially handy when your criteria are more elaborate since each criterion name can only be 12 characters long. - Next, determine the scale names and how much each scale will be worth.
- Provide a short description/feedback to indicate what students will have to do to achieve a certain scale for any of the criteria.
- When you are done, click on 'Save'.
(Figure 24)
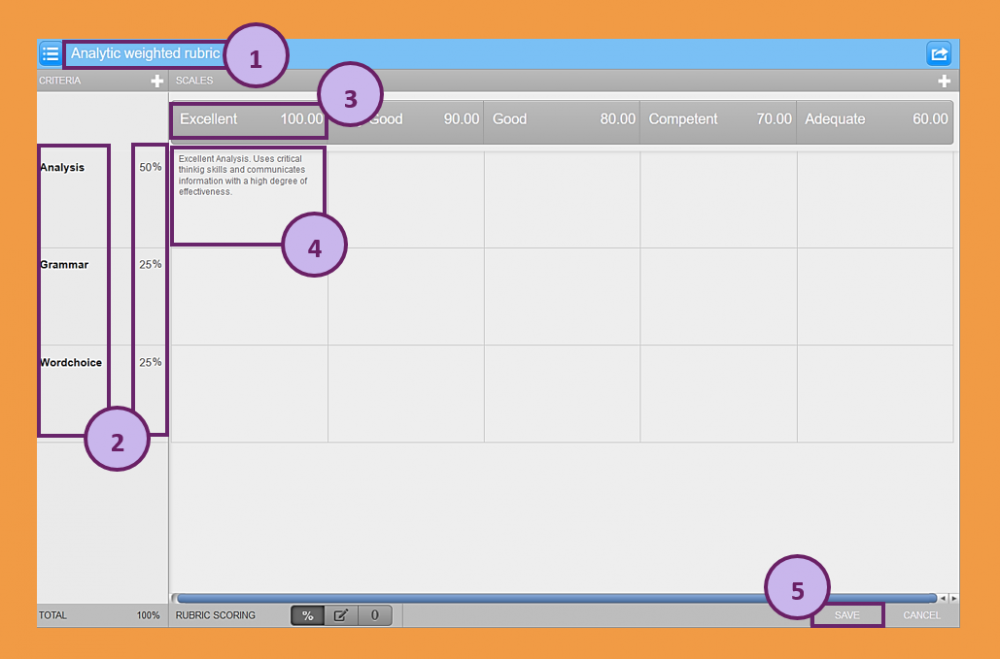 Figure 24
Once you are done and have saved your rubric, you can go to back to your previous Turnitin® optional settings window and can select your rubric to be attached to your assignment. Now you will be able to use this rubric to mark students assignment in the Turnitin® Feedback Studio. (Figure 25)
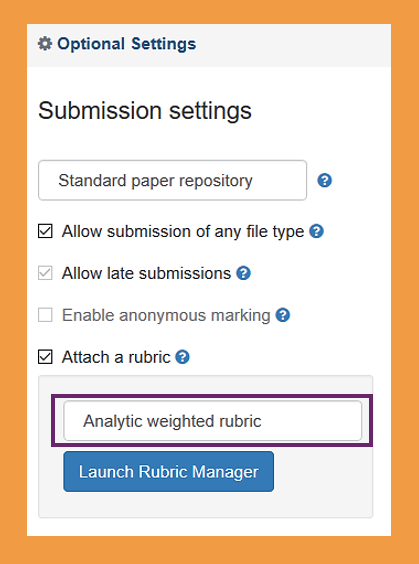 Figure 25
Here, you will find a brief explanation of the components of a custom points rubric. To start creating a custom points rubric, click on the pen and paper symbol on the bottom of the screen next to Rubric Scoring. (Figure 26)
 Figure 26
- Start by giving your rubric a name.
- Next, determine the criteria you would like to evaluate.
Note: Once you have entered the criterion names, you can also provide short explanations for each criterion by clicking on the field below the criterion name. This comes in especially handy when your criteria are more elaborate since each criterion name can only be 12 characters long. - Next, determine the scale names.
- Provide a short description/feedback to indicate what students will have to do to achieve a certain scale for any of the criteria. This area is also where you can enter your custom point values for each scale and criteria.
- When you are done, click on 'Save'.
(Figure 27)
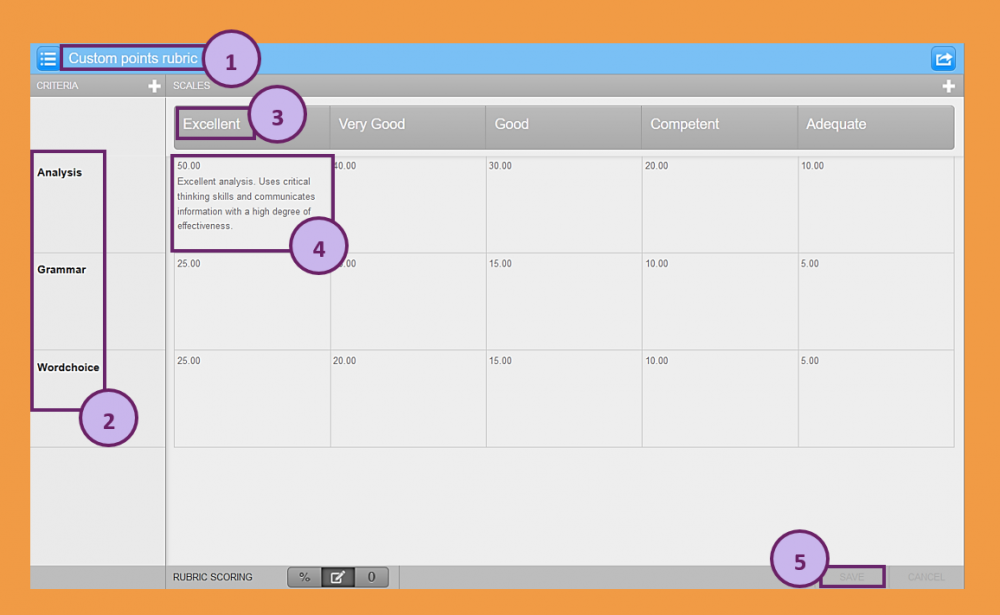 Figure 27
Once you are done and have saved your rubric, you can go to back to your previous Turnitin® optional settings window and can select your rubric to be attached to your assignment. Now you will be able to use this rubric to mark students assignment in the Turnitin® Feedback Studio. (Figure 28)
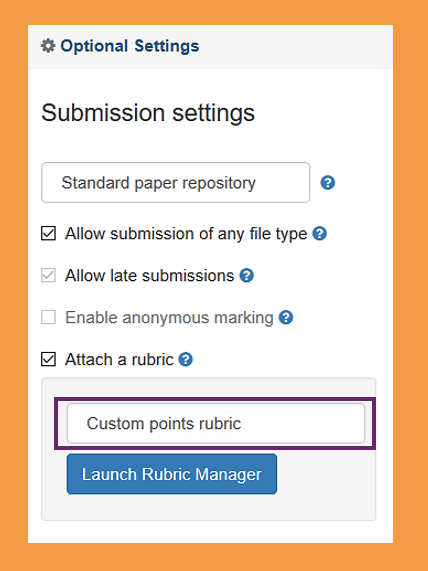 Figure 28
Here, you will find a brief explanation of the components of a qualitative rubric. To start creating a qualitative rubric, click on the '0' on the bottom of the screen next to Rubric Scoring. (Figure 29)
 Figure 29
- Start by giving your rubric a name.
- Next, determine the criteria you would like to evaluate.
Note: Once you have entered the criterion names, you can also provide short explanations for each criterion by clicking on the field below the criterion name. This comes in especially handy when your criteria are more elaborate since each criterion name can only be 12 characters long. - Next, determine the scale names.
- Provide a short description/feedback to indicate what students will have to do to achieve a certain scale for any of the criteria.
- When you are done, click on 'Save'.
(Figure 30)
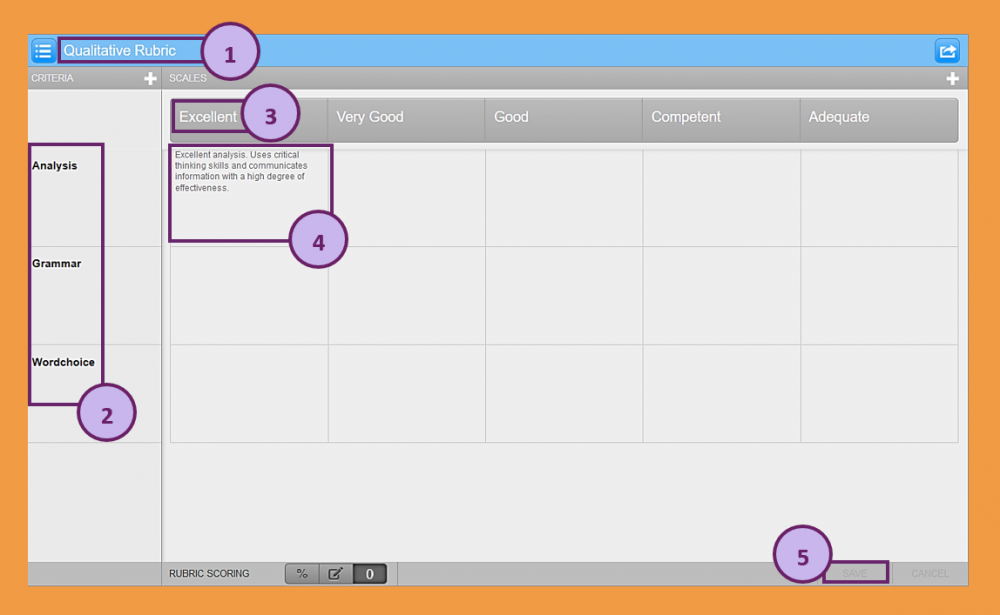 Figure 30
Once you are done and have saved your rubric, you can go to back to your previous Turnitin® optional settings window and can select your rubric to be attached to your assignment. Now you will be able to use this rubric to mark students assignment in the Turnitin® Feedback Studio. (Figure 31)
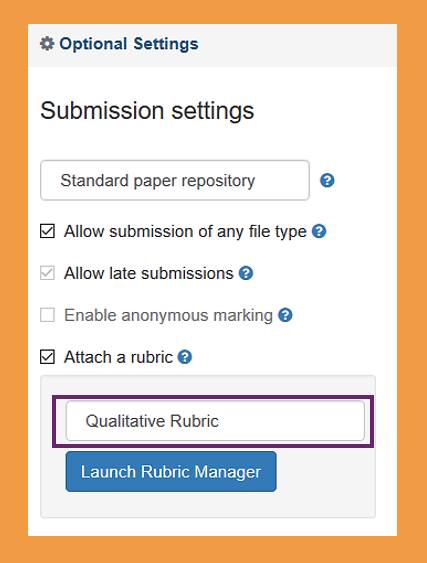 Figure 31
Grading forms in Turnitin®
Within Turnitin®, you can also create a grading form or holistic rubric.
To start, launch the rubric manager menu and select 'Create new grading form' from the menu.
(Figure 32)
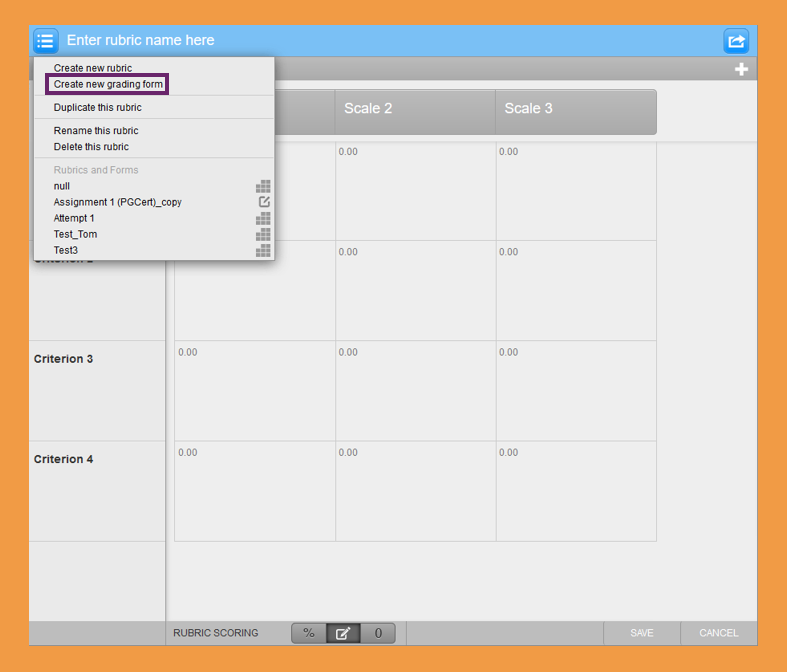 Figure 32
- Start by giving your grading form a name.
- Next, enter your criteria and a short description for the crieria.
- Use the big + button on the bottom of the page to add further criteria.
- If you would like to be able to enter scores for the criteria when you mark the assignment, enable scoring in the bottom left-hand corner of the page.
- Once you are done, click 'Save' in the bottom right-hand corner.
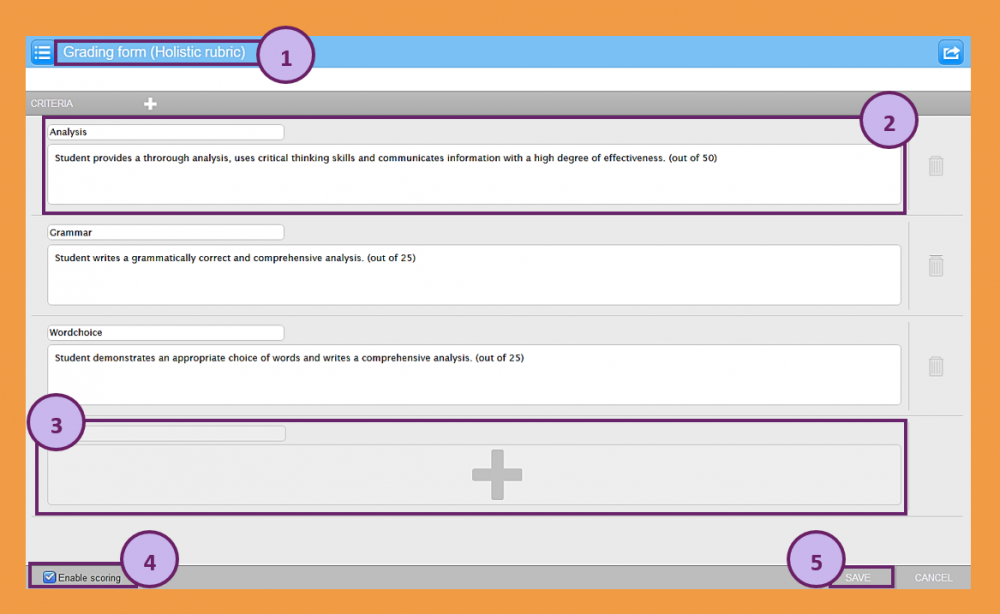 Figure 33
To attach the grading form to a Turnitin® assignment, select it from the list of rubrics in the 'Optional Settings' pop-up window. (Figure 34)
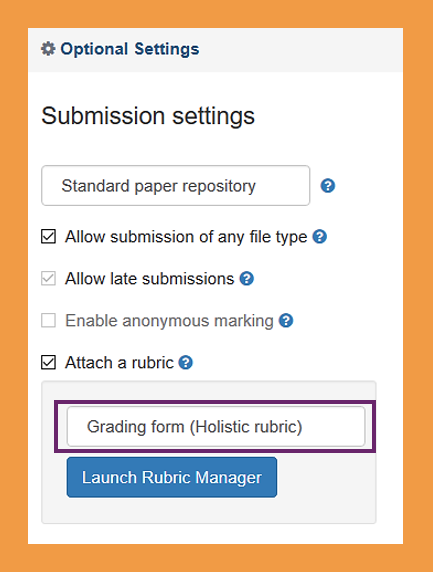 Figure 34
Marking in Turnitin® - General
Once students have submitted an assignment that's linked to Turnitin®, you will be able to evaluate it via the Brightspace assignment tool.
To access the assignment tool, select Assignments from the Course Tools drop-down menu in the navbar. (Figure 35)
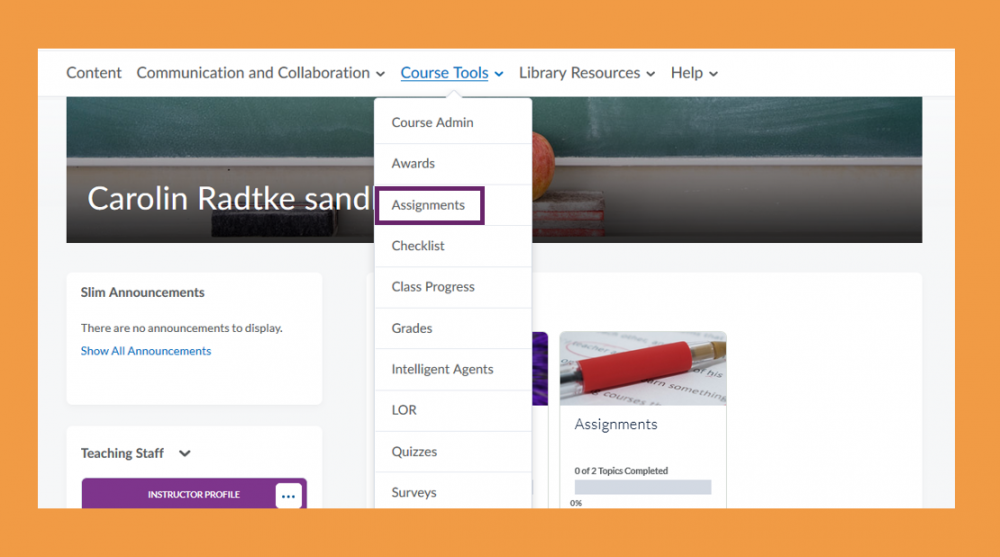 Figure 35
Once you are in the assignment tool, you will be able to access all assignment submission folders set up for the module/unit.
Click on any of the submission folders to evaluate student submissions to that folder.
(Figure 36)
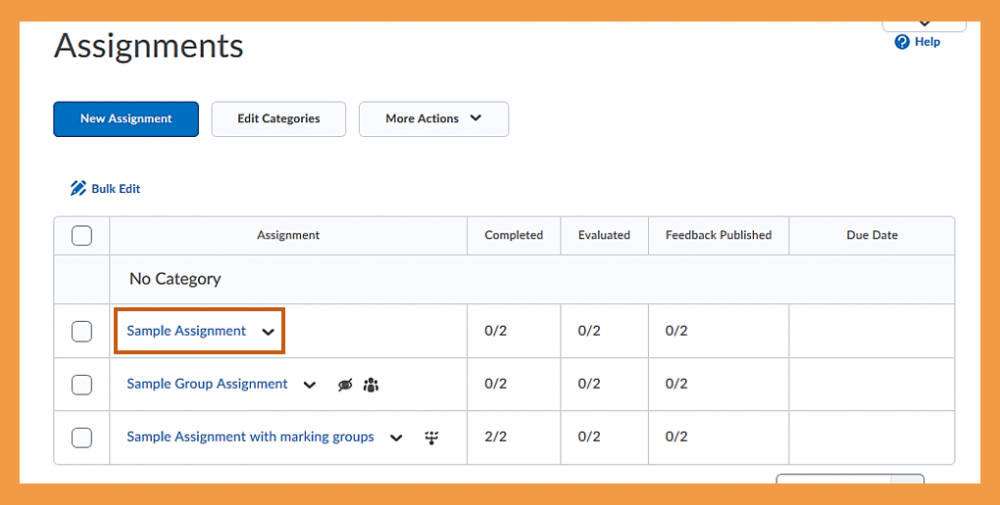 Figure 36
Once you have entered an assignment folder that is linked to Turnitin®, you will be able to see a list of submissions. For each student, you will be able to see the following information about the submissions:
- Name of the student, assignment (inlcuding name, type and size)
- Turnitin® similarity report
- Turnitin® Online Grading area® (including whether there is a score and feedback, a pen symbol that will take you straight to the Turnitin® Feedback Studio, and an arrow symbol to refresh any mark that might not have synced)
- Date and time of submission
(Figure 37)
 Figure 37
To mark an assignment in Turnitin®, click on the pen symbol in submission view... (Figure 38)
 Figure 38
When you first enter the Turnitin® Feedback Studio, you will see the following:
- Student name and assignment name
- Overall score for the current student
- Toggle through multiple submissions/students
- Feedback area and similarity details:
any of the blue buttons have to do with assessment and feedback, any of the red buttons have to do with similarity
(Figure 39)
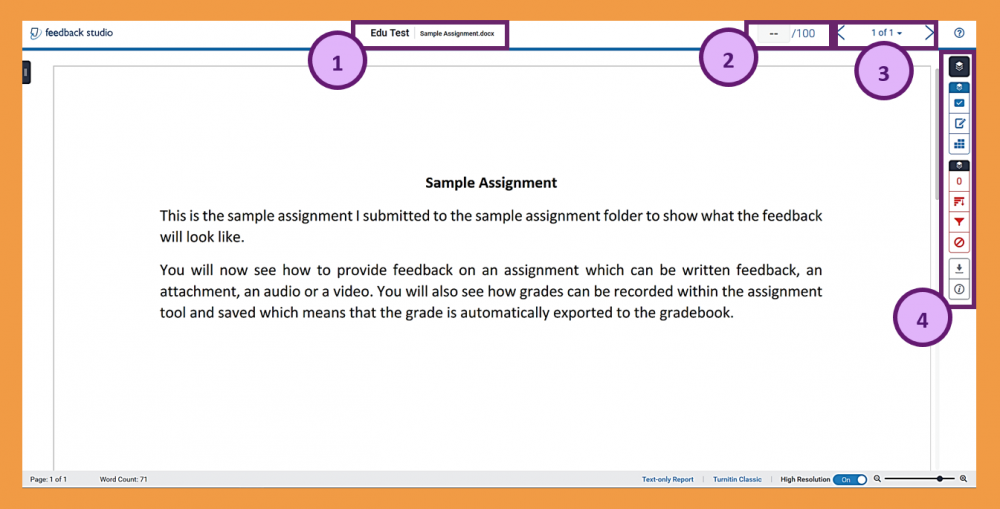 Figure 39
Turnitin® QuickMarks
If you navigate to the first button (checkmark button) in the blue assessment and feedback area, you will get to the Turnitin® QuickMarks. These are designed to help you give feedback quicker. From the drop-down menu, you will be able to select tag lists to make looking for a the appropriate QuickMark quicker. There is also a screw that will let you edit and add QuickMarks. (Figure 40)
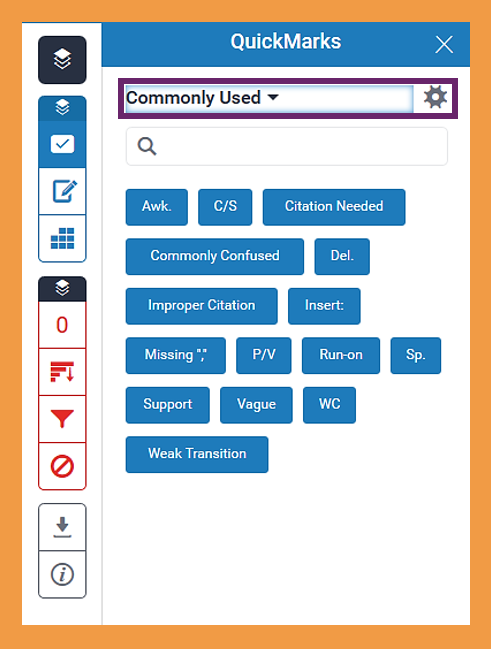 Figure 40
Once you have clicked on the screw, a new window will open where you can see a list of existing QuickMarks (2). When you click on an existing QuickMark, you can see a description of what the QuickMark means. You can also see which sets or lists it already belongs too, or you could add it to a new set (3). In the QuickMarks editor, you can also add your own QuickMarks. Simply click on the '+' symbol (1) and add your QuickMark name, description and set affiliation. (Figure 41)
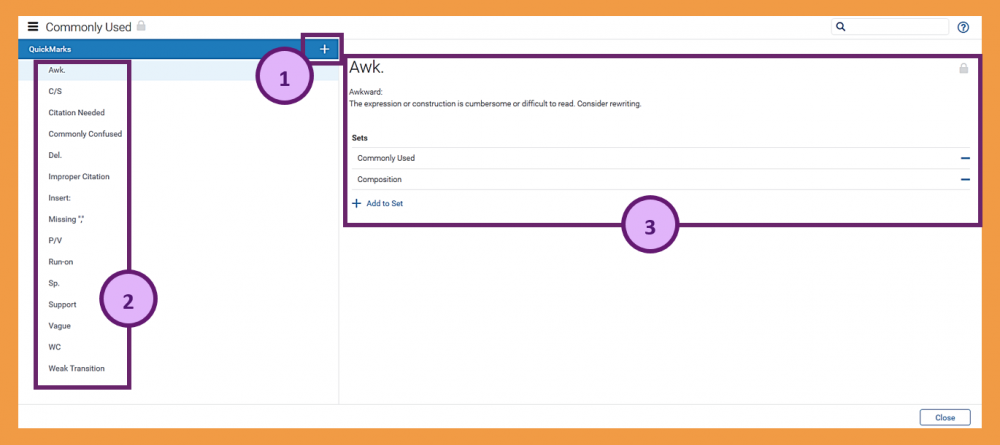 Figure 41
Turnitin® Fedback Summary
If you navigate to the next button (pen and notepad button) in the blue assessment and feedback area, you will get to the Turnitin® Feedback Summary area. Here, you can add overall feedback to the student's submission. This feedback can either be a voice or a text comment. (Figure 42)
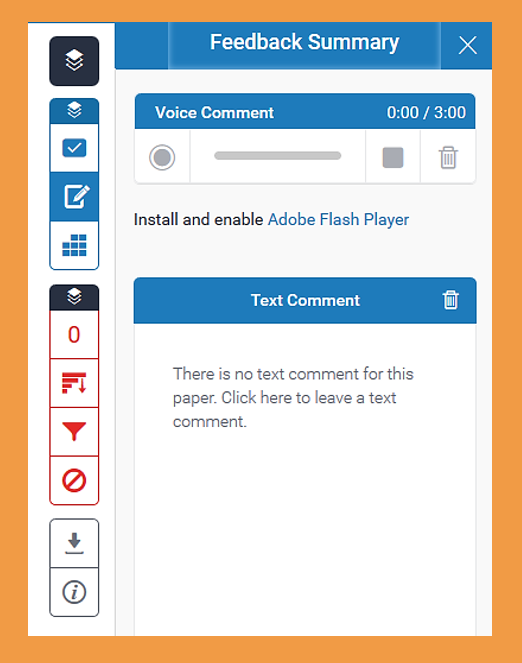 Figure 42
Turnitin® Rubric
If you navigate to the last button (grid button) in the blue assessment and feedback area, you will get to the Turnitin® Rubric area. Here, you will be able to mark the submission with your previously attached rubric (in this case, a custom points rubric). Using the sliding scales, you will be able to determine how many points the student will get for each criterion (3). Below the sliding scales, you will also be able to see description for all the scales and criterion combinations (4). The overall student mark will update automatically in the grade area (1) and can be applied to the gradebook by pressing the blue 'Apply to Grade' button. (Figure 43)
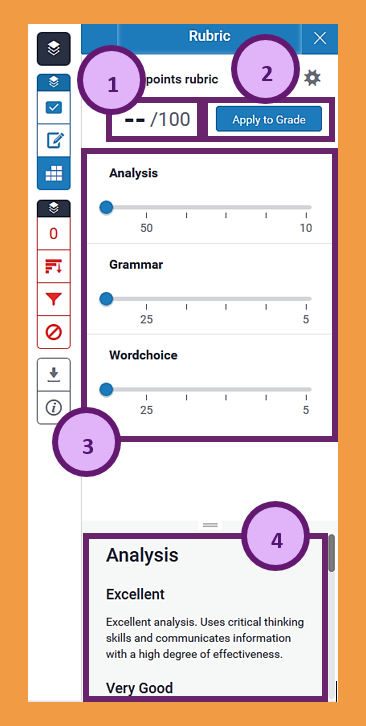 Figure 43
Alternatively, you can have a look at the rubric as a whole by clicking on the expand button next to the rubric title. This will open up the rubric in a new window. (Figure 44)
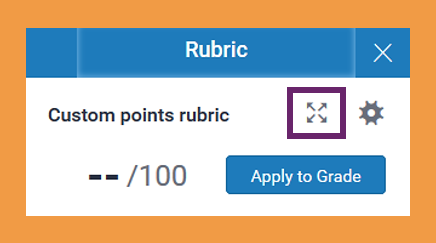 Figure 44
Once the rubric has opened in a new window, simply select the scale for each criterion by clicking on the correct description/feedback (1). Once you have selected a scale, the field will turn a light blue which indicates that your choice has been recorded. When you are done marking the assignment, click on the 'Apply to Grade' button and then the 'Close' button (2). (Figure 45)
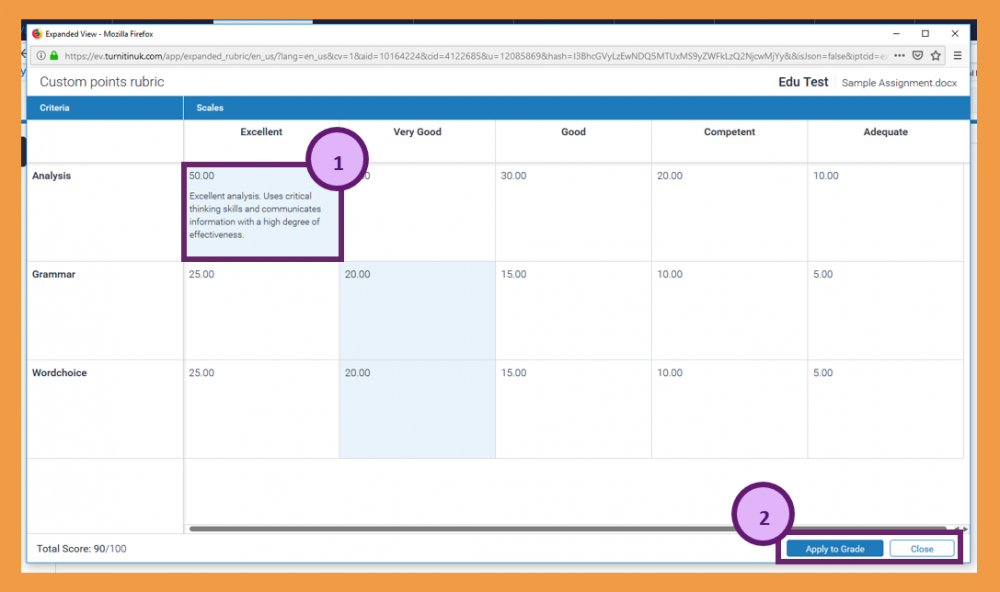 Figure 45
Your feedback has now been recorded. You will see that the sliding scales will have adjusted and reflect your selection (2). Additionally, the score will have been updated to reflect the student's overall mark (1). (Figure 46)
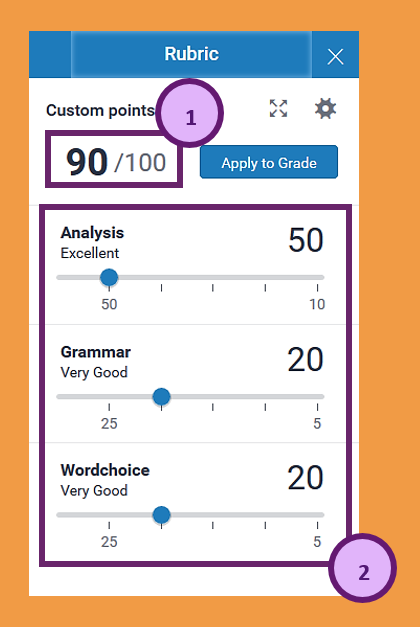 Figure 46
Aside from just being able to mark students' assignments and providing overall audio or written feedback, you can also annotate students' assignments and give them more specific feedback that way. To do so, highlight a word or phrase. Once you have done so, a little black bar will pop up from which you can select what you would like to do. Select the check mark button to add a QuickMark (see above) to the highlighted section. Select the speech bubble button to add a custom comment yourself. Or select the strike through button to strike the highlighted word or phrase. (Figure 47)
 Figure 47
Once you are done with your detailed marking and feedback, you can either use the sliding scales of your rubric to mark the assignment (1) or you can expand the rubric and mark the assignment that way (see above). The grade will automatically update and once your are done, you will just have to confirm the grade by clicking on the 'Apply to Grade' button (3). Once you have done so, the grade will also appear on the top (4) and can be synced into Brightspace as a draft. (Figure 48)
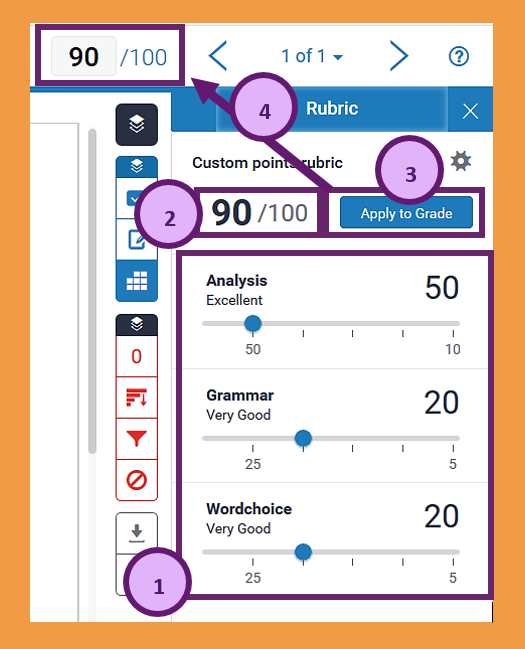 Figure 48
Once you are done marking in the Turnitin® Feedback Studio, you can close it and return to the Brightspace assignment submission area. If you look at a student assignment now, you will be able to see that the grade from Turnitin® mark has been synced to Brightspace (if you set up for the mark to be synced automatically). You can now add further feedback, or hit the 'Publish' or 'Save Draft' button. (Figure 49)
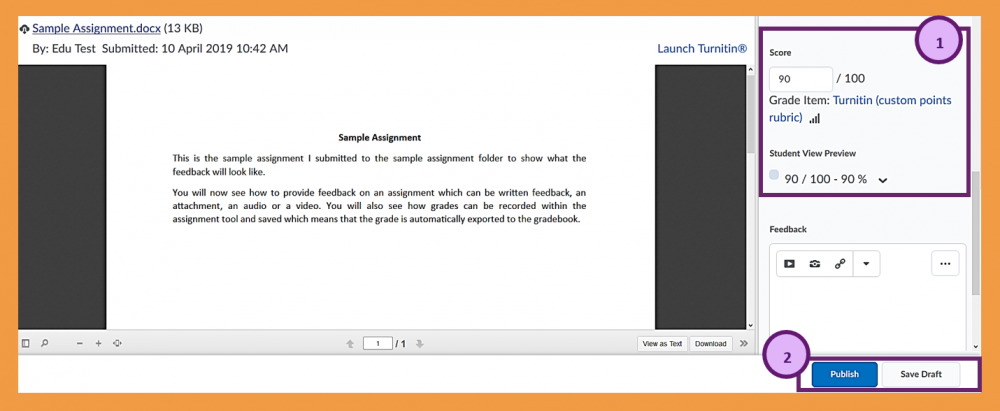 Figure 49
When you are back in the assignment submission area where you can see a list of submissions, you will notice that the displayed information has now changed. You are now able to see that in Turnitin® Online Grading®, there is now a grade as well as a symbol for feedback (1). You can also see that any grade or feedback has been saved as draft (2). Once you publish the grade an feedback, this will change to published. (Figure 50)
 Figure 50
Marking in Turnitin® with different types of rubrics and grading sheets
If you use a weighted rubric, you will be able to see sliding scales which include the point values specified when the rubric was set up (1). Below, there will be explanations for the different scales within each criteria (2). The total of the score from the sliding scales will be visible at the top and can be applied to the grade (3). (Figure 51)
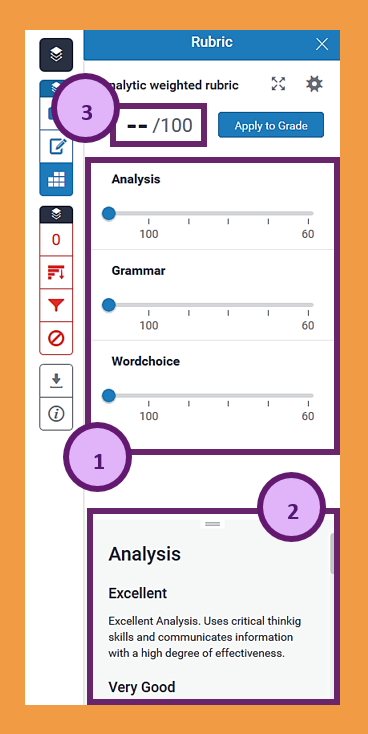 Figure 51
If you use a custom points rubric, you will be able to see sliding scales which include the custom point values specified when the rubric was set up (1). Below, there will be explanations for the different scales within each criteria (2). The total of the score from the sliding scales will be visible at the top and can be applied to the grade (3). (Figure 52)
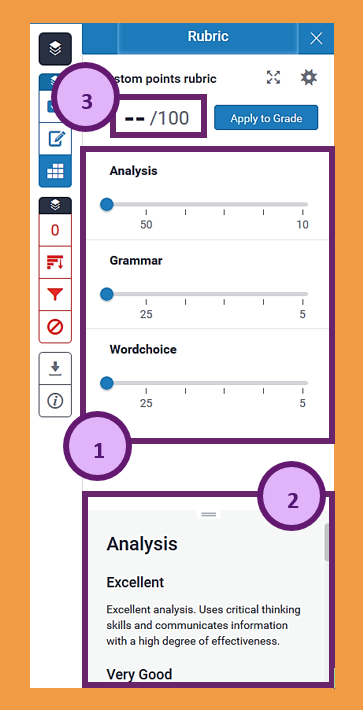 Figure 52
If you use a qualitative rubric, you will be able to see sliding scales which you can drag to match the different scales you determined when you created the rubric (1). Below, there will be explanations for the different scales within each criteria (2). Since this rubric does not have point values attached to any of the scales, there is no overall score or 'Apply to Grade' button at the top. (Figure 53)
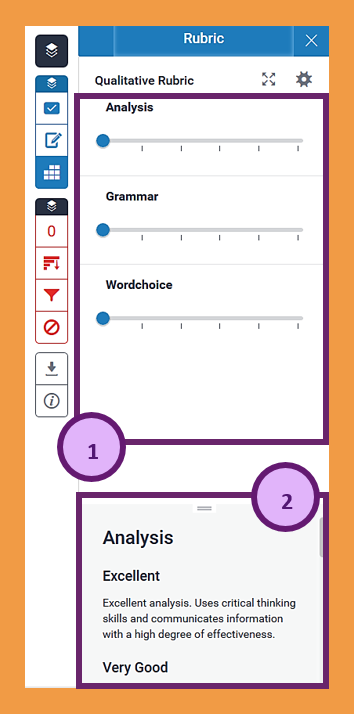 Figure 53
If you use a grading sheet with scoring, you will see the name of your criterion, a comment box below where you can enter feedback, and a box next to the criterion name where you can enter a score (1). The scores entered in these boxes, will then be automatically updates at the top and can be applied to the grade (3). On the bottom, there will be explanations for the different criteria which you determined when you set up the rubric (2). (Figure 54)
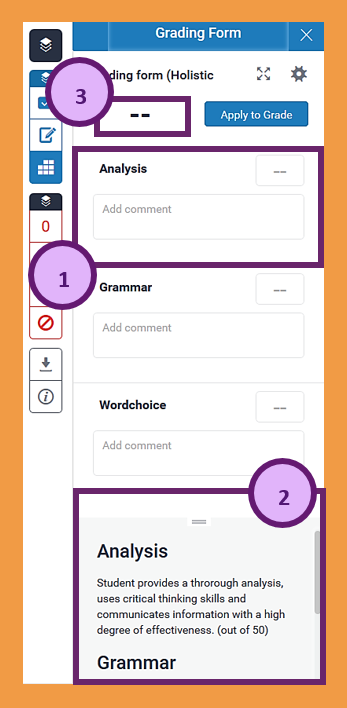 Figure 54
If you use a grading sheet without scoring, you will see the name of your criterion, and a comment box below where you can enter feedback (1). On the bottom, there will be explanations for the different criteria which you determined when you set up the rubric (2). Since this grading sheet does not have the option for entering a score attached to any of the criteria, there is no overall score or 'Apply to Grade' button at the top. (Figure 55)
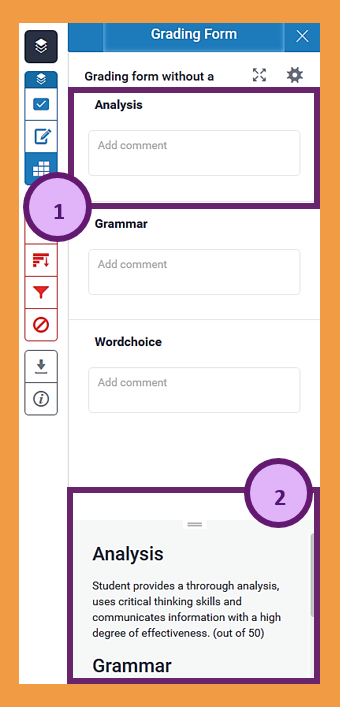 Figure 55


