Building your unit/module
To start building your unit(s)/module(s) in Brightspace, there are two steps you need to take:
- Firstly, you must request access to the unit(s)/module(s) that you will be delivering;
- Secondly, decide if you want all of your existing resources brought over from Blackboard for you.
If you are currently a Blackboard site owner, you have two options when it comes to migrating content into Brightspace: to build from the ground up (migrating content yourself) or to start with everything you currently have. Arguments can be made either way, depending on various factors, including the structure and currency of your content. We recommend you start work on the Brightspace professional development module before making your decision.
Option 1: Craft a new unit/module
Develop your unit/module from the ground up, using tools newly available in Brightspace. This could be a great opportunity to increase interactivity and update your resources. Note: You do not have to recreate every single resource. If you have items in Blackboard that you wish to bring into your new site, there are various ways to do this. Click to see more detail.
Option 2: Migrate all existing Blackboard content
Request all your existing Blackboard resources to be transferred into your new unit/module space for you. There are some factors that should be considered if taking this option. Click to see more detail.
Form 1: step by step instructions
Visit the LIS Servicedesk self-service portal
Note: You will have to sign in to the portal using your UHI credentials
Instructions:
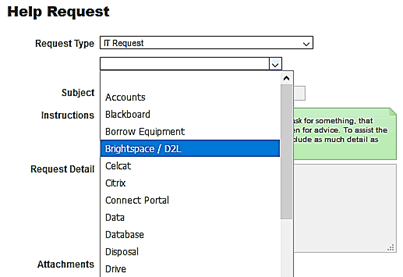
Initially, you will see a blank form. Select ‘IT Request’ as Request Type, then in the next box Brightspace/D2L:
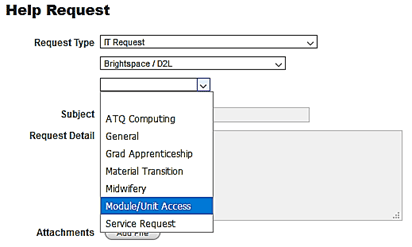
In the third dropdown box, select Module/Unit access:
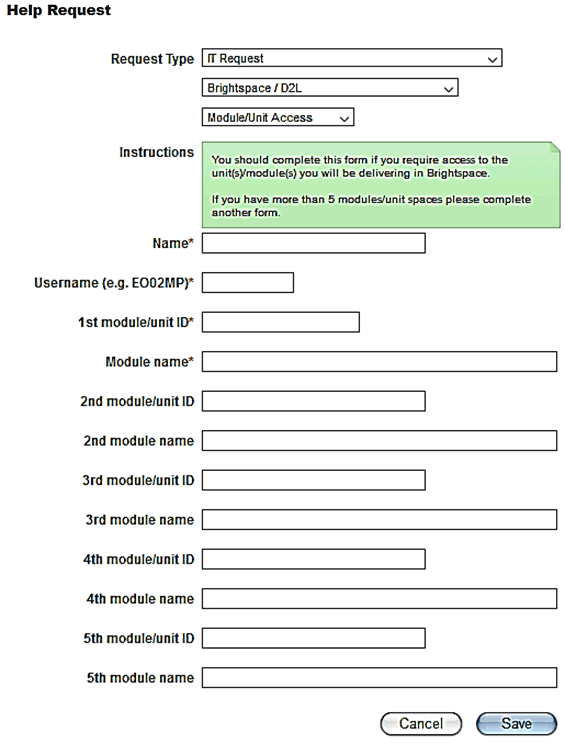
Follow the Instructions (in green) and complete the required boxes beneath:
Form 2: step by step instructions
Visit the LIS Servicedesk self-service portal
Note: You will have to sign in to the portal using your UHI credentials
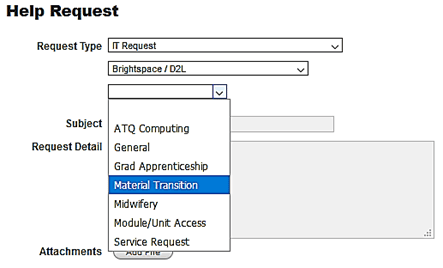
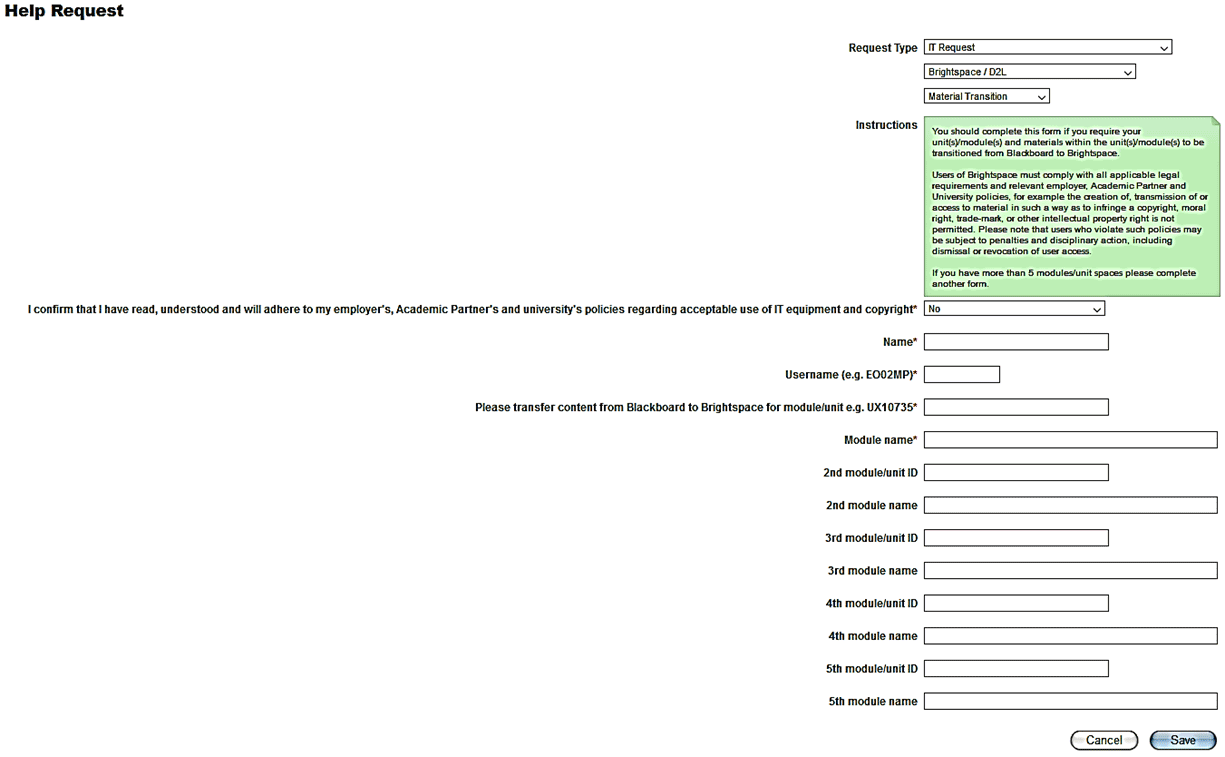
Initially, you will see a blank form. Select ‘IT Request’ as Request Type, then in the next box Brightspace/D2L:

In the third dropdown box, select Material Transition:
Follow the Instructions (in green) and complete the required boxes beneath:
Option 1
-
Textual items
In Blackboard you may have textual items (which can include pictures and external links) such as Announcements, Discussion forums, or Learning resources items (Figure 1).
If you have any items like this that you wish to keep, simply select the text, copy and paste into appropriately named Word documents. Save these files in well-named folders (‘Week 1 2018’, ‘Discussion forums Semester 2’) and you will have an easy way to locate and reuse any of the content you keep.

Figure 1: Example of textual item in Blackboard
Creating textual content in Brightspace is very similar to Blackboard. To reuse text that you saved from Blackboard, open the appropriate Word document, select and copy the text. In Brightspace, most item types, such as Announcements and Files, feature an html editor (just like Blackboard). Place the cursor where you wish to add your text and paste (Figure 2).

Figure 2: Brightspace html editor
-
Inserted files
In Blackboard, one way you can attach files to course content is by using the paperclip (Insert File) icon in the html editor (Figure 3).

Figure 3: Blackboard Insert File icon
When added, inserted files are displayed as links. To save for future use in Brightspace, simply click on the url (Figure 4) and the file will be downloaded to your computer.
Most browsers will have a default download destination. It is advisable to move saved files from this to a more appropriate location.
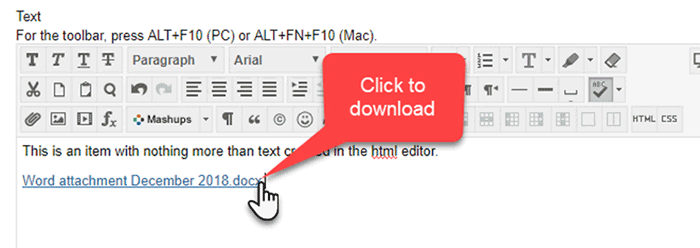
Figure 4: Example of inserted file in Blackboard item
Inserting a file into a content item in Brightspace is very similar to Blackboard. To reuse the file that you saved from Blackboard, in the html editor click on Insert Stuff and navigate to your file (Figure 5 below).
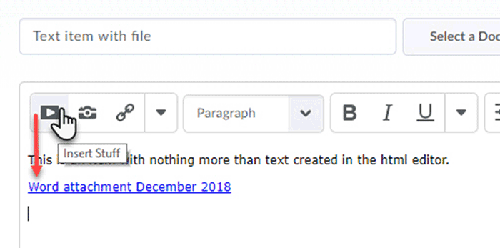
Figure 5: Insert Stuff icon in Brightspace
-
Attachments
In Blackboard, files can also be added as attachments to items by using the Attach Files area of the Item editor (Figure 6). You can source files either from your computer or add them in advance to the Files area of your site.

Figure 6: Blackboard file attachments options
When files are added to Blackboard items by browsing your computer the files are automatically stored in the Files area (Figure 7) of the site. Folders and files can also be added directly into the Files area, without being added to items.
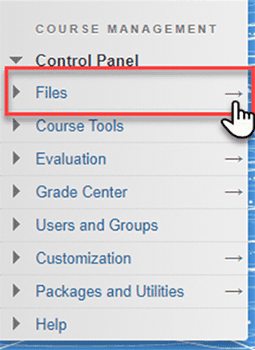
Figure 7: Blackboard Files entry point
In the Files area of a Blackboard site you are free to choose which files and folders you wish to save.
It’s a straight forward process, simply check the boxes to the left of the files and/or folders you want to keep and then click Download Package (Figure 8). The files are saved in a zip file and downloaded to your computer.
Most browsers will have a default download destination. It is advisable to move saved files from this to a more appropriate location.
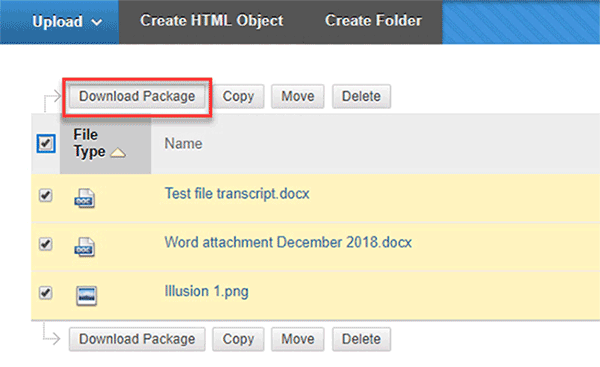
Figure 8: Downloading Files package in Blackboard
Important Note: There is one important thing to note about folders in the file area. Folders offer valuable structure wherever they are used but, oddly, in Blackboard if a folder in the Files area only contains files (and no additional folders) when the downloaded package is unzipped the folders disappear, leaving simply a list of files! However, if you add folders to other folders the entire structure will be retained in the downloaded package, e.g.:
- Folder: ‘2018 Content for use in Brightspace Module X’
- Folder: ‘Selected Announcements’
- ‘Reusable 2018 Announcements.docx’
- Folder: ‘Learning Resources’
- Folder: ‘Week 1’
- File ‘Introduction.pdf’
- Folder: ‘Week 2’
- File: ‘Image 1.jpg’
- File: ‘Reflective activity 1.docx’
- Folder: ‘Week 1’
- Folder: ‘Activities’
- Folder: ‘Selected Announcements’
The following illustrations take you through the process of moving folders into one overarching folder, in order to retain folder structure.
Here we have three folders we want to keep in order to reuse the content in Brightspace (Figure 9):
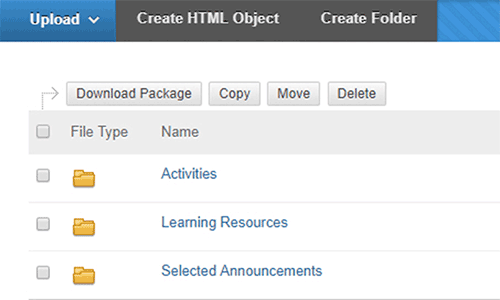
Figure 9: Folders in Blackboard Files area
Before we save them, we need to add an extra folder (using ‘Create Folder’) to move them into (Figure 10):
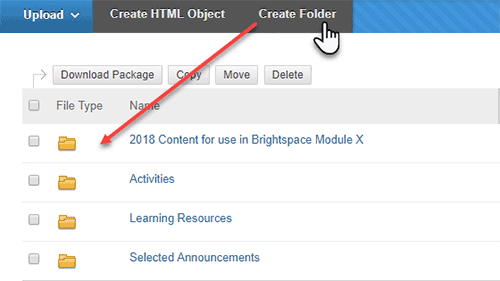
Figure 10: Creating a new folder
To move the original folders into the new overarching folder, select the folders and click Move (Figure 11). Follow the clear instructions to select the right folder to move them into.
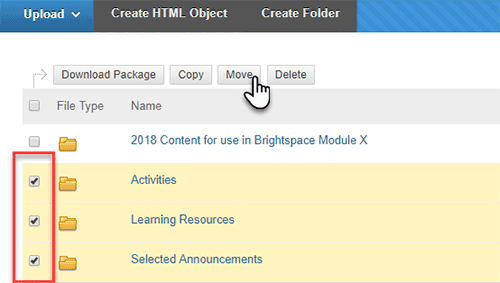
Figure 11: Selecting and moving folders
Finally, select the single overarching folder as the item you wish to download (Figure 12) and click Download Package. The files are saved in a zip file and downloaded to your computer.
Most browsers will have a default download destination. It is advisable to move saved files from this to a more appropriate location.
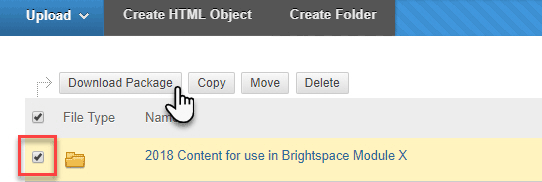
Figure 12: Downloading package file
To upload saved folders or files to Brightspace go to Manage Files (Course Tools > Course Admin > Manage Files) (Figure 13).
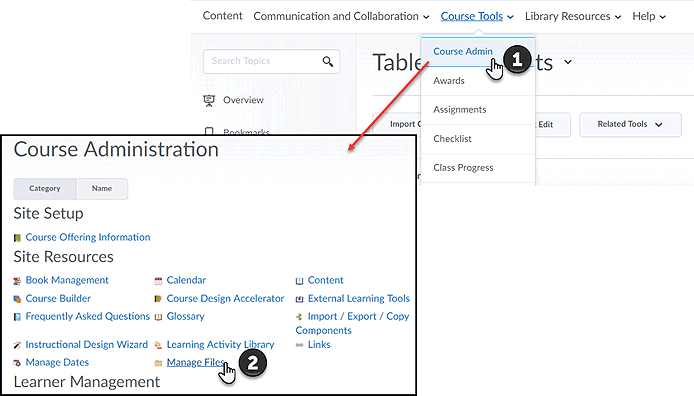
Figure 13: Course Administration panel in Brightspace
Note: You will need to extract any zip packages downloaded from Blackboard before uploading to Brightspace. We would advise you to save your extracted files in a safe location (e.g. your desktop/shared UHI drive).
In Manage Files, select Upload and navigate to the folders or files you wish to bring into Brightspace (Figure 13).

Figure 14: Manage Files - Upload in Brightspace
You will now have access to the content you have uploaded whenever creating content within Brightspace. Via the html editor, for example if using the Insert Stuff or Insert Image icons, select Course Offering Files from the source location options and you will see all of the content you uploaded (Figure 14).

Figure 15: Course Offering Files in Brightspace
- Folder: ‘2018 Content for use in Brightspace Module X’
-
Export/archive course
There is a third option in Blackboard for saving content in order to transfer it from one site (or VLE) to another, this is the Export/Archive Course option. Although technically possible, we would advise against this option for two main reasons:
- Export/Archive Course is a time-consuming multi-step process (both in terms of exporting from Blackboard and importing into Brightspace);
- This option does not allow for individual file choices to be made, if you select Learning resources, you get all the content in Learning resources; if you select Announcements, you get all the Announcements in the unit/module. If you want all this content – you would be much better served selecting migration Option 2, where all exporting and importing is done for you.
Option 1: Request that your existing unit/module is moved into a unit/module sandbox for you.
Option 2
You can request your existing Blackboard resources to be transferred into your new /unit module space. If you feel that you have a solid structure for your content, with tried and tested interactive resources, this may be a good option for you. The vast majority of the content you currently have in Blackboard will come over to Brightspace fully functional and in the same order; however, it is important to note:
- You will need to check every page of teaching content (especially links, as any internal links set up using Blackboard will no longer be active).
- You will need to update anything that bears a specific date (like an announcement) or a due date (like an assignment).
- You will find that some content created with Blackboard’s own tools may come over partially or not at all; again, a thorough check of every item is essential.
- The migrated materials will be the version in Blackboard at end December, you will need to transfer any subsequent versions manually as described in the Option 1 guidance.
Requests for migrated material need to be submitted by 22nd February 2019 in order for the material to be available in Brightspace by the end of March.
Option 2
Request all your existing Blackboard resources to be transferred into your new unit/module space for you.

All efforts have been made to ensure materials created by the EDU comply with current accessibility guidelines (JISC: Support for learners with disabilities).
If further assistance is required with accessibility matters please contact the student support section in your academic partner UHI: Accessing learner support.
Links
Unless otherwise stated all external links will open in a new tab/window
We welcome any comments on how to improve this unit. Please feel free to pass these on at any time.
If you have any difficulty viewing this resource please contact EDU (edu@uhi.ac.uk) with:
- the name of the resource;
- a description of the problem (please give as much detail as possible);
- the section of the resource where the problem occurred;
- your internet browser (you can check your browser version at: http://detectmybrowser.com/).
UHI provides links to external sources of information and may refer to specific Web sites, products, processes or services within this resource. Such references are examples and are not endorsements and whilst every effort is taken to ensure the accuracy of information provided UHI is not responsible for any of the content or guidance. You are advised to exercise caution.
Audio
Video
Reading
Download
Information
External link
Activity
Question
Asterisk
Discussion
Collaboration
Reflection/journal/log
History
Download a copy of this resource in PDF format.
You can also print individual pages by printing directly from the browser.