What this resource is all about

This resource covers...
... an introduction to some of the assessment tools in Brightspace, including...
- the assignments tool
(including how to set up an assignment, how to give feedback, and how to ) - Turnitin®
(including how to set up Turnitin®, how to set up a Turnitin® rubric, and how to mark in Turnitin®) - the Brightspace rubrics tool
(including how to set up a Brightspace rubric and how to mark using a Brightspace rubric) - the Brightspace grades tool
(including how to set up your gradebook using the Setup Wizard)

The Assignments tool
From your homepage, navigate to Course Tools and then Assignments. (Figure 1)
 Figure 1
Once you have entered the Assignments tool, you will be able to create new assignments by clicking on the blue New Assignment button. In addition, you will be able to see all previously created assignments as well as any categories they might be sorted in. You will also see a drop-down menu labeled More Actions. (Figure 2)
 Figure 2
Setting up a new assignment
Once you have clicked on the blue New Assignment button, you will be taken into the assignment editor. On the left of the screen you can add various Assignment details; on the right there are three headings: Availablillity Dates & Conditions, Submission & Completion and Evaluation & Feedback.
See below for further information on these various areas.
Start on the left of the screen (Assignment details) where you can include a name, grade, due date and a set of instructions (Figure 3).

For more information on Ouriginal, the FE and HN originality checker, have a look at our guidance on Ouriginal.
Start by giving your assignment a name. Next, add a figure to the Marks Out Of area (doing this will activate a dropdown list, which asks if you want the assignment to be added to the Grade Book).
Enter a Due Date for your assignment.
We would encourage you to use the Instructions area to provide some instructions to students. You have access to a full html editor here, so you will be able to include a variety of formatting options, add in images, links etc.
If you have instructions in a PDF or Word document, you can also add an attachment via the 'File Upload' button at the foot of this screen. Additionally, you could opt to record audio instructions via the 'Record Audio' button or a video via the 'Record Video' button (Figure 4).

Further customise your assignment by setting start and end dates, as well as bringing in the functionality of Release Conditions and Special Access (Figure 5).
| Start and End dates |
This allows you to select a start date and time at which time the assignment will become visible to users, as well as an end date at which time the assignment will no longer be visible. Notes:
|
| Release Conditions | This allows you to attach an existing or new release condition. This means that students will have to do something else before the assignment becomes visible to them ( See our guide to Release Conditions for further information). |
| Special Access |
This allows you to give special access to users. You will be able to select users from your classlist. This is a useful tool, for example, if you need to extend the due date for individual users. When would I use this feature?When creating an assignment you may have one or more students that require a different due date, for example, those with PLSPs. Use Manage Special Access to give particular students later submission dates* *It is also good practice to have an end date of 10 days after the due date in the event that students apply for mitigating circumstances. |


In the Submission & Completion section of the menu, you can choose what type of assignment you are creating, and what file types you will accept from learners submitting their assignments.
| Assignment Type | Here you can choose whether the assignment will be an individual assignment or a group assignment. Individual assignments are visible to all students in the module. If you have set up groups, though, you can make an assignment available to a group only. |
| Submission Type | Choose from the drop-down menu what type of assignment you would like to create. Your choices are:
|
| Files Allowed Per Submission | This allows you to select whether you would like to allow students one file only or multiple files. |
| Submissions | This allows you to choose which and how many student submissions you would like to keep. |
| Notification Email | If you want, you can enter an email address here to be notified when students submit an assignment. |

Finally, customise your evaluation and feedback options (Figure 8).
| Rubrics | This allows you to attach an existing rubric or to create a rubric that you can attach to the assignment. |
| Learning Objectives | If you have learning objectives set up for your module, you can, by clicking on Manage Learning Objectives, associte particular objectives with your assignment. |
| Annotation Tools |
One of the newest features you can use in the Brightspace Assignments tool, is the annotation tool. This will allow you to annotate student assignments in the Brightspace Assignment viewer. When you set up a new assignment, this feature will be enabled by default, but you can also uncheck the box if you do not wish to use the tool. To learn more about the Brightspace assignment annotation tool, explore the next section in this guide: Giving feedback within the Brightspace Assignment tool. |
| Anonymous Marking |
If you check this box, students will not be identified by name when you are marking. |
| Turnitin Integration |
Click on Manage Turnitin and you can enable a similarity report for the assignment, and/or online grading. For comprehensive guidance on Turnitin, visit pages 8 to 16 of this guide.
|

Giving Feedback within the Brightspace Assignments tool
Once students have submitted assignments, you will be able to see a list of submissions upon clicking on the assignment itself. In this list, you will see the students name (Test, Edu), the submission and file type as well as the submission date and time.
 Figure 9
Once you have clicked on the submission or file you would like to evaluate, you will see the actual submission and a panel on the left that would let you edit the assignment folder, preview the assignment in student view, see the assignment availability dates and any rubrics you might have attached. If you attached rubrics, you can now use them to evaluate the submission.
If you have switched on the annotation tool, you will also see a menu bar for that. For further information on how to use it, familiarise yourself with the information below.
 Figure 10
Scrolling further down in the right-hand side panel, you will also be able to enter the score, see the student preview of the score and add feedback. You can either type your feedback into the HTML editor, add an attachment, record and audio or record a video.
When you are done, you can either hit the blue 'Publish' button which means that the grade will be live and visible for students. You can also hit the 'Save Draft' button which allows you to publish all grades and feedback in bulk later on.
 Figure 11
Marking using the Brightspace assignment submission annotation tool
You will notice that if the annotation tool is enabled for your assignment, you will be able to see an additional toolbar above the assignment preview. (Figure 12)
 Figure 12
You can easily mark up students' submissions using the text highlighting feature - simply select the text you would like to mark up, and select to either highlight, strike through, or underline the selected text. (Figure 13)
 Figure 13
Once you have selected and highlighted / struck through / underlined something, you can change the colour of the highlight / strike through / underlining by clicking on the portion of the text. A menu bar will pop up at the top of the screen which will allow you to change the colour (1) and opacity (2) of the highlight / strike through / underlining. (Figure 14)
 Figure 14
 Figure 15
Aside from highlighting text and then selecting that you would like to highlight / strike through / underline, you can also access the highlighter via the pen icon in the navbar. When you click on the pen icon, you can choose two different types of highlighters - a freehand highlighter (1) and the automatic highlighter (2) which highlights text after you select it. (Figure 15)
If you would like to delete any annotations, stricke through or underlining, simply click on the highlighted / struck through / underlined area, and click on the bin at the right-hand side of the menu bar to delete.(Figure 16)
If you have used the freehand highlighting tool, simply use the eraser to erase your highlighting. (Figure 17)
 Figure 16
 Figure 17
If you would like to use a free hand drawing tool, click on the pen symbol. You can now either stick with the freehand drawing tool (pen; 1) or you can use the freehand highlighter (2) mentioned above. (Figure 18)
 Figure 18
A mentioned above regarding the highlighting / strike through / underlining tools, you can further format your freehand drawing via a pop-up menu (1) which will allow you to change features such as colour, tickness, background colour as well as opacity. You can also use the bin on the right-hand side of this menu to delete the freehand annotation from the document. Within the text, you will also be able to move and resize your annotation. Simply click on the annotation when you are finished creating it. A frame (2) will appear around the annotation which will allow you to resize and move around your annotation. (Figure 19)
 Figure 19
Use the notes function to add collapsable notes to submissions. To do this, select the notes tool from the menu. (Figure 20)
 Figure 20
You will now be able to add differently coloured notes to the submission. In addition to changing the display colour of the notes, you will also be able to use different shapes to show students there is a note. This means you could for instance use a checkmark or star note to highlight something a student did well (1) and a questionmark note to ask a student a question or suggest a revision (2). (Figure 21)
To add a note simply click anywhere on the page. This will add the note. You can now enter text (1). Clicking anywhere else on the screen will collapse the note and you will just see the symbol you chose for your note, in our example the questionmark (2). (Figure 21)
 Figure 21
Just as freehand annotations, notes can be dragged anywhere you would like them to be. Simply click on the note icon and drag it to a different place in the document if you need to do so.
Similar to the other types of annotations, you can delete your note at any time by clicking on the bin icon on the right-hand side of the menu. (Figure 22)
 Figure 22
If you would like to add shorter comments that will permanently appear in the document, use the text annotation function. To do this, select the text tool from the menu. (Figure 23)
 Figure 23
You will now be able to add text comments to the submission. To add text simply click anywhere on the page. This will add a text space. You can now enter text. Once you have added the text to the text box and click out of the box, you will be able to resize it and move it around, just like the freehand annotations. In addition, you can add the text annotation menu to change the text and background colour, the opacity, font, font size, and alignment. To delete your text comment, simply click on the bin in the right-hand corner of the menu. (Figure 24)
 Figure 24
In addition to highlighting, striking through, underlining as well as adding notes and texts, you can also add shapes to your annotations. To do this, click on the shapes tool on the menu. (Figure 25)
You will now be able to select which type of shape you would like to insert.
 Figure 25
 in an annotated text and further customisation options via the menu bar at the top of the annotation page") Figure 26
Figure 26
Students should first access their assignment by clicking on the Course Tools drop-down menu in the Navbar, and selecting Assignments. (Figure 27)
 Figure 27
Once students are in the assignment tool, they should see their assignment(s). In the column Evaluation Status, they should see that they have unread feedback. To access the feedback, they should click on the blue Unread link. (Figure 28)
 Figure 28
This will take them to the feedback area for their assignment. To see their marked up and annotated submission, they should click on View Inline Feedback. (Figure 29)
 Figure 29
Students will now see their marked up and annotated document, which they can download and print. Students will see all your annotations and can also read the notes by hovering over the note symbols. (Figure 30)
 Figure 30
Turnitin®
-
can be used to perform originality checks on students' assignments
-
can be used to evaluate students' submissions using QuickMarks® and rubrics/grading forms
-
can be set up so marks generated in Turnitin® automatically sync as draft into the assignments tool and gradebook in Brightspace
Before you start using Turnitin®
For more information on Urkund, the FE and HN originality checker, have a look at our staff guidance on Urkund, as well as our Ouriginal Student Guide.
Linking an assignment in Brightspace to Turnitin®
When you set up an assignment, you will see four tabs in the assignment set up wizard. The first two were already covered in the assignments section of this resource.
To link your assignment to Turnitin®, navigate to the last tab on the right labeled Turnitin®. Once you are there, you will be able to enable the Turnitin® originality checker as well as Turnitin® GradeMark® which will allow you to attach a Turnitin® rubric to your assignment and grade it in the Turnitin® feedback studio. (Figure 31)
 Figure 31
Please note as well that you should only use Turnitin® in teaching spaces and not in Sandboxes.
Once you have enabled Turnitin® GradeMark®, you will be able to determine whether you would like grades in Turnitin® to sync automatically as a draft to Brightspace or whether you would like to sync Turnitin® grades manually as draft in Brightspace.
If you have linked the assignment to a grade item and choose the first option, a grade from Turnitin® will automatically saved as draft in Brightspace. This means that once you are done marking all assignments in Turnitin®, you will only need to release the grades to students afterwards. If you decide for option number two, you would have the added step of having to first sync all grades from Turnitin® into Brightspace and then releasing them to students. (Figure 32)
 Figure 32
Once you have enabled the Turnitin® Originality Check®, you will be able to determine what will be displayed to students as well as whether or not you would like an originality check to be performed on all submissions or just individual submissions. (Figure 33) If you choose for students to be able to see their Turnitin® similarity scores, students will see the following once they have submitted their assignment and have clicked on 'Submitted' in their assignment view:
 Figure 34
You as the instructor will see the following:
 Figure 35
Once you have graded the assignment, you will also be able to see the score where at the moment it says 'No Score'.
 Figure 33
For more information on how your students will use Turnitin®, have a look at our Turintin® Student Guide.
Optional settings for Turnitin®
Once you have enabled the Turnitin® GradeMark® and Originality Check®, click on the 'More Options' button to customise your settings further. In this step, you will also be able to create and/or attach a rubric. (Figure 36)
 Figure 36
Once you have clicked on the 'More Options' button, a new window will open for you. Initially, you will be able to see the title of your assignments and the max grade which are both taken from the assignments tool. You will also see a button that says 'Optional settings'. Click on the button to customise your assignment further. (Figure 37)
 Figure 37
Submission settings (Figure 38)
| Repository | Here, you can choose which repository you would like submissions to be stored in. If you select 'Standard paper repository', papers will be stored and can be used for similarlity checks in the future. If you select for your paper not to be stored, an initial similarity report wil be generated but the paper will not be stored and available for any future similarity comparisons. |
| File type | [check what will happen if this is unchecked] |
| Late submissions | This option cannot be customised in Turnitin® as it is one that can be customised in the Brightspace assignment set-up wizard. If you have selected this option there, it will be automatically checked here and vice versa. |
| Anonymous marking | This option cannot be customised in Turnitin® as it is one that can be customised in the Brightspace assignment set-up wizard. If you have selected this option there, it will be automatically checked here and vice versa. |
| Rubrics | Here, you can choose to attach a rubric to your assignment. You can either choose from your existing rubrics or can launch the rubric manager to create a new rubric. |
 Figure 38
Compare against (Figure 39)
This area allows you to customise what you would like to compare student submissions agains.
 Figure 39
| When will reports be generated? |
There are three options when reports will be generated.
|
| Visibility of Similarty Report to students | This option cannot be customised hre as it is one that can be customised in the Brightspace assignment set-up wizard in the Turnitin® tab. If you have selected this option there, it will be automatically checked here and vice versa. |
| Exclude bibliographic materials | This means that bibliographies are excluded from the similarity check. |
| Exclude quoted materials | This means that quotes won't factor into the similarity report. (This can be overridden for individual submissions.) |
| Exclude small sources | If you check this box, you can determine a number of words or percentage that will be automatically excluded from the similarity reports. |
 Figure 40
If you check this box, your settings will be saved for the future. (Figure 41)
 Figure 41
Setting up a rubric or grading form in Turnitin®
If you would like to create and/or attach a rubric or grading form to your assignment, check the box next to 'Attach a rubric' under 'Submission settings' and click on the blue 'Launch Rubric Manager' button. (Figure 42)
 Figure 42
This will take you to the Turnitin® rubric manager (opens in a new window). If you already have rubrics and grading forms in the manager, you will be taken to the first on your list. If not, you will be able to create a new rubric or grading form.
If you are taken to a previous rubric or grading form, or to see the rubric manager options, click on the list button on the top left-hand side.
From there, you will be able to create a new rubric (analytic rubric) or grading from (holistic rubric). You can also duplicate previously created rubrics or grading form, rename them or delete them.
(Figure 43)
Note: You can only delete rubrics or grading form that have not yet been used for marking an assignment.
 Figure 43
Rubrics in Turnitin®
Within Turnitin®, there are different types of analytic rubrics that you can create.
- Weighted rubrics (weight each criterion)
- Custom points rubrics (enter custom points for each scale)
- Qualitative rubrics (no grade is assigned, there is only text based feedback)
To start, launch the rubric manager menu and select 'Create new rubric' from the menu. (Figure 44)
 Figure 44
Here, you will find a brief explanation of what you will see when you start creating a rubric. (Figure 45)
- Start by giving your rubric a name.
- The + sign next to criteria and scales will allow you to add additional criteria and scales.
- This is where you can change the weight of each criterion in weighted rubrics. By clicking on the individual criteria, i.e., 'Criterion 1', you will also be able to rename them.
- This is where you can edit the scales. Click on the individual scales, i.e., 'Scale 1', to edit the scale name. Click on the point value in the top right-hand corner to edit the value of each scale. Click on the boxes below the scales to edit the description/feedback.
- Here, you can choose the type of rubric you would like to create - weighted rubric (%), custom points rubric or qualitative/text only rubric (0).
- When you are done, click save.
 Figure 45
Here, you will find a brief explanation of the components of a weighted rubric. This is usually the default that comes up when you create a new rubric.
If not, click on the percentage symbol on the bottom of the screen next to Rubric Scoring. (Figure 46)
 Figure 46
- Start by giving your rubric a name.
- Next, determine the criteria you would like to evaluate and how much each will be worth.
Note: Once you have entered the criterion names, you can also provide short explanations for each criterion by clicking on the field below the criterion name. This comes in especially handy when your criteria are more elaborate since each criterion name can only be 12 characters long. - Next, determine the scale names and how much each scale will be worth.
- Provide a short description/feedback to indicate what students will have to do to achieve a certain scale for any of the criteria.
- When you are done, click on 'Save'.
 Figure 47
Once you are done and have saved your rubric, you can go to back to your previous Turnitin® optional settings window and can select your rubric to be attached to your assignment. Now you will be able to use this rubric to mark students assignment in the Turnitin® Feedback Studio. (Figure 48)
 Figure 48
Here, you will find a brief explanation of the components of a custom points rubric. To start creating a custom points rubric, click on the pen and paper symbol on the bottom of the screen next to Rubric Scoring. (Figure 49)
 Figure 49
- Start by giving your rubric a name.
- Next, determine the criteria you would like to evaluate.
Note: Once you have entered the criterion names, you can also provide short explanations for each criterion by clicking on the field below the criterion name. This comes in especially handy when your criteria are more elaborate since each criterion name can only be 12 characters long. - Next, determine the scale names.
- Provide a short description/feedback to indicate what students will have to do to achieve a certain scale for any of the criteria. This area is also where you can enter your custom point values for each scale and criteria.
- When you are done, click on 'Save'.
 Figure 50
Once you are done and have saved your rubric, you can go to back to your previous Turnitin® optional settings window and can select your rubric to be attached to your assignment. Now you will be able to use this rubric to mark students assignment in the Turnitin® Feedback Studio. (Figure 51)
 Figure 51
Here, you will find a brief explanation of the components of a qualitative rubric. To start creating a qualitative rubric, click on the '0' on the bottom of the screen next to Rubric Scoring. (Figure 52)
 Figure 52
- Start by giving your rubric a name.
- Next, determine the criteria you would like to evaluate.
Note: Once you have entered the criterion names, you can also provide short explanations for each criterion by clicking on the field below the criterion name. This comes in especially handy when your criteria are more elaborate since each criterion name can only be 12 characters long. - Next, determine the scale names.
- Provide a short description/feedback to indicate what students will have to do to achieve a certain scale for any of the criteria.
- When you are done, click on 'Save'.
 Figure 53
Once you are done and have saved your rubric, you can go to back to your previous Turnitin® optional settings window and can select your rubric to be attached to your assignment. Now you will be able to use this rubric to mark students assignment in the Turnitin® Feedback Studio. (Figure 54)
 Figure 54
Grading forms in Turnitin®
Within Turnitin®, you can also create a grading form or holistic rubric.
To start, launch the rubric manager menu and select 'Create new grading form' from the menu.
 Figure 55
- Start by giving your grading form a name.
- Next, enter your criteria and a short description for the crieria.
- Use the big + button on the bottom of the page to add further criteria.
- If you would like to be able to enter scores for the criteria when you mark the assignment, enable scoring in the bottom left-hand corner of the page.
- Once you are done, click 'Save' in the bottom right-hand corner.
 Figure 56
To attach the grading form to a Turnitin® assignment, select it from the list of rubrics in the 'Optional Settings' pop-up window. (Figure 57)
 Figure 57
Marking in Turnitin® - General
Once students have submitted an assignment that's linked to Turnitin®, you will be able to evaluate it via the Brightspace assignment tool.
To access the assignment tool, select Assignments from the Course Tools drop-down menu in the navbar. (Figure 58)
 Figure 58
Once you are in the assignment tool, you will be able to access all assignment submission folders set up for the module/unit.
Click on any of the submission folders to evaluate student submissions to that folder.
(Figure 59)
 Figure 59
Once you have entered an assignment folder that is linked to Turnitin®, you will be able to see a list of submissions. For each student, you will be able to see the following information about the submissions:
- Name of the student, assignment (inlcuding name, type and size)
- Turnitin® similarity report
- Turnitin® GradeMark area® (including whether there is a score and feedback, a pen symbol that will take you straight to the Turnitin® Feedback Studio, and an arrow symbol to refresh any mark that might not have synced)
- Date and time of submission
(Figure 60)
 Figure 60
To mark an assignment in Turnitin®, you can either click on the pen symbol in submission view... (Figure 61)
... or on the link 'Launch Turnitin®' when you are viewing a submission. (Figure 62)
 Figure 61
 Figure 62
When you first enter the Turnitin® Feedback Studio, you will see the following:
- Student name and assignment name
- Overall score for the current student
- Toggle through multiple submissions/students
- Feedback area and similarity details:
any of the blue buttons have to do with assessment and feedback, any of the red buttons have to do with similarity
(Figure 63)
 Figure 63
Turnitin® QuickMarks
If you navigate to the first button (checkmark button) in the blue assessment and feedback area, you will get to the Turnitin® QuickMarks. These are designed to help you give feedback quicker. From the drop-down menu, you will be able to select tag lists to make looking for a the appropriate QuickMark quicker. There is also a screw that will let you edit and add QuickMarks. (Figure 64)
") Figure 64
Figure 64
Once you have clicked on the screw, a new window will open where you can see a list of existing QuickMarks (2). When you click on an existing QuickMark, you can see a description of what the QuickMark means. You can also see which sets or lists it already belongs too, or you could add it to a new set (3). In the QuickMarks editor, you can also add your own QuickMarks. Simply click on the '+' symbol (1) and add your QuickMark name, description and set affiliation. (Figure 65)
 Figure 65
Turnitin® Fedback Summary
If you navigate to the next button (pen and notepad button) in the blue assessment and feedback area, you will get to the Turnitin® Feedback Summary area. Here, you can add overall feedback to the student's submission. This feedback can either be a voice or a text comment. (Figure 66)
 Figure 66
Turnitin® Rubric
If you navigate to the last button (grid button) in the blue assessment and feedback area, you will get to the Turnitin® Rubric area. Here, you will be able to mark the submission with your previously attached rubric (in this case, a custom points rubric). Using the sliding scales, you will be able to determine how many points the student will get for each criterion (3). Below the sliding scales, you will also be able to see description for all the scales and criterion combinations (4). The overall student mark will update automatically in the grade area (1) and can be applied to the gradebook by pressing the blue 'Apply to Grade' button. (Figure 67)
 Figure 67
Alternatively, you can have a look at the rubric as a whole by clicking on the expand button next to the rubric title. This will open up the rubric in a new window. (Figure 68)
 Figure 68
Once the rubric has opened in a new window, simply select the scale for each criterion by clicking on the correct description/feedback (1). Once you have selected a scale, the field will turn a light blue which indicates that your choice has been recorded. When you are done marking the assignment, click on the 'Apply to Grade' button and then the 'Close' button (2). (Figure 69)
 Figure 69
Your feedback has now been recorded. You will see that the sliding scales will have adjusted and reflect your selection (2). Additionally, the score will have been updated to reflect the student's overall mark (1). (Figure 70)
 Figure 70
Aside from just being able to mark students' assignments and providing overall audio or written feedback, you can also annotate students' assignments and give them more specific feedback that way. To do so, highlight a word or phrase. Once you have done so, a little black bar will pop up from which you can select what you would like to do. Select the check mark button to add a QuickMark (see above) to the highlighted section. Select the speech bubble button to add a custom comment yourself. Or select the strike through button to strike the highlighted word or phrase. (Figure 71)
 Figure 71
Once you are done with your detailed marking and feedback, you can either use the sliding scales of your rubric to mark the assignment (1) or you can expand the rubric and mark the assignment that way (see above). The grade will automatically update and once your are done, you will just have to confirm the grade by clicking on the 'Apply to Grade' button (3). Once you have done so, the grade will also appear on the top (4) and can be synced into Brightspace as a draft. (Figure 72)
 Figure 72
Once you are done marking in the Turnitin® Feedback Studio, you can close it and return to the Brightspace assignment submission area. If you look at a student assignment now, you will be able to see that the grade from Turnitin® mark has been synced to Brightspace (if you set up for the mark to be synced automatically). You can now add further feedback, or hit the 'Publish' or 'Save Draft' button. (Figure 73)
 Figure 73
When you are back in the assignment submission area where you can see a list of submissions, you will notice that the displayed information has now changed. You are now able to see that in Turnitin® Grademark®, there is now a grade as well as a symbol for feedback (1). You can also see that any grade or feedback has been saved as draft (2). Once you publish the grade an feedback, this will change to published. (Figure 74)
 Figure 74
Marking in Turnitin® with different types of rubrics and grading sheets
Depending on what type of rubric or grading form you attached to a submission folder via Turnitin®, marking will look somewhat different for you.
If you use a weighted rubric, you will be able to see sliding scales which include the point values specified when the rubric was set up (1). Below, there will be explanations for the different scales within each criteria (2). The total of the score from the sliding scales will be visible at the top and can be applied to the grade (3). (Figure 75)
 Figure 75
If you use a custom points rubric, you will be able to see sliding scales which include the custom point values specified when the rubric was set up (1). Below, there will be explanations for the different scales within each criteria (2). The total of the score from the sliding scales will be visible at the top and can be applied to the grade (3). (Figure 76)
 Figure 76
If you use a qualitative rubric, you will be able to see sliding scales which you can drag to match the different scales you determined when you created the rubric (1). Below, there will be explanations for the different scales within each criteria (2). Since this rubric does not have point values attached to any of the scales, there is no overall score or 'Apply to Grade' button at the top. (Figure 77)
 Figure 77
If you use a grading sheet with scoring, you will see the name of your criterion, a comment box below where you can enter feedback, and a box next to the criterion name where you can enter a score (1). The scores entered in these boxes, will then be automatically updates at the top and can be applied to the grade (3). On the bottom, there will be explanations for the different criteria which you determined when you set up the rubric (2). (Figure 78)
 Figure 78
If you use a grading sheet without scoring, you will see the name of your criterion, and a comment box below where you can enter feedback (1). On the bottom, there will be explanations for the different criteria which you determined when you set up the rubric (2). Since this grading sheet does not have the option for entering a score attached to any of the criteria, there is no overall score or 'Apply to Grade' button at the top. (Figure 79)
 Figure 79
The Rubrics Tool
From your homepage, navigate to Course Tools and then to Course Admin. (Figure 80)
 Figure 80
Once you are in the Course Admin area, select the rubrics tool from the menu. If you have your Course Admin area set up to be sorted by category, the rubrics tool will be one of the assessment tools. (Figure 81)
 Figure 81
Once you have entered the Rubrics tool, you will be able to see a blue New Rubric button.
You will also see a search field that can help you look for a particular rubric.
Once you have created rubrics, you will see a list of them below the search field.
(Figure 82)
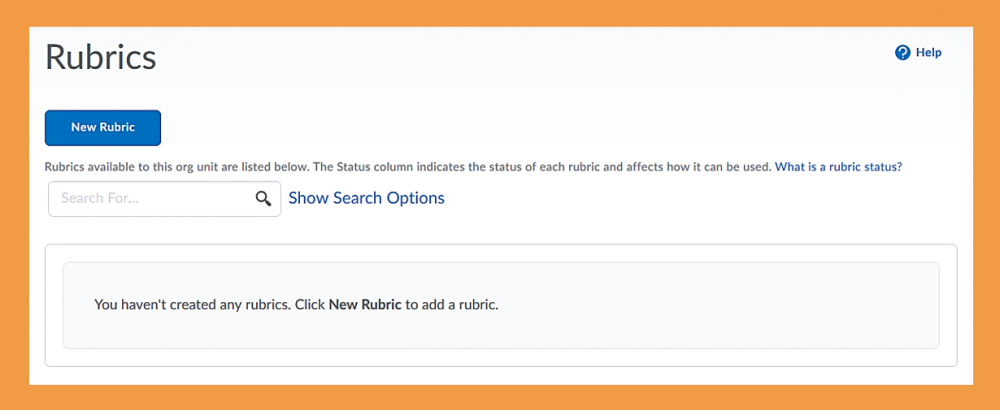 Figure 82
Setting up a new analytic rubric
To set up a new analytic rubric, start by clicking on the blue New Rubric button. This will open the rubric editor for you. (Figure 83)
 Figure 83
When you first get into the rubric editor, you will see a default analytic rubric which is scored on points. You will later be able to change that using the Type and Scoring drop-down menus (2).
On the top of the page, you can see the status of your rubric which is Published by default. As with content items in Brightspace, you can change this status to Draft, though. Next to the status information, you will be able to check the saving status of your rubric. The Brightspace rubric tool automatically saves all changes you make to it. (1)
Most of the page is taken up by the actual rubric. You will be able to edit level and criteria names, point values as well as criteria descriptions and feedback.
Finally, toward the bottom of the page, there is an options menu which will be explained in detail further down (3).
(Figure 84)
 Figure 84
As mentioned above, new rubrics will be analytic rubrics by default, so there is no need for you to change the rubric type. Depending on what kind of analytic rubric you would like to create, you might want to change the scoring method, though. You have the choice between:
- No score (= qualitative rubric for feedback purposes only)
- Points (all levels for all criteria are worth the same amount of points)
- Custom points (you can customise the point value of the levels for each criterion)
If you want to create an analytic rubric with ranges, use the custom points scoring method and see the instructions below.
(Figure 85)
 Figure 85
Once you have selected your scoring method, you can start creating the rubric. The rubric on the right-hand side is an analytic points rubric.
- Give your rubric a name.
- Label the levels and enter the point value for each level.
- Enter the name as well as any possible description for the criteria.
- Enter the generic level/criteria performance description.
- Enter the generic level/criteria feedback.
- Use the waffle icons on the left-hand side to drag and drop criteria to different places within the rubric.
- Use the Add Criterion button on the bottom to add further criteria.
- The total on the bottom will update when you change the points values, and add/remove criteria.
(Figure 86)
 Figure 86
Alternatively, you can also work with criteria group. To do so, click on the Add Criteria Group button below the current group of criteria. (Figure 87)
 Figure 87
Criteria groups allow you to create a broader category, such as Content and Language (1), and then add criteria that are part of that category (2).
The points value of the levels for each criteria group or category can be the same or you could choose to weigh one criteria group / category more heavily by raising the points value for its levels. (Figure 88)
 Figure 88
On the bottom of the screen, you will see a separate section called Overall Score. Simply change the level names and provide the minimum percentage needed to reach the levels (1). You can also add some overall feedback for each level in the box below the minimum percentage needed to reach the level (2). (Figure 89)
 Figure 89
Under Options, you will be able to customise the visibility of and availability of your rubric. (Figure 90)
- Rubric visibility: You can choose whether a rubric should be visible to students, hidden from them, or only released to them once feedback is published.
- Score visibility: If you choose to hide the score, students will be able to see the rubric and any feedback from the rubric but will not see any points.
- Description: Entering a description here, might make it easier for you to find a specific rubric, especially if you use many rubrics.
- Advanced Availability: Allowing new associations of a rubric with competencies and/or the ePortfolio means that you can use rubrics to evaluate competencies and that students can attach rubrics to ePortfolio items that they might want to share with you.
Note:
Leave Competencies checked to be able to associate rubrics with assignments.
 Figure 90
Once you finished setting up your rubric, you will only need to click on the Close button at the bottom of the page. Remember that all changes were saved by the system as you were working on the rubric. (Figure 91)
 Figure 91
If you would like to set up an analytic weighted rubric with ranges, you will need to set up an analytic custom point rubric.
Start by changing the scoring method to Custom Points (1). You will now have the option to enter different point values for the levels of each criterion (2). (Figure 92)
For more information on how to customise your weighted rubric with ranges, see this guidance. Here, you will also find a calculator that can help you figure out the point equivalent for different percentages.
 Figure 92
When you have set up all the levels for your criteria, you will need to edit the overall score again. Simply change the level names and provide the minimum percentage needed to reach the levels. (Figure 93)
 Figure 93
Setting up a new holistic rubric
To set up a new analytic rubric, start by clicking on the blue New Rubric button. This will open the rubric editor for you. (Figure 94)
Figure 94
When you first get into the rubric editor, you will see a default analytic rubric which is scored on points. You will later be able to change that using the Type and Scoring drop-down menus (2).
On the top of the page, you can see the status of your rubric which is Published by default. As with content items in Brightspace, you can change this status to Draft, though. Next to the status information, you will be able to check the saving status of your rubric. The Brightspace rubric tool automatically saves all changes you make to it. (1)
Most of the page is taken up by the actual rubric. You will be able to edit level and criteria names, point values as well as criteria descriptions and feedback.
Finally, toward the bottom of the page, there is an options menu which will be explained in detail further down.
(Figure 95)
Figure 95
To set up a holistic rubric, you will first need to change the rubric type from 'Analytic' to 'Holistic'. (Figure 96)
 Figure 96
This will change the scoring options. You can choose between:
- No Score (= qualitative rubric for feedback purposes only)
- Percentage (this allows you to pick a level and students will receive a certain percentage for their work)
(Figure 97)
 Figure 97
To set up your rubric, you should:
- Give your rubric a name.
- Label the levels and enter the percentage value for each level.
- Enter the generic level/criteria specific feedback.
(Fogure 98)
 Figure 98
Under Options, you will be able to customise the visibility of and availability of your rubric. (Figure 99)
- Rubric visibility: You can choose whether a rubric should be visible to students, hidden from them, or only released to them once feedback is published.
- Score visibility: If you choose to hide the score, students will be able to see the rubric and any feedback from the rubric but will not see any points.
- Description: Entering a description here, might make it easier for you to find a specific rubric, especially if you use many rubrics.
- Advanced Availability: Allowing new associations of a rubric with competencies and/or the ePortfolio means that you can use rubrics to evaluate competencies and that students can attach rubrics to ePortfolio items that they might want to share with you.
Note:
Leave Competencies checked to be able to associate rubrics with assignments.
 Figure 99
Once you finished setting up your rubric, you will only need to click on the Close button at the bottom of the page. Remember that all changes were saved by the system as you were working on the rubric. (Figure 100)
 Figure 100
Marking with a Brightspace rubric
To mark with a Brightspace rubric, you need to attach the rubric to the assignment when you set it up.
Once students have submitted their assignments, open one of them. You will see the submission preview as well as the assessment and feedback area on the right-hand side. Under Evaluation and Feedback, you will see the rubric that is attached to the assignment folder.
Click on the rubric which will open for you in a pop-up window.
(Figure 101)
 Figure 101
Once the rubric has opened, you can choose which level the student achieved for the different criteria (1). If you are marking on a rubric with ranges and would like to customise the amount of points a student will receive, click on the last box in each criterion's row (2). You will now be able to customise the score for this criterion. The score on the bottom of the page will automatically adjust as you adjust the level score. Any changes to the score will furthermore be autosaved to the system. To add custom feedback, click on the Add Feedback link below each of the criteria names and/or descriptions (3). (Figure 102)
 Figure 102
You will now be able to see the initial/generic feedback you provided when you set up your rubric (1), but will also be able to add customised feedback for the student (2). (Figure 103)
 Figure 103
Finish marking the rest of the criteria, edit the scores if needed and leave further feedback. When you are done, click the blue Close button on the bottom of the page. (Figure 104)
 Figure 104
You will now see the overall score you generated with the rubric is reflected in the assessment area next to the assignment preview. You can now add further overall feedback, save the mark and feedback as draft, or publish it to the student. (Figure 105)
 Figure 105
The Grades tool
From your homepage, navigate to Course Tools and then Quizzes. (Figure 106)
 Figure 106
Once you have entered the Grades tool, you will be able to set up your grade book, monitor students' grades and create new grade items. On the top of the page, you can see four tabs. The 'Enter Grades' tab allows you to enter and monitor student grades. This is also where you can create an Excel sheet or a CVS document. The 'Manage Grades' tab allows you to create new grade items and categories. The 'Schemes' tab allows you to create new grade schemes. The grade book already has a preset percentage scheme but you can add other, such as Pass/Fail, etc. The 'Setup Wizard' tab helps you to set up your grade book. (Figure 107)
 Figure 107
The Manage Grades area
The 'Manage Grades' area gives you an overview of all your grade categories and items. When you select the blue 'New' drop-down menu, you can also create new grade categories or grade items. Grade categories appear in grey in the table while grade items have a white background. You can also see the grade item type, any associations and the max amount of points. (Figure 108)
 Figure 108
Grade Schemes
In the 'Grade Schemes' area, you are able to create new grade schemes. The grade book comes preconfigured with a percentage grade scheme. If you click on 'New Scheme', you can create your own. Any schemes you set up yourself will display under 'Course Schemes'. (Figure 109)
 Figure 109
To set up your own grade scheme, click on the blue 'New Scheme' button. Once the grade scheme editor opens, give your new scheme a name. Afterwards, you need to determine the ranges. Start by adding the so called 'Grade Scheme Symbols'. In my case, they are Pass and Fail, but they could also be other text grades or letter grades. Next edit the 'Start %'. For the lowest level, the start percentage will be set to 0%. When setting up my grade scheme, I determined that students will start receiving a Pass if they have achieved 70%. Next, you can add colours to give students a visual clue for their grade. Then, in 'Assigned Value %' list the upper cut off percentage for your ranges.
When you are done, hit the blue 'Save and Close' button.
(Figure 110)
 Figure 110
Setting up your grade book - the Setup Wizard
The grade book setup wizard help you in 7 easy steps to set up your grade book.
When you enter the grades tool for the first time, you will be directed to the Grades Setup Wizard.
Brightspace also comes with a preconfigured grade book which is what you will see when you first go into the Grades Setup Wizard.
To customise your gradebook, click on the blue 'Start' button.
(Figure 111)
 Figure 111
In Step 1, you have to chose your grading system. Most commonly, this will either be weighted or in points. (see Figure 112 for examples)
 Figure 112
In Step 2, you can choose whether you want to release the Calculated or the Adjusted Final Grade. You can also tick a box to automatically release the final grade. (Figure 113)
 Figure 113
In Step 3,you will first be able to choose what will happen to your ungraded items. You can either drop all ungraded items or tream them as 0. Dropping all ungraded items means that the final calculated grade actually reflects the students grade at a certain point in the semester. If ungraded items are treated as 0, all existing grade items will be factored into the calculation of the final grade. In Step 3, you can also select once again to keep the final grade automatically updated. (Figure 114)
 Figure 114
In Step 4,you will be able to choose your default grade scheme which enables you to organize users’ performances on grade items into levels of achievement. The grade book comes with a preset percentage grade scheme, but you can also select any other grade scheme you have created. (Note: You will still be able to change the grade scheme for individual items when you are setting them up or are editing them.) (Figure 115)
 Figure 115
In Step 5, you will chose the number of decimal places to display with grade items. This is especially important if you have a point or percentage grade scheme. (Figure 116)
 Figure 116
In Step 6, you are able to select what will be displayed to students. Selecting the 'Points grade' checkbox means that the points for individual assignments or quizzes will be displayed in the grade book. By selecting the 'Grade scheme symbol' and 'Grade scheme colour' boxes, students will for instance see the Pass/Fail grade scheme symbols as well as the colours associated with each. You can now also select how many decimals should be displayed to students. Another option for customisation is to change the 'Number of characters to display for text items'. This is really about grade item names, and usually 50 characters is perfectly adequate. Finally, you can choose if students should see the final grade calculation or not. (Figure 117)
 Figure 117
In Step 7, Brightspace provides a summary of your grade book setup. To save all changes and finish setting up your gradebook, hit the blue 'Finish' button. (Figure 118)
 Figure 118
How the tools work together
If you have linked your assignment to a grade item, any score you enter in the 'Score out of' box when evaluating the assignment, will also be released into the gradebook once you publish the assignment results in the assignment area. When setting up your assignment and grade item, we therefore recommend that the point value you enter in the 'Score out of box' in assignments and the 'Max Points' when setting up your grade item match. With marks both in the assignment area and the gradebook, students can go both into their submission as well as the grades tool to see their result (provided the grade item is visible to them and not hidden). If you decide to provide feedback in the assignments area, this feedback will, however, only be available to students via their submission and not in the gradebook. The only things that gets transferred out of the assignments area to the gradebook is the mark itself.
When it comes to using rubrics, you can choose to use Brightspace rubrics, or, if you are marking and annotating in Turnitin® anyways, you can also use Turnitin® rubrics. As this guide showed in the Turnitin® and Brightspace rubrics sections above, both rubric tools are completely independent from each other and do not interact. Whichever rubric you ultimately go for, however, students will be able to see rubrics results by going into their submission once feedback has been published. There, they will see your marked Brightspace rubric with any feedback, or they can go into the Turnitin® feedback studio to see evaluations via Turnitin® rubrics there.
If you mark using a rubric in Turnitin®, you can opt to have the mark from the Turnitin® feedback studio synced as draft into Brightspace. All you will have to do is to publish the marks that were synced into Brightspace so students can access them as well as their feedback.
If you mark using a Brightspace rubric, selecting and potentially editing the score of our level and criteria will automatically compute a score which will then appear with the submission in Brightspace. All you will have to do is publish the mark and any feedback you might have to students.
If you want students to have a one-stop-shop where they see their mark and any feedback, we recommend that you point them back to the assignments tool, as this is where all tools are connecting and where all the feedback you provided to students will be displayed.