Introduction
Asking students to work in groups online is an ideal way to help them develop a wide variety of UHI Graduate Attributes (including but not restricted to: Problem solving, Written communication, Taking initiative, and Giving and receiving feedback effectively). Brightspace allows you to set up groups in a variety of ways.
This guide illustrates the general process of creating groups, then touches on some use cases that you might want to try out:
- Group assignments (inc. marking)
- Group discussions
- Group file exchange
Official guidance

Through the D2L Brightspace Community, D2L offer a wide variety of guidance to a wide variety of user groups (HIgher Ed, K-12 (i.e. schools) and Corporate). When it comes to the Groups tool, they have clearly illustrated information under the banner of Create group work areas for learners. The information on that page is separated into topics, such as: Create categories and groups.
Groups also pops up in other sections of D2L's guidance - you'll find links to that in the pages that follow.
Five reasons why you might want to use group tasks with your students
-
They promote collaboration and teamwork: Well-facilitated group tasks can provide students with opportunities to work collaboratively, fostering teamwork and interpersonal skills. In the professional world, people often need to collaborate on projects, and group tasks could help your students develop these crucial skills early on.
-
They enhance critical thinking and problem-solving: Working in a group can require students to analyse information, discuss different perspectives, and collectively solve problems. To stimulate critical thinking consider how you might get your students to engage in discussions, consider alternative viewpoints, and find innovative solutions.
-
They encourage a diversity of perspectives: Potentially, group tasks can bring together students with diverse backgrounds, experiences, and perspectives. This diversity can enriches discussions and approaches to problem-solving. Again, when designig your tasks, think how you will encourage students to consider different viewpoints.
-
They develop communication skills: Group tasks necessitate effective communication among team members. Be explciit about the roles you need the students to take on (you can also get them to switch around). Make clear what you expect of them, what successful participation looks like - and be prepared to get involved, especially early on. Being able to articulate ideas, listen to others, and express themselves clearly are invaluable skills in both academic and professional settings.
-
They can pepare for real-world challenges: In many professions, individuals are required to work in teams to achieve common goals. Group tasks that simulate real-world scenarios, can help prepare your students for the collaborative nature of the workplace.
How to set up groups in Brightspace
There are several steps to this process, and choices along the way - but Brightspace does a good job of signposting.
When you are in your Brightspace module/unit area, select ‘Groups’ from the drop-down menu ‘Communication and Collaboration’.
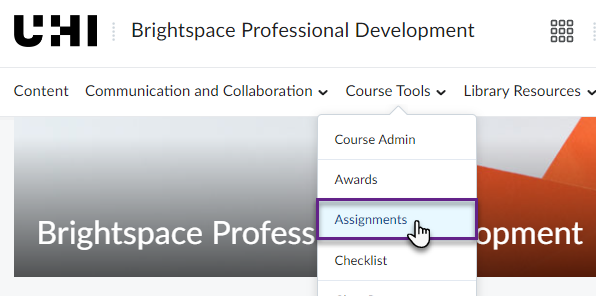
You are now on the Manage Groups page. You can now start setting up your first group/ set of groups. Because groups can be used for various purposes in Brightspace, you are asked to categorise the group/s you are about to set up.
Click on the blue ‘New Category’ button.

Give your category a name (1), provide a short description if you would like, and select the enrolment type (for more information about the different enrolment types, have a look at this Brightspace guidance on enrolment types).
Next, choose the number of groups you want (2).
For this example we have given the category the name ‘Group Assignment’, and will select ‘# of Groups – No Auto Enrolments’ which means that we will be able to determine how many groups we want in that category (in this example 2), and that students will not be auto enrolled, which means that we will be able to enrol them ourselves.
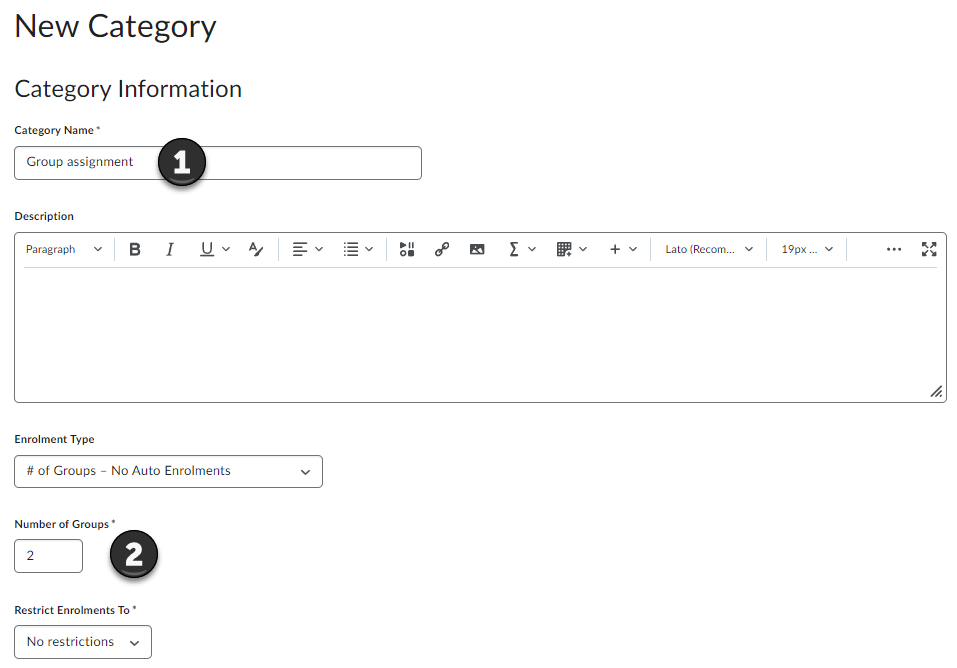
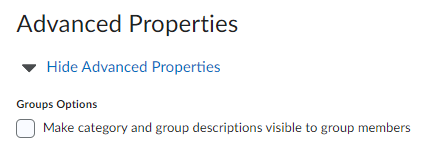
Under Advanced Properties, you have the option to make the category name and description visible to students.
This might be particularly useful if you choose any option involving self-enrolment by the students.
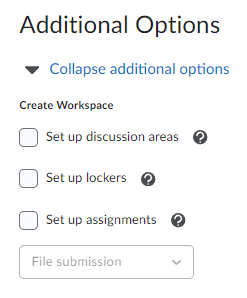
Next, you will be able to select some additional options.
You can, for example, choose to set up discussion areas for the different groups. Students would only have access to the discussion topic for their specific group and would only be able to interact with students from their group.
You can also set up lockers. Lockers are file sharing and exchange area for each of the different groups. Again, students will only have access to the locker areas for the group that they are enrolled on.
In addition, you can set up group-specific assignments, where students can submit a group assignment and be assessed as a group.
Once you are happy with your choices, click the blue Save button at the bottom of the screen.
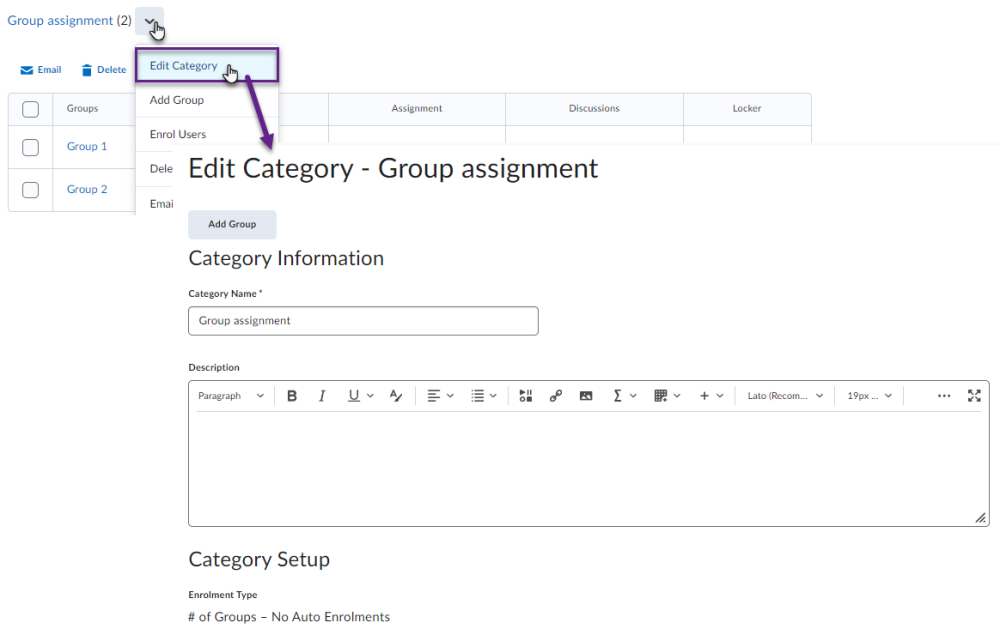
Having clicked on Save, you will now be taken back to the Groups homepage and will be able to see your newly created group category and the groups associated with this category.
In our example there are 2 groups associated with a category called Group assignment (picture opposite).

If you need to edit the group category, click on the drop-down menu next to the category name and select Edit Category.
This will activate a popup window where you can make edits to the category, i.e.,
- Add further groups
- Edit the group name
- Edit the description, or
- Add a discussion area, etc.
Note: You will, however, not be able to edit the enrolment type and any associated information anymore.
If you have selected the group type # of Groups – No Auto Enrolment, you will need to enrol students on the groups. To do so, go back to the overview page of your newly created group category and the associated groups (opposite). There, you will see how many members are enrolled in a group (Members), as well as information on Assignments, Discussions and group files (Locker) if you have enabled these features.

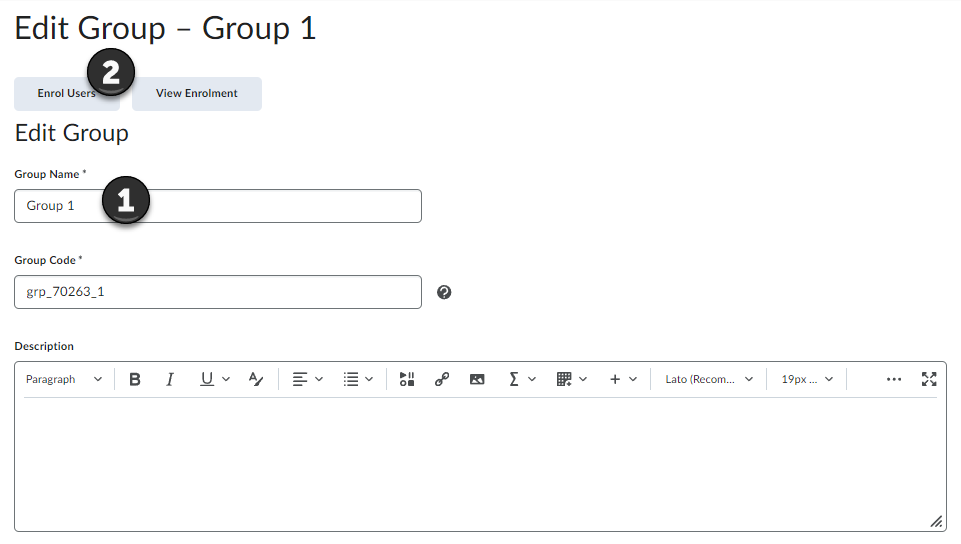
To enrol users (and rename groups), click on one of the group names, for instance Group 1.

Once you are in the group, you can rename the group in the text box underneath Group Name and add a group specific description (1).
To enrol users click on the Enrol Users button (2).
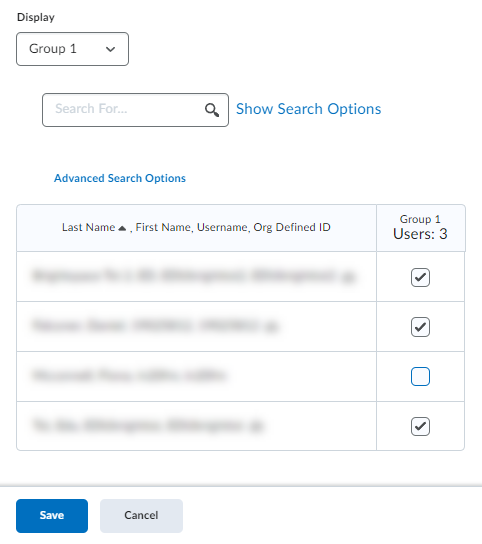
This will take you to the enrolment page, where you will see the classlist of your module/unit with all students enrolled in it. Check the box next to a student’s name to enrol this student on the group. When you are done, click on the blue ‘Save’ button.
Ours is only a test example, so there's only one student but in your case, all of those enrolled in your unit/module would be listed as possible enrollees.
Note: You can enrol students on multiple groups within one category if you would like to do so.
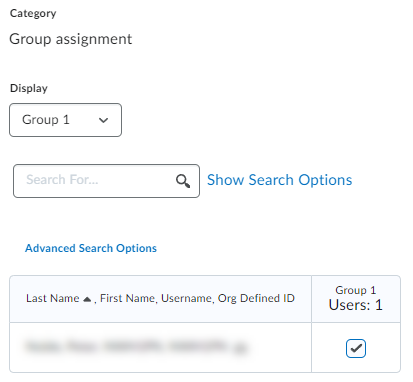
Once you have enrolled the student, you can verify the enrolment in the members column on the group category overview page (note Group 1 is now showing as having 1 member).

Group assignments
Once you have set up your group/s, you will be able to set up a group assignment. You can do so when you set up a group, but we would recommend that you set up the assignment via the Assignment tool in Brightspace.
When you set up assignments in the Groups tool, you will have reduced functionality in comparison to the Assignments tool, e.g. you not be able to set any restrictions or associate the assignment with Turnitin.
Official guidance

A couple of years ago, the Assignments interface went through a significant update. D2L have comprehensive, illustrated, guidance on the Assignments tool on their Community pages.
To see the information we'll cover below, you'll need to scroll down D2L's 'Create an assignemnt' page until you get to 'Customize Submission Type & Completion settings'.
To start setting up your assignment, navigate to the Course Tools drop-down menu in Brightspace. Select Assignments from this drop-down menu then follow the steps below (shown opposite).
Once you are in the assignment tool, click on the blue New Assignment button (shown opposite). This will open the Brightspace assignment set-up.

Once you are in the assignment set-up, set up your assignment as you wish ( D2L guidance).
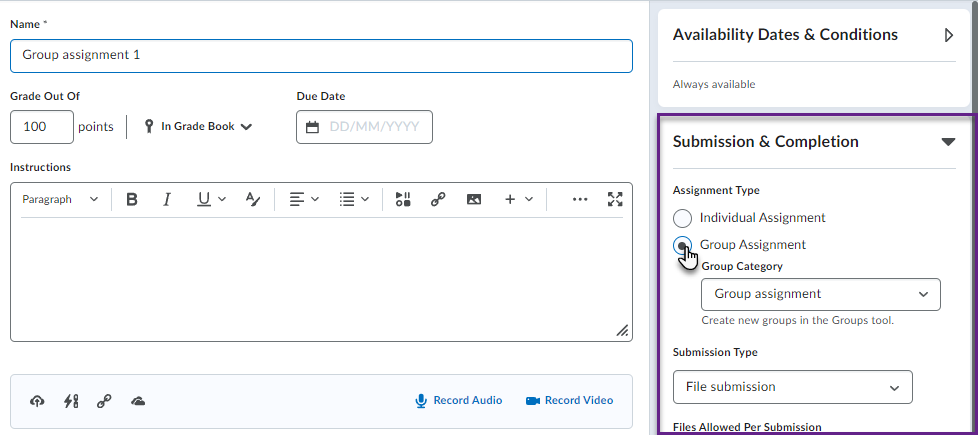
To make an assignment a group assignment, you will need to access the Assignment Type settings under Submission, Completion and Categorization on the right of the screen.
By default, all assignments are individual assignments. That means that each student submits their own assignment and gets their own mark/feedback.
To make an assignment a group assignment, select the checkbox next to Group Assignment (shown opposite). Next, select the group category you would like to associate with the assignment. This will automatically set this assignment up for all groups in this category. When you are done, click on the blue Save and Close button at the bottom of the screen.
Once students have submitted their assignments, you will be able to open and mark the assignments in Brightspace as usual.
To start, locate your group assignment in the list of assignments, and click on it to open it.

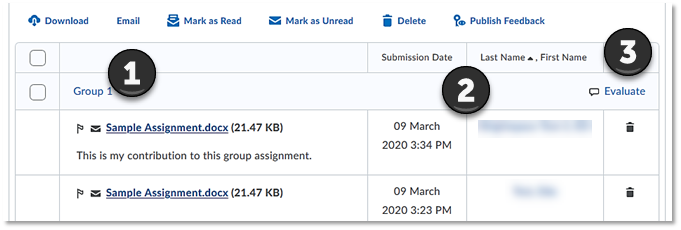
Once you are in the assignment folder, you will see that instead of by name as usual, submissions are organised by group (1).
Students’ submissions are nested under the group that they belong to. With each submission, you will see information on who made the submission and when (2).
To give a mark and feedback to the group, click on Evaluate (3).
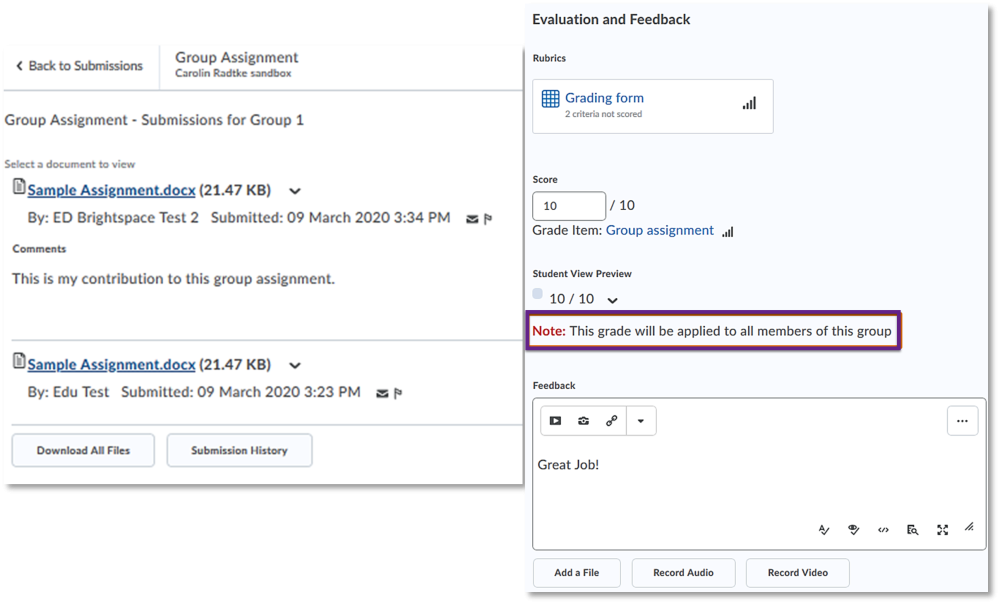
Once you are in the evaluation area for the group assignment, you will see a familiar interface. On the left-hand side you can open the group submissions to review and annotate them.
On the right-hand side you will see the evaluation pain, including feedback box, any attached rubric and score box.
Note that there is a warning reminding you that the grade you give this assignment will be applied to all members of the group.
When you are done evaluating the assignment, save your feedback as draft and continue evaluating the other groups’ submissions.

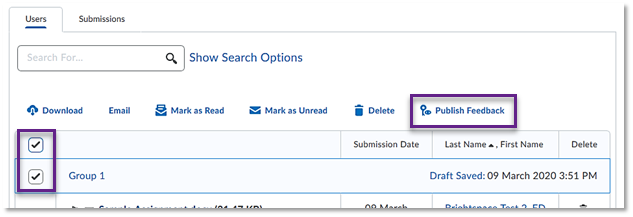
Once you are done evaluating all assignments, you can publish the feedback in bulk by selecting all assignments and then selecting Publish feedback.
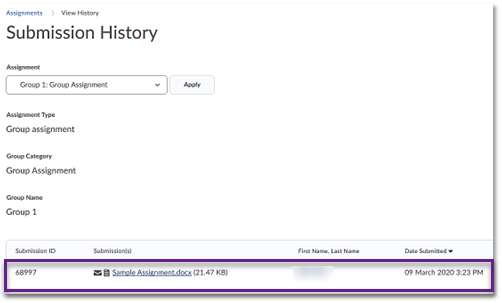
Students will submit their assignment just as they normally would. If they are the first person to submit the assignment, they will be able to see their own submission once they have made it. If they click on their submission, they will be taken into the submission history.

In this area, students will be able to review their own assignment, and can also see information about when the assignment was submitted.
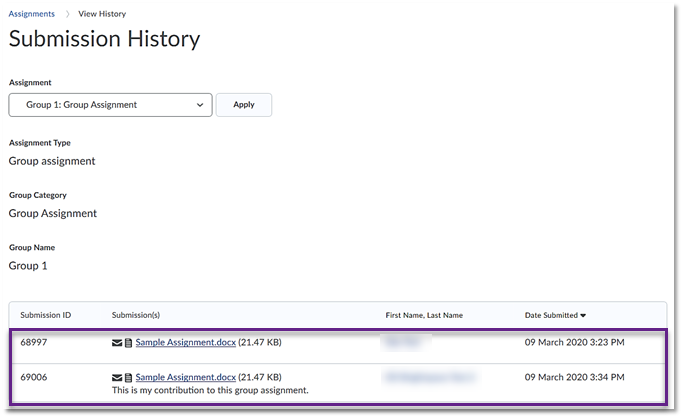
Once another student has contributed to the group assignment, the assignment folder will update to show that there are two submissions (shown opposite). If students now click on the submissions, they will be taken into the submission history again where they can review their own as well as any group members’ submissions.

Once students are in the Submission History area, they will now be able to see their own as well assignments submitted by other group members. They can review their group members' submissions by clicking on their submissions.
Once the groups’ marks and feedback have been published, they will be able to access them as usual. As mentioned before, all students will see the same marks and feedback.
Group discussions
When working in a group discussion, students will only be able to see the discussion forum for their particular group. They will also be able to interact with the members of their own group only. Use group discussion forums if you want to have students work in smaller groups for a project or to encourage more participation.
This part of the guide will explain:
- How to set up a group in Brightspace, create discussion areas, and enrol students
- What your discussion forum looks like in the Discussions tool
- What the student experience in a group discussion is like
When you are in your Brightspace module/unit area, select Groups from the drop-down menu Communication and Collaboration.
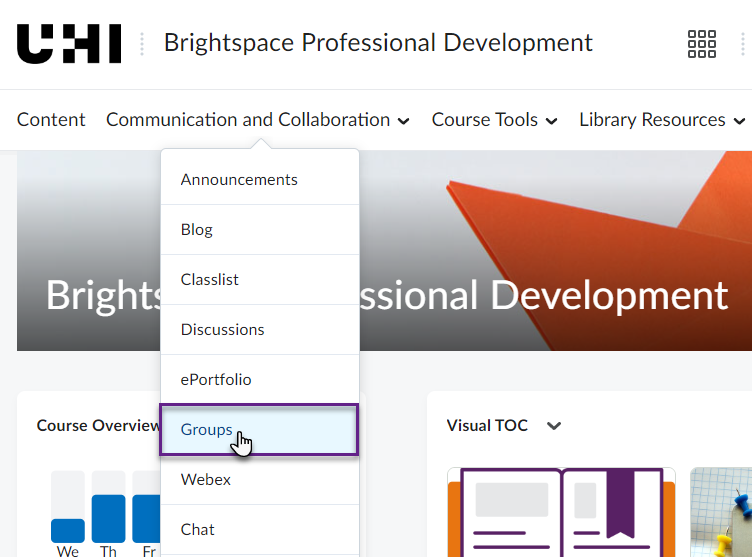
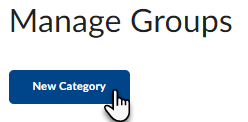
This will take you to the Groups tool in Brightspace. To start setting up a group, click on the blue ‘New Category’ button.
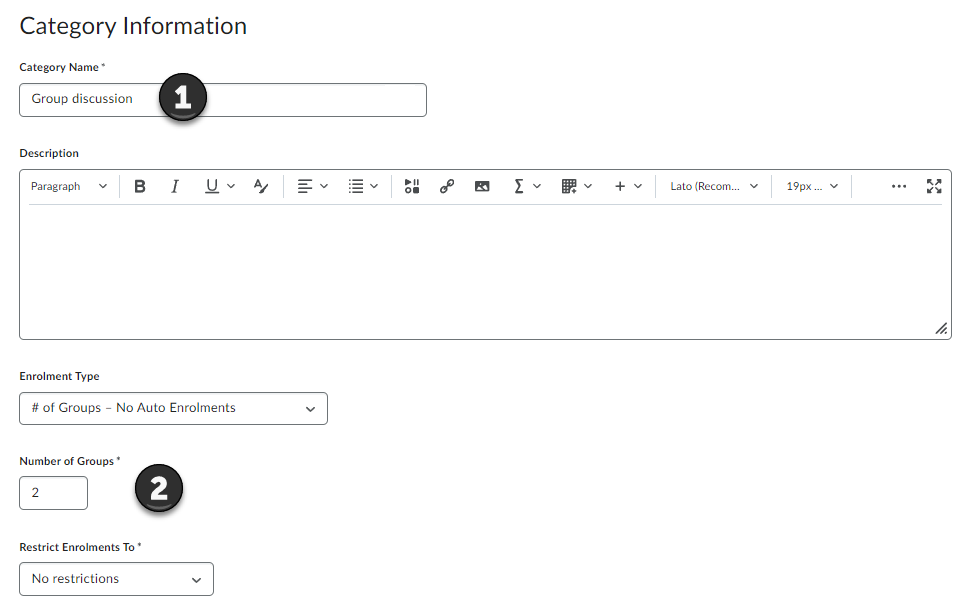
Give your category a name (1), provide a short description if you would like, and select the enrolment type (for more information about the different enrolment types, have a look at this Brightspace guidance on enrolment types) as well as the number of groups (2). For this example we will give the category the name ‘Group discussion’, and will select ‘# of Groups – No Auto Enrolments’ which means that we will be able to determine how many groups we want to sit in that category (in this example 2), and that students will not be auto enrolled, which means that we will have to enrol them ourselves.
Under Advanced Properties, you have the option to make the category name and description visible to students. This might be particularly useful when you choose any option involving self- enrolment by the students.
Next, you will be able to select Additional Options. You could choose to set up discussion areas for the different groups. Students would only have access to the discussion topic or thread for their specific group and would only be able to interact with students from their group. You can also set up lockers which is a file sharing and exchange area for each of the different groups. Again, students will only have access to the locker areas for the group that they are enrolled on. In addition, you could set up group-specific assignments, where students could submit a group assignment and be assessed as a group.
To select one or more, simply click in the ppropriate box.
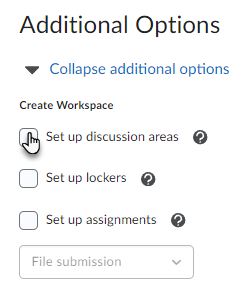
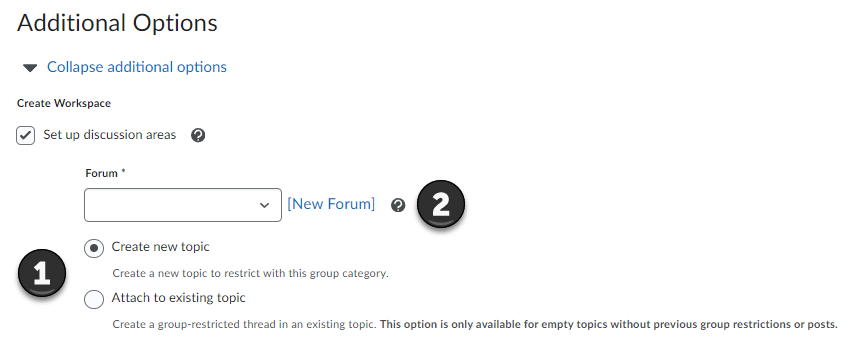
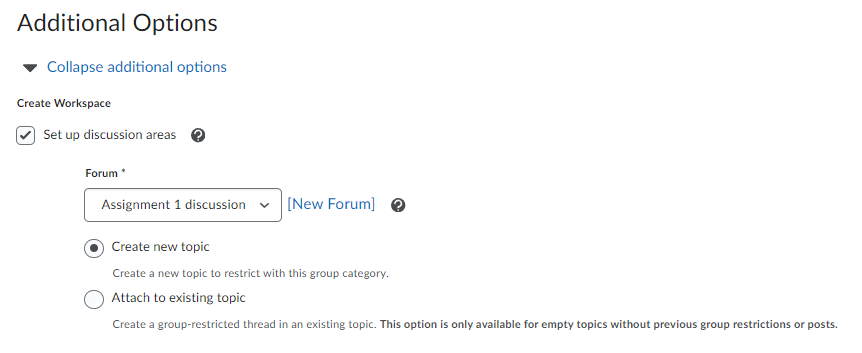
To create discussion areas for your group, check the box next to Set up discussion areas. This will open further options. You could now associate this group category and its groups with an existing discussion forum which you can select from the drop-down menu (1). If you go for this option, you could either create a new topic for this forum, or you could associate the group category and its groups with an existing topic in the forum. For more information on how to create and manage discussion boards in Brightspace, refer to our Brightspace Discussion tool guidance. For this example, we will select to create a Student view of their group thread within the group discussion with one topic for all students (2).
Once you have clicked on the New Forum link (Figure 6), a pop-up window will open. You can now give your new discussion forum a name and can provide a description. When you are done, click the blue Save button at the bottom of the pop-up window.
Note:
In this example, I will set up the discussion forum as a supplement for a group assignment students are doing. For more information on group assignments, refer to our Groups Assignments guidance. You can of course customise your discussion forum accordingly so it has a meaningful title and description.
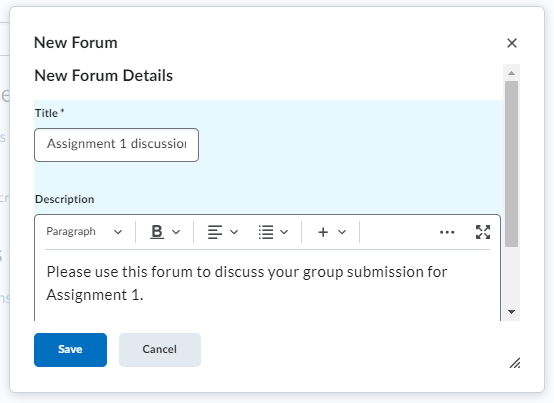
Once you have saved your new discussion forum, you will see that it will automatically appear in the drop-down menu under Forum.
As this is a new discussion forum, you will now need to create the topic(s) for this forum. Leave the box next to Create new topic checked and click on the blue Save button at the bottom of the page.
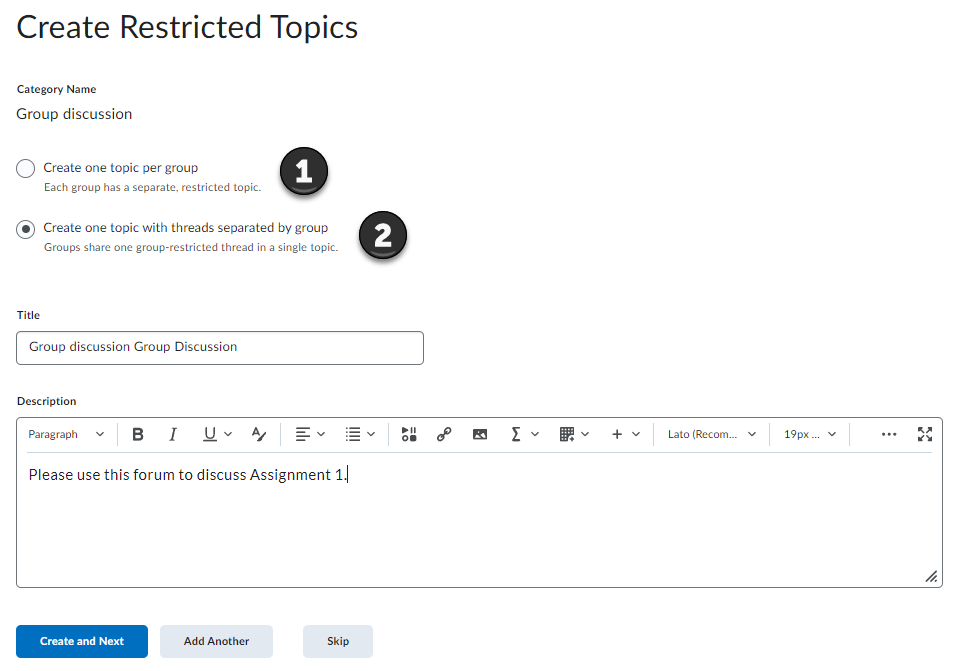
You will now be able to create your topic(s) for the discussion forum. You can either create one topic with threads separated by group (1), or a topic for each group (2). Once you have made your selection, click on the blue Create and Next button (Figure 9).
Note: If you have chose to Create one topic with threads separated by group, we would recommend that you create the initial thread students can post to. More information can be found in the section on What your discussion forum looks like in the Discussions tool below.
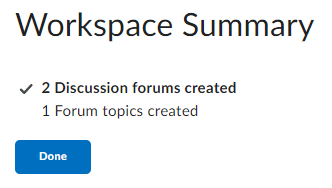
You will now see a confirmation that your forum and the topics have been created. Click on the blue Done button.
Note: You will see a slightly different summary when you go for the option of creating a topic for each group. For some reasons, it says that the topics were not created but that is not correct. You will find the topics when you look at the forum in the Discussions tool. More information can be found in the section on What your discussion forum looks like in the Discussions tool below.
You will now be taken back to the Category set-up page. Here, you can make further changes, if these might be needed, i.e. edit your description, or add a locker/group assignment folder. When you are happy with your group category, click on the blue Save button at the bottom of the page.
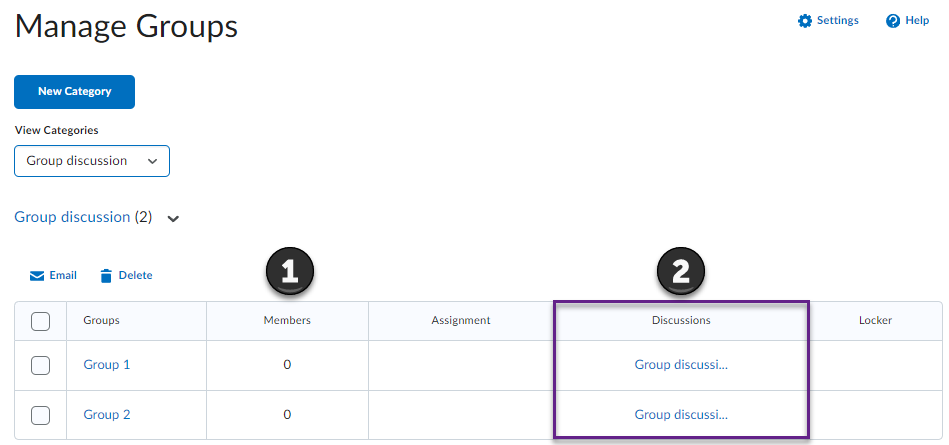
You will now see your newly created group category and its groups in the Manage Groups area. On this page, you will also see how many members are enrolled in a group (1), as well as information on assignments, discussions and group files in the locker area (2) if you have enabled these features
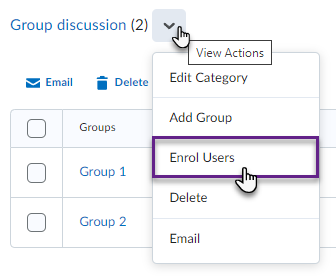
If you have selected the group type # of Groups – No Auto Enrolment, you will need to enrol students on the groups. To do so, select the drop-down menu next to the group name and click on Enrol Users.
You will now be able to see your classlist against the groups that you have created. Enrol users on the groups by checking the corresponding box next to their name.
When you are done enrolling student, click on the blue Save button at the bottom of the screen.

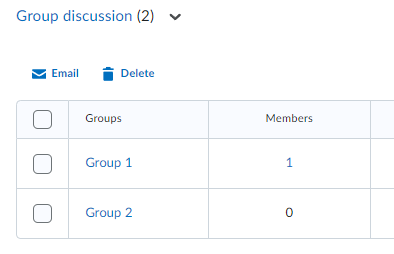
You will now see the enrolment reflected in the Members column on the Manage Groups page.
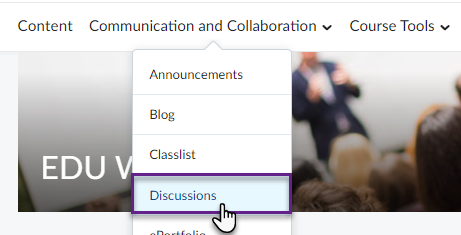
If you would like to see what your discussion forum and/or topic(s) look like in the Discussions tool, start by navigating to the Discussions tool. Locate the Navbar of your module/unit/course and select Discussions from the Communication and Collaboration drop-down menu.
Locate the discussion you created following the steps above.
If you chose to create a topic for each group, you will see that there are multiple topics with the same name, however students will only be able to see the topic for the group they are enrolled on.
If you chose to create one topic with a thread per group, you will see that there is only one topic within the discussion forum. All students will see the forum and the topic but they will only be able to see posts from members of the group they are enrolled on (pictured opposite).

If you would like to make the forum easier to manage for yourself, you can create a thread for each group and ask them to contribute to this thread only instead of creating a number of their own threads. To do so, click on the discussion topic link to enter the discussion board.
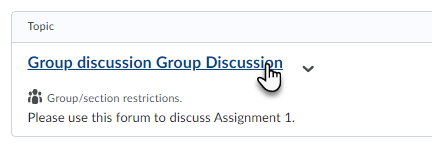
Click on the blue Start a New Thread button.

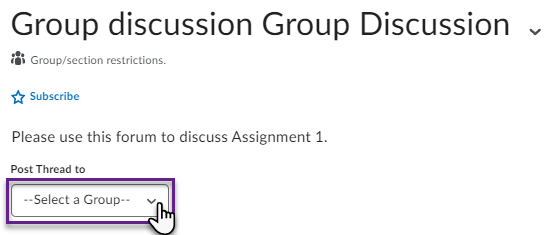
You will now be able to create a thread. If you want all students to start out with an identical thread, select All Groups from the drop-down menu under Post Thread to. If you would like to give groups different tasks, you could also post separate threads for any of your groups, though.
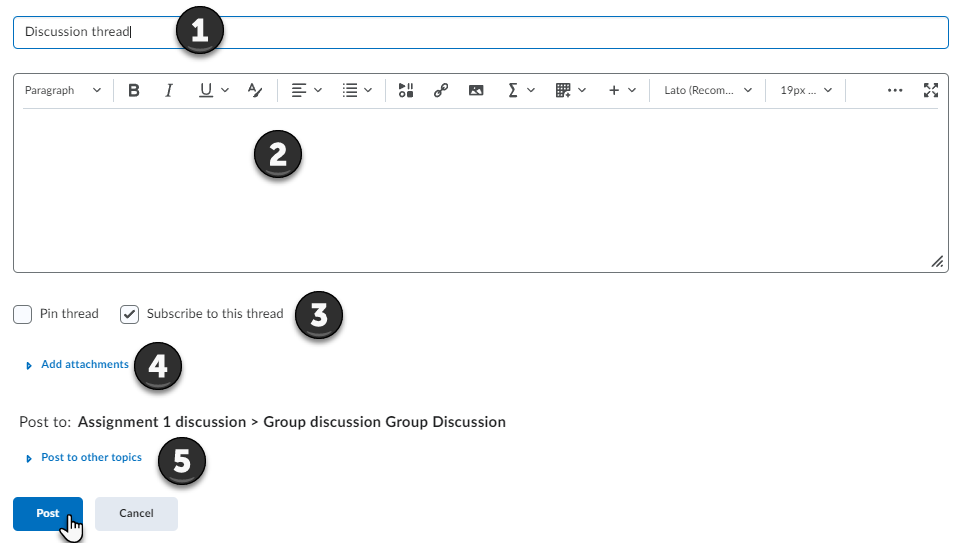
Next, customise your thread further with a heading (1) and message (2). You can also opt to pin the thread or subscribe to it so you get updates on when students post (3). Below, you can also add attachments if needed (4) and you could opt to post this thread to other discussion topics as well (5).
When you are done customising your thread, click on the blue Post button at the bottom of the page.
A thread has now been added to the topic for each group. For more information about the Discussions tool, refer to our Discussion tool guidance.
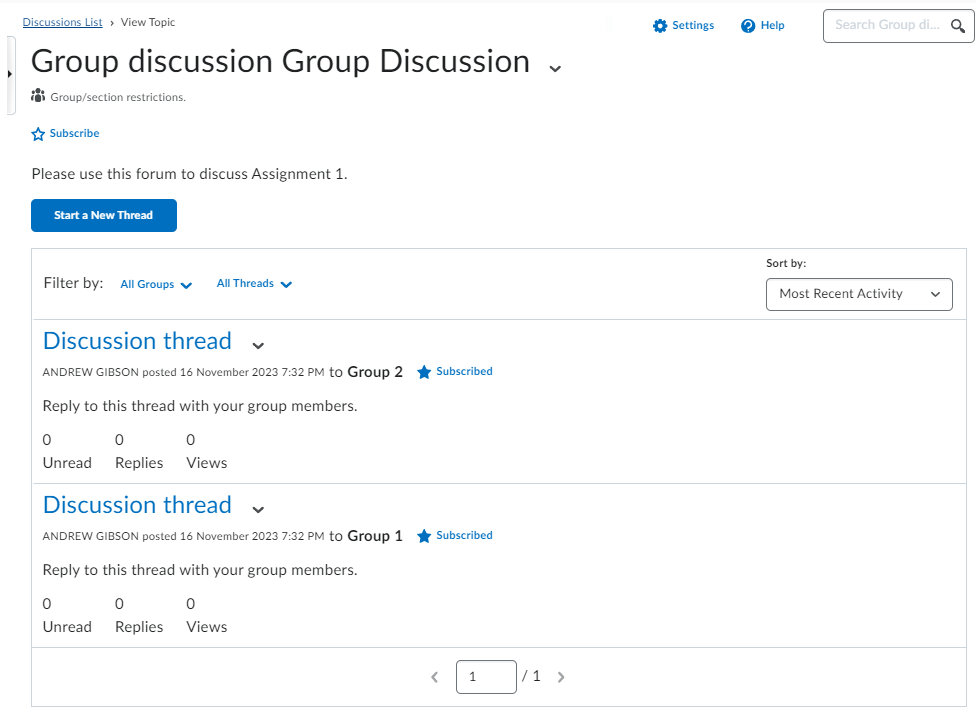
As mentioned before, students will only be able to see the topic or thread for the group they are enrolled on and will also only be able to interact with students from the group they are enrolled on.
If you have created a group discussion with one separate topic for each group, a student enrolled on Group 1 will also only see the discussion topics for this group. If you have created a group discussion with one topic for all groups, all students will see the topic (shown opposite).

If you have also created a thread for each group, however, students will only see the thread for their group once they enter the discussion topic (in the example shown in the picture opposite particilar students will only see the thread for Group 1 or Group 2).
For more general information about the student experience in the Brightspace Discussions tool, refer to our Discussion tool guidance for students.
Group file exchange
As part of your unit/module in Brightspace, you might want to have students share documents with each other, in specific groups. This guide will walk you through the steps necessary for creating groups with file exchange functionality using the Groups tool in Brightspace.
This part of the guide will explain:
- How to set up a group in Brightspace, create group lockers, and enrol students
- What students see
When you are in your Brightspace module/unit area, select Groups from the drop-down menu Communication and Collaboration.

This will take you to the Groups tool in Brightspace. To start setting up a group, click on the blue ‘New Category’ button.

Give your category a name (1), provide a short description if you would like, and select the enrolment type (for more information about the different enrolment types, have a look at this Brightspace guidance on enrolment types) as well as the number of groups (2).
For this example we will give the category the name ‘Test File Exchange’, and will select ‘# of Groups – No Auto Enrolments’ which means that we will be able to determine how many groups we want to sit in that category (in this example 2), and that students will not be auto enrolled, which means that we will have to enrol them ourselves. There are a number of other options, e.g. determining the number of students enrolled on groups, or auto enrolment, but for this example, we will go with 2 groups and instructor enrollment.
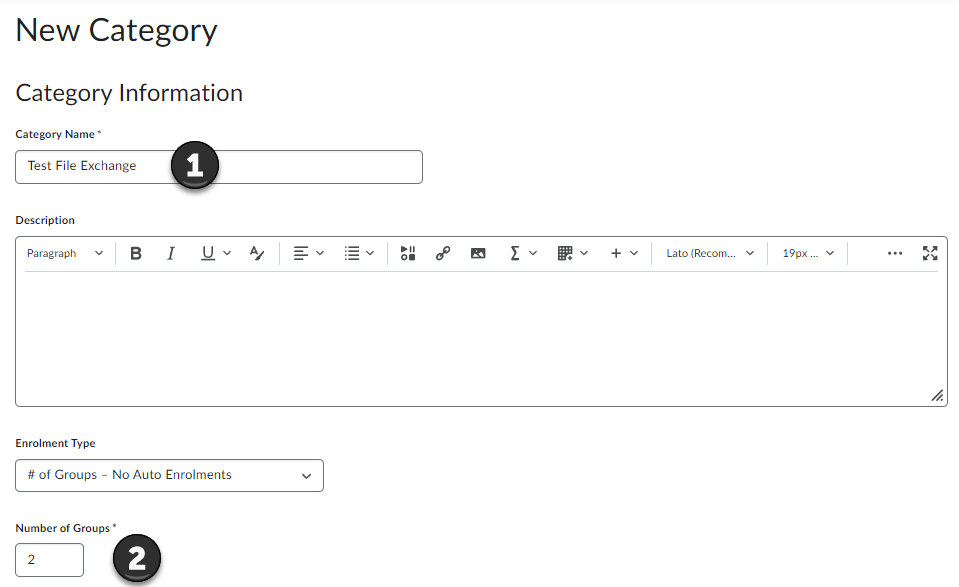
Under Advanced Properties, you have the option to make the category name and description visible to students. This might be particularly useful when you choose any option involving self-enrolment by the students.

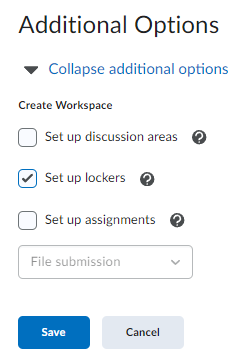
Next, you will be able to select additional options.
You could choose to set up discussion areas for the different groups, allowing for group-specific discussion areas. Students would only have access to the discussion topics for their specific group.
This is where we set up file sharing for groups - known as lockers in Brightspace. Like discussion areas, students will only have access to the locker areas for the group that they are enrolled on.
Finally, you could also set up group-specific assignments (note: we suggest using the Assignments tool for this).
For this example, we will only select to create lockers for our groups.
Once you are happy, click Save. When you do this you will be shown a 'Workspace Summary' informing you that you have created 2 groups and 2 lockers.
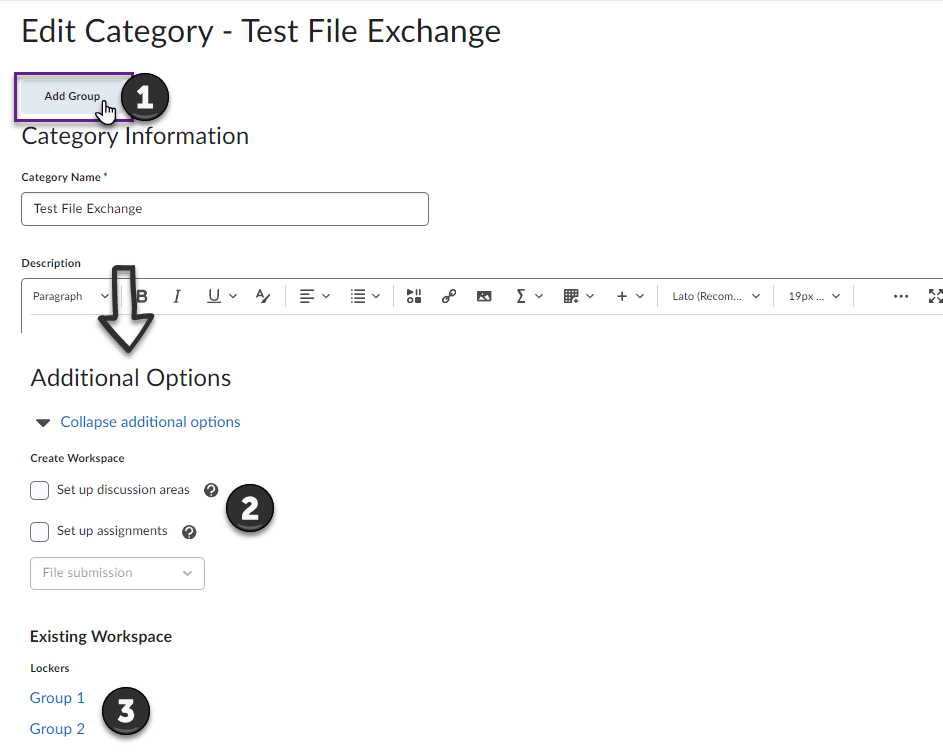
Next, you will be taken back to an area where you could further edit the category, i.e., by adding further groups (1).
Also - after you scroll down to the bottom of the screen - you can use this screen to create assignments and/or discussion area/s for each group (2).
Under the heading Existing Workspace, you will also be able to see the lockers for your two existing groups (3). If you click on one of the group names shown there you will be taken to the locker area of that group (shown in the next image 'Locker area homepage').
Clicking on a group number (3 above) you are taken to the Group Lockers tab where you can upload files, create new files using the HTML editor, add new folders or email group members.

Before you email group members, though, you will first need to enrol students on the groups. To do so, go back to the Groups tool, where you will now see your group category (1) as well as both groups you created (2). In the overview, you will see how many and which members are enrolled in a group (3), as well as, information on assignments, discussions and group files in the locker (4) area if you have enabled these features. Since we have only enabled the locker for these groups, we will not see any information under assignments and discussions, but can enter the locker area by clicking on ‘Group Files’ (5).

You will now be able to create your topic(s) for the discussion forum. You can either create one topic with threads separated by group (1), or a topic for each group (2). Once you have made your selection, click on the blue Create and Next button (Figure 9).
Note: If you have chose to Create one topic with threads separated by group, we would recommend that you create the initial thread students can post to. More information can be found in the section on What your discussion forum looks like in the Discussions tool below.

You will now see a confirmation that your forum and the topics have been created. Click on the blue Done button.
Note: You will see a slightly different summary when you go for the option of creating a topic for each group. For some reasons, it says that the topics were not created but that is not correct. You will find the topics when you look at the forum in the Discussions tool. More information can be found in the section on What your discussion forum looks like in the Discussions tool below.
You will now be taken back to the Category set-up page. Here, you can make further changes, if these might be needed, i.e. edit your description, or add a locker/group assignment folder. When you are happy with your group category, click on the blue Save button at the bottom of the page.

You will now see your newly created group category and its groups in the Manage Groups area. On this page, you will also see how many members are enrolled in a group (1), as well as information on assignments, discussions and group files in the locker area (2) if you have enabled these features

To enrol users, click on the group name (shown opposite).

Once you are in the group, click on enrol users to add users to the group.
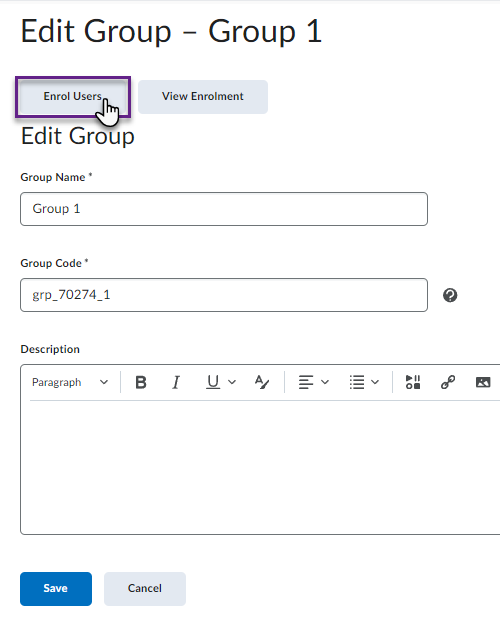
This will take you to the enrolment page, where you will see the classlist of your module/unit with all students enrolled in it (1). Enrol the particular students you want to be in the particular group (Group 1 in this case) by checking the box next to its name (2).
When you are done, click on the blue ‘Save’ button.
Note: You can enrol students on multiple groups within one category if you would like to do so.
When students enter the Groups tool through the ‘Communication and Collaboration’ drop-down menu, they will see the categories and groups they are enrolled on. Similar to instructors, they will be able to see who else is enrolled on their specific group, could email the other members and can access the group locker area via ‘Group Files’.

Once they enter the group files area, they will see the same as the instructors. They will be able to upload files, create a new file, create a new folder or email the group members.

.jpg?1700081687681)


